WordPress uses forms to help people log in, leave a comment, register with the site and much more. Unfortunately, forms can be targeted by spammers and malicious users. They can use automated software to leave spam comments, insert malicious code or gain unauthorised access to your administration section.
It is important to use security tools that prevent these automated tools from using your forms. One of the best tools for doing so is a CAPTCHA field. A CAPTCHA is a type of test that prevents automated software programs from successfully submitting a form while allowing humans to use the form normally. It achieves this task by asking a question that automated software applications would struggle to answer.
One of the best CAPTCHA tools available is Google’s reCAPTCHA. It incorporates a traditional CAPTCHA with a powerful risk analysis engine. reCAPTCHA can easily be integrated into WordPress thanks to the Google Captcha plugin.
This guide will explain why malicious form submissions must be stopped and how reCAPTCHA works. We’ll also show you how to install and configure the Google Captcha plugin!
Table of Contents
- Why you must stop malicious form submissions
- How the Google Captcha plugin stops malicious form submissions
- Installing Google Captcha
- Configuring Google Captcha
Why you must stop malicious form submissions
Most people are familiar with email spam. Spammers obtain your email address and begin to send you unsolicited emails selling products and services. The emails usually contain scams and can sometimes even include malicious software.
Web form spam is a little different. Spammers and malicious users use the forms on your websites with different objectives in mind. Typically, they will have one of the following three goals:
1. They are trying to get links published on your website
Spammers often try to insert links to their own website into other websites. They do so by posting comments, participating in discussion forums or leaving messages in a guestbook. Their objective is to increase their website traffic and improve their website’s search engine rankings – which doesn’t help anyway :).
2. They are looking for vulnerability in your website
Some malicious users may be interested in finding vulnerabilities in the code of your website. They may attempt to insert malicious code that redirects users to their website, gather sensitive data from your website or makes changes to the content of your pages. They may also be attempting to insert data into your database. However, they will use automated bots to test the security of your forms.
3. They may be performing a brute force attack
Malicious users may also be trying to gain access to the administration section of your WordPress site. They may attempt to log into your admin panel hundreds or even thousands of times per hour.
How the Google Captcha plugin stops malicious form submissions
CAPTCHA stands for “Completely Automated Public Turing test to tell Computers and Humans Apart” — quite a mouthful! If you are a regular web user, you have probably encountered hundreds of CAPTCHAs already. The most common CAPTCHA uses an image with some letters and numbers in it. The user is asked to look at the image and type the characters in another form field. Automated bots struggle to understand the contents of the image, preventing them from submitting the form.
Google’s version of CAPTCHA is called reCAPTCHA. It is a powerful anti-spam security tool that uses a risk analysis engine and adaptive CAPTCHA field to stop automated spambots in their tracks. It develops a risk profile of each user to determine if a CAPTCHA is required or not.
The images used by reCAPTCHA come from books and maps that Google is attempting to digitise. Every time a user successfully completes a reCAPTCHA field, Google uses the solution in their digitised version of the book or map.
The Google Captcha plugin makes adding reCAPTCHA to the forms on your WordPress installation simple. There are two versions available, the free version and a pro version with additional features. The features included in the free version are:
- Add Google Captcha (reCAPTCHA) to every form used by WordPress including the registration, login, reset password, comments, and contact forms.
- The ability to hide reCAPTCHA for certain IP addresses
- A variety of themes
- The ability to hide reCAPTCHA for logged in users with certain roles
- Support for Version 1, Version 2 and Google Captcha plugin
- The ability to add custom code
- Multilingual and RTL ready
The Pro version of the Google Captcha plugin adds the following features:
- Compatibility with Contact Form 7 and Subscriber plugins
- Compatibility with WooCommerce forms
- Compatibility with BuddyPress
- The ability to change the reCAPTCHA language automatically
- Additional support from the plugin developers
Installing Google Captcha
Installing the Google Captcha plugin is a straightforward process.
1. Log into the WordPress administration section
2. Use the left-hand navigation to select Plugins > Add New.
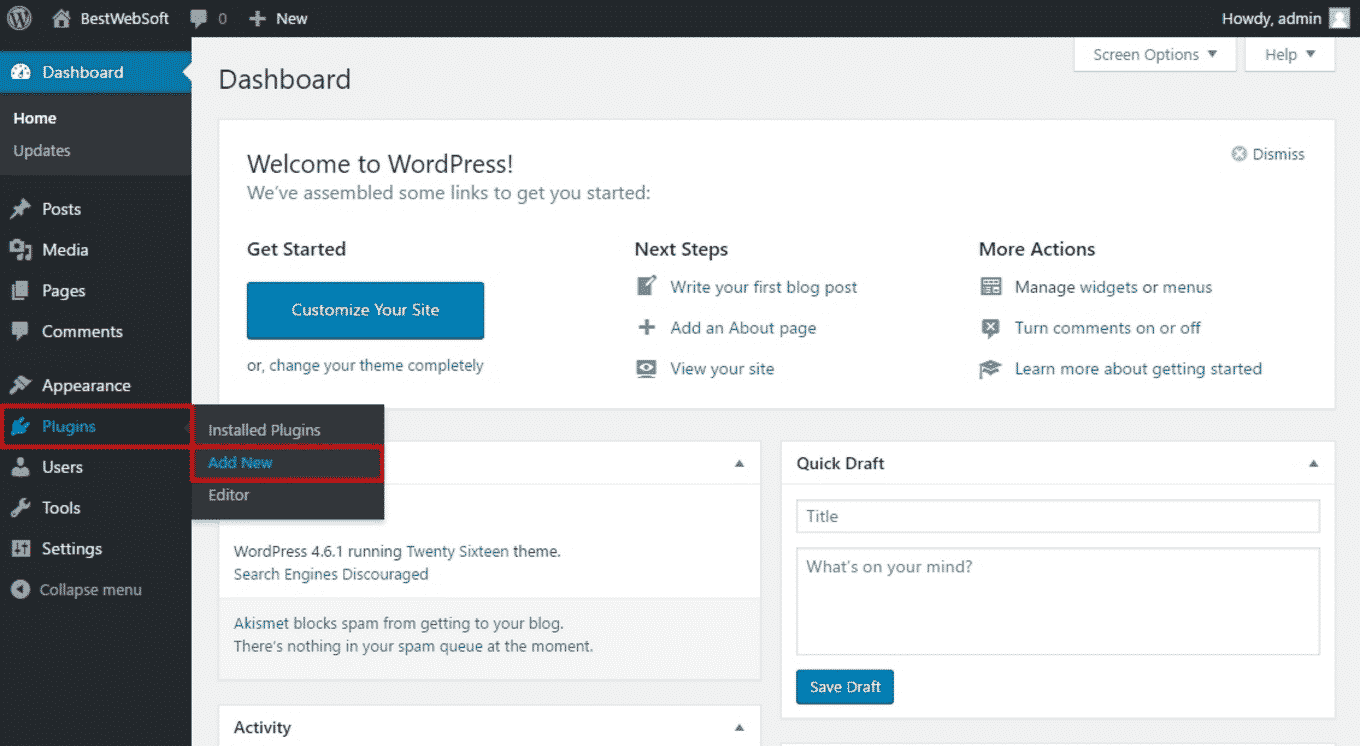
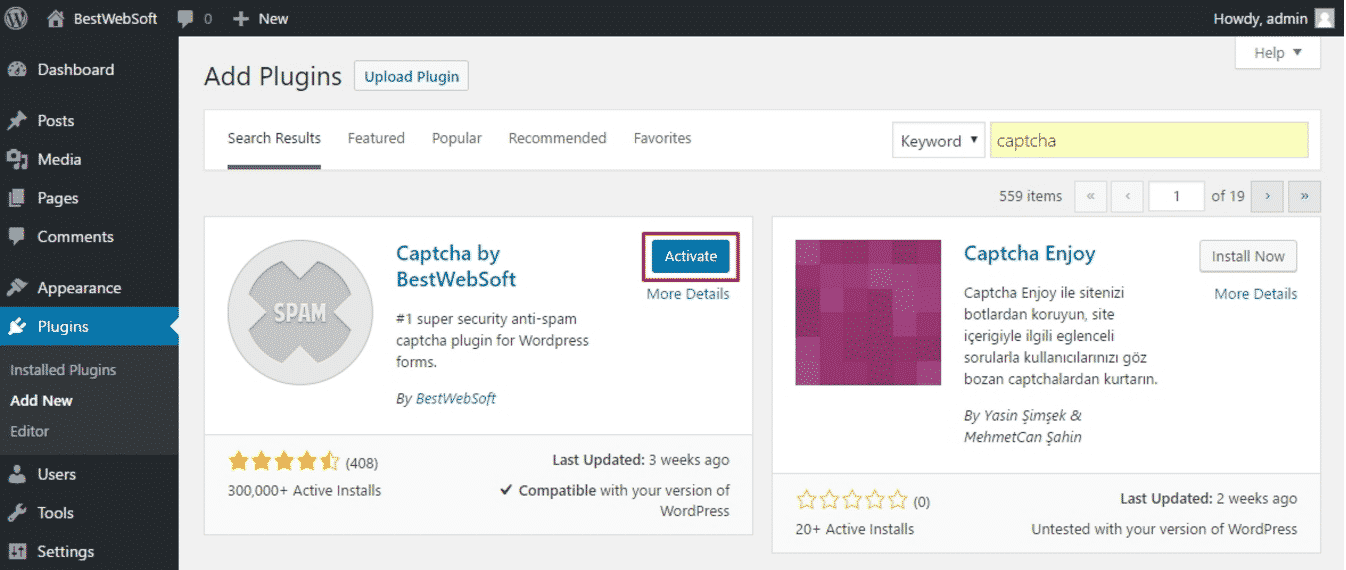
3. In the Search field on the upper right corner, type “captcha”
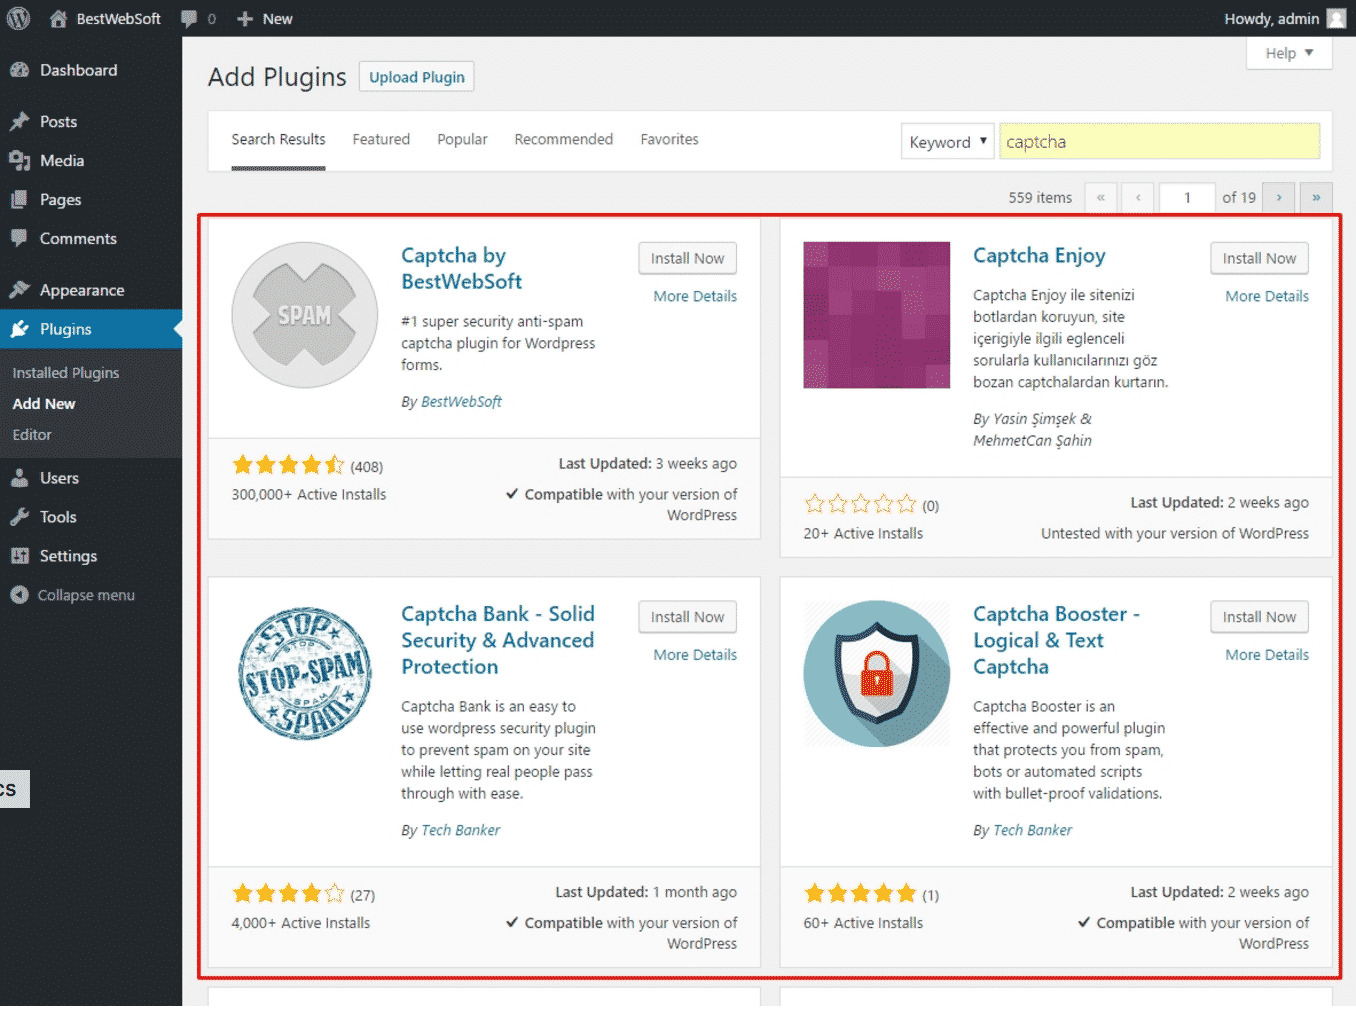
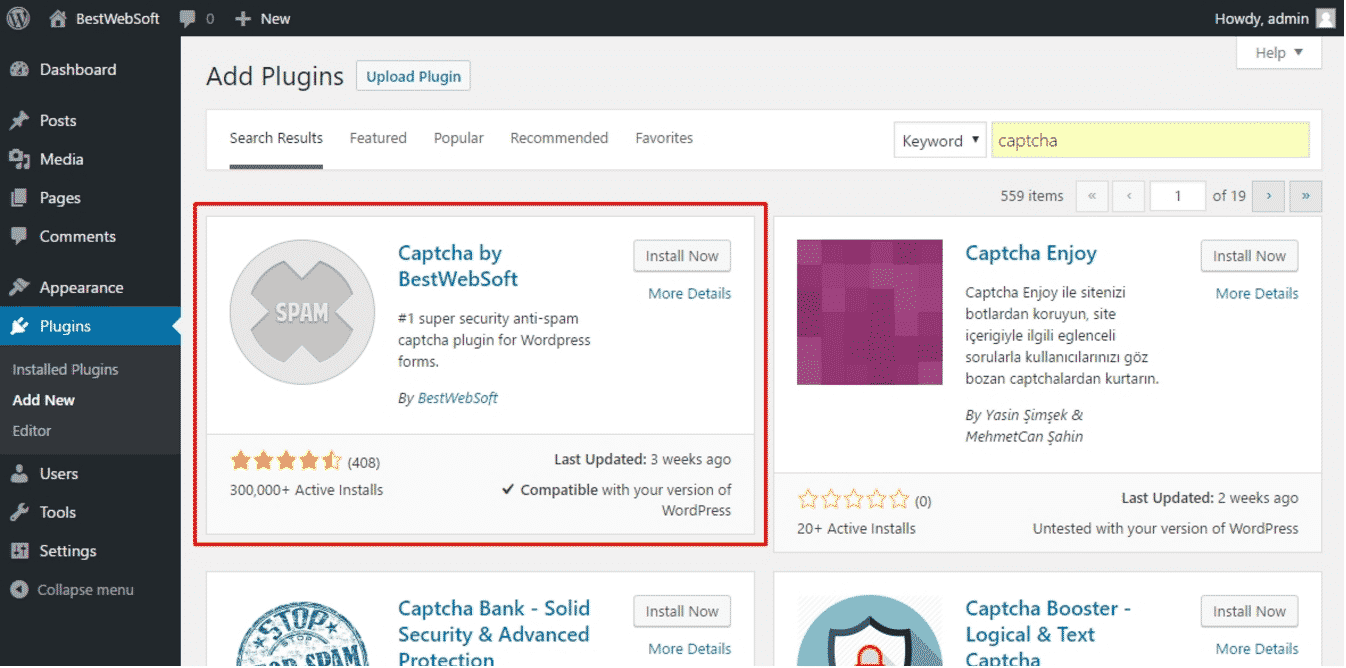
4. You will see a list of results for your search. The Captcha plugin we are looking for is made by BestWebSoft. It is the most popular WordPress Captcha plugin available, so it will be the first result you see. Click “Install Now”.
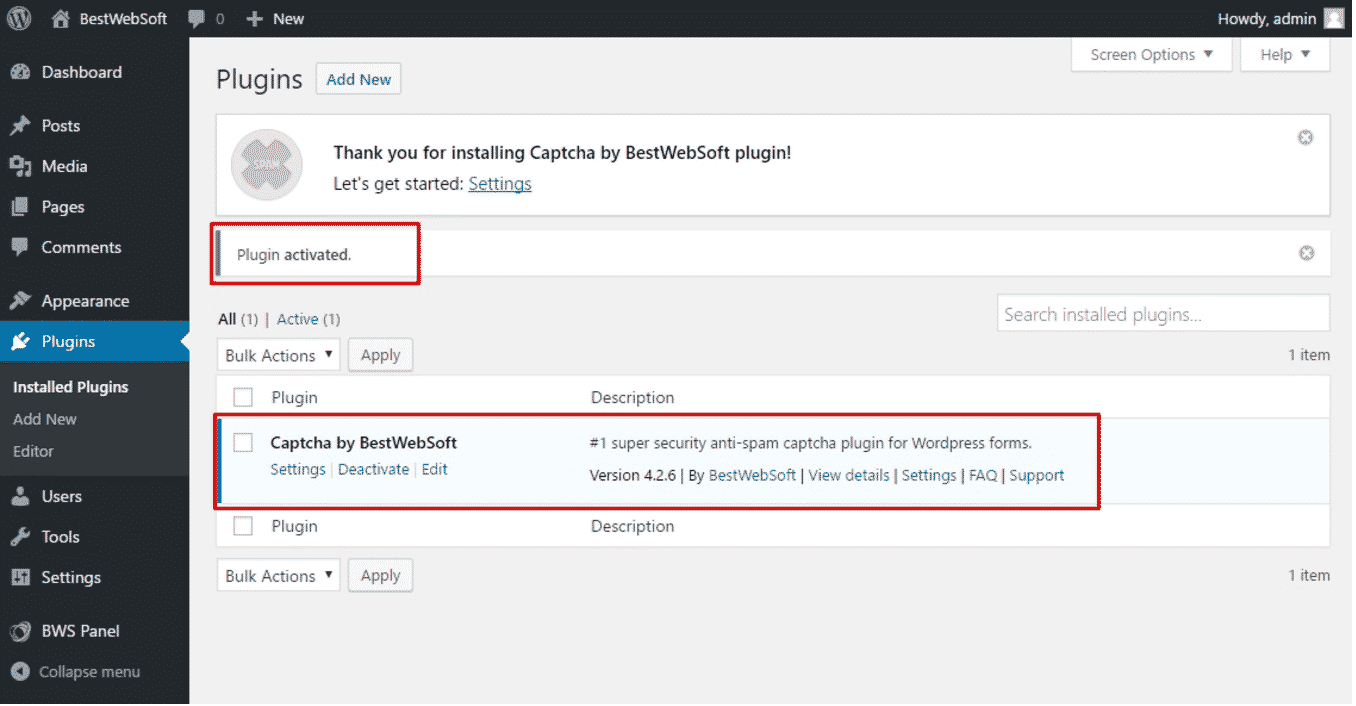
5. Once the plugin has finished installing, click the Activate button.
6. You will now be redirected to the Installed Plugins page. From here you can click on Settings link to begin configuring the plugin for your site.
Configuring Google Captcha
Although the Google Captcha plugin is packed with features, it is fairly simple to configure. You will notice a new menu has been added to the left-hand side of the screen, under the heading BWS Panel.
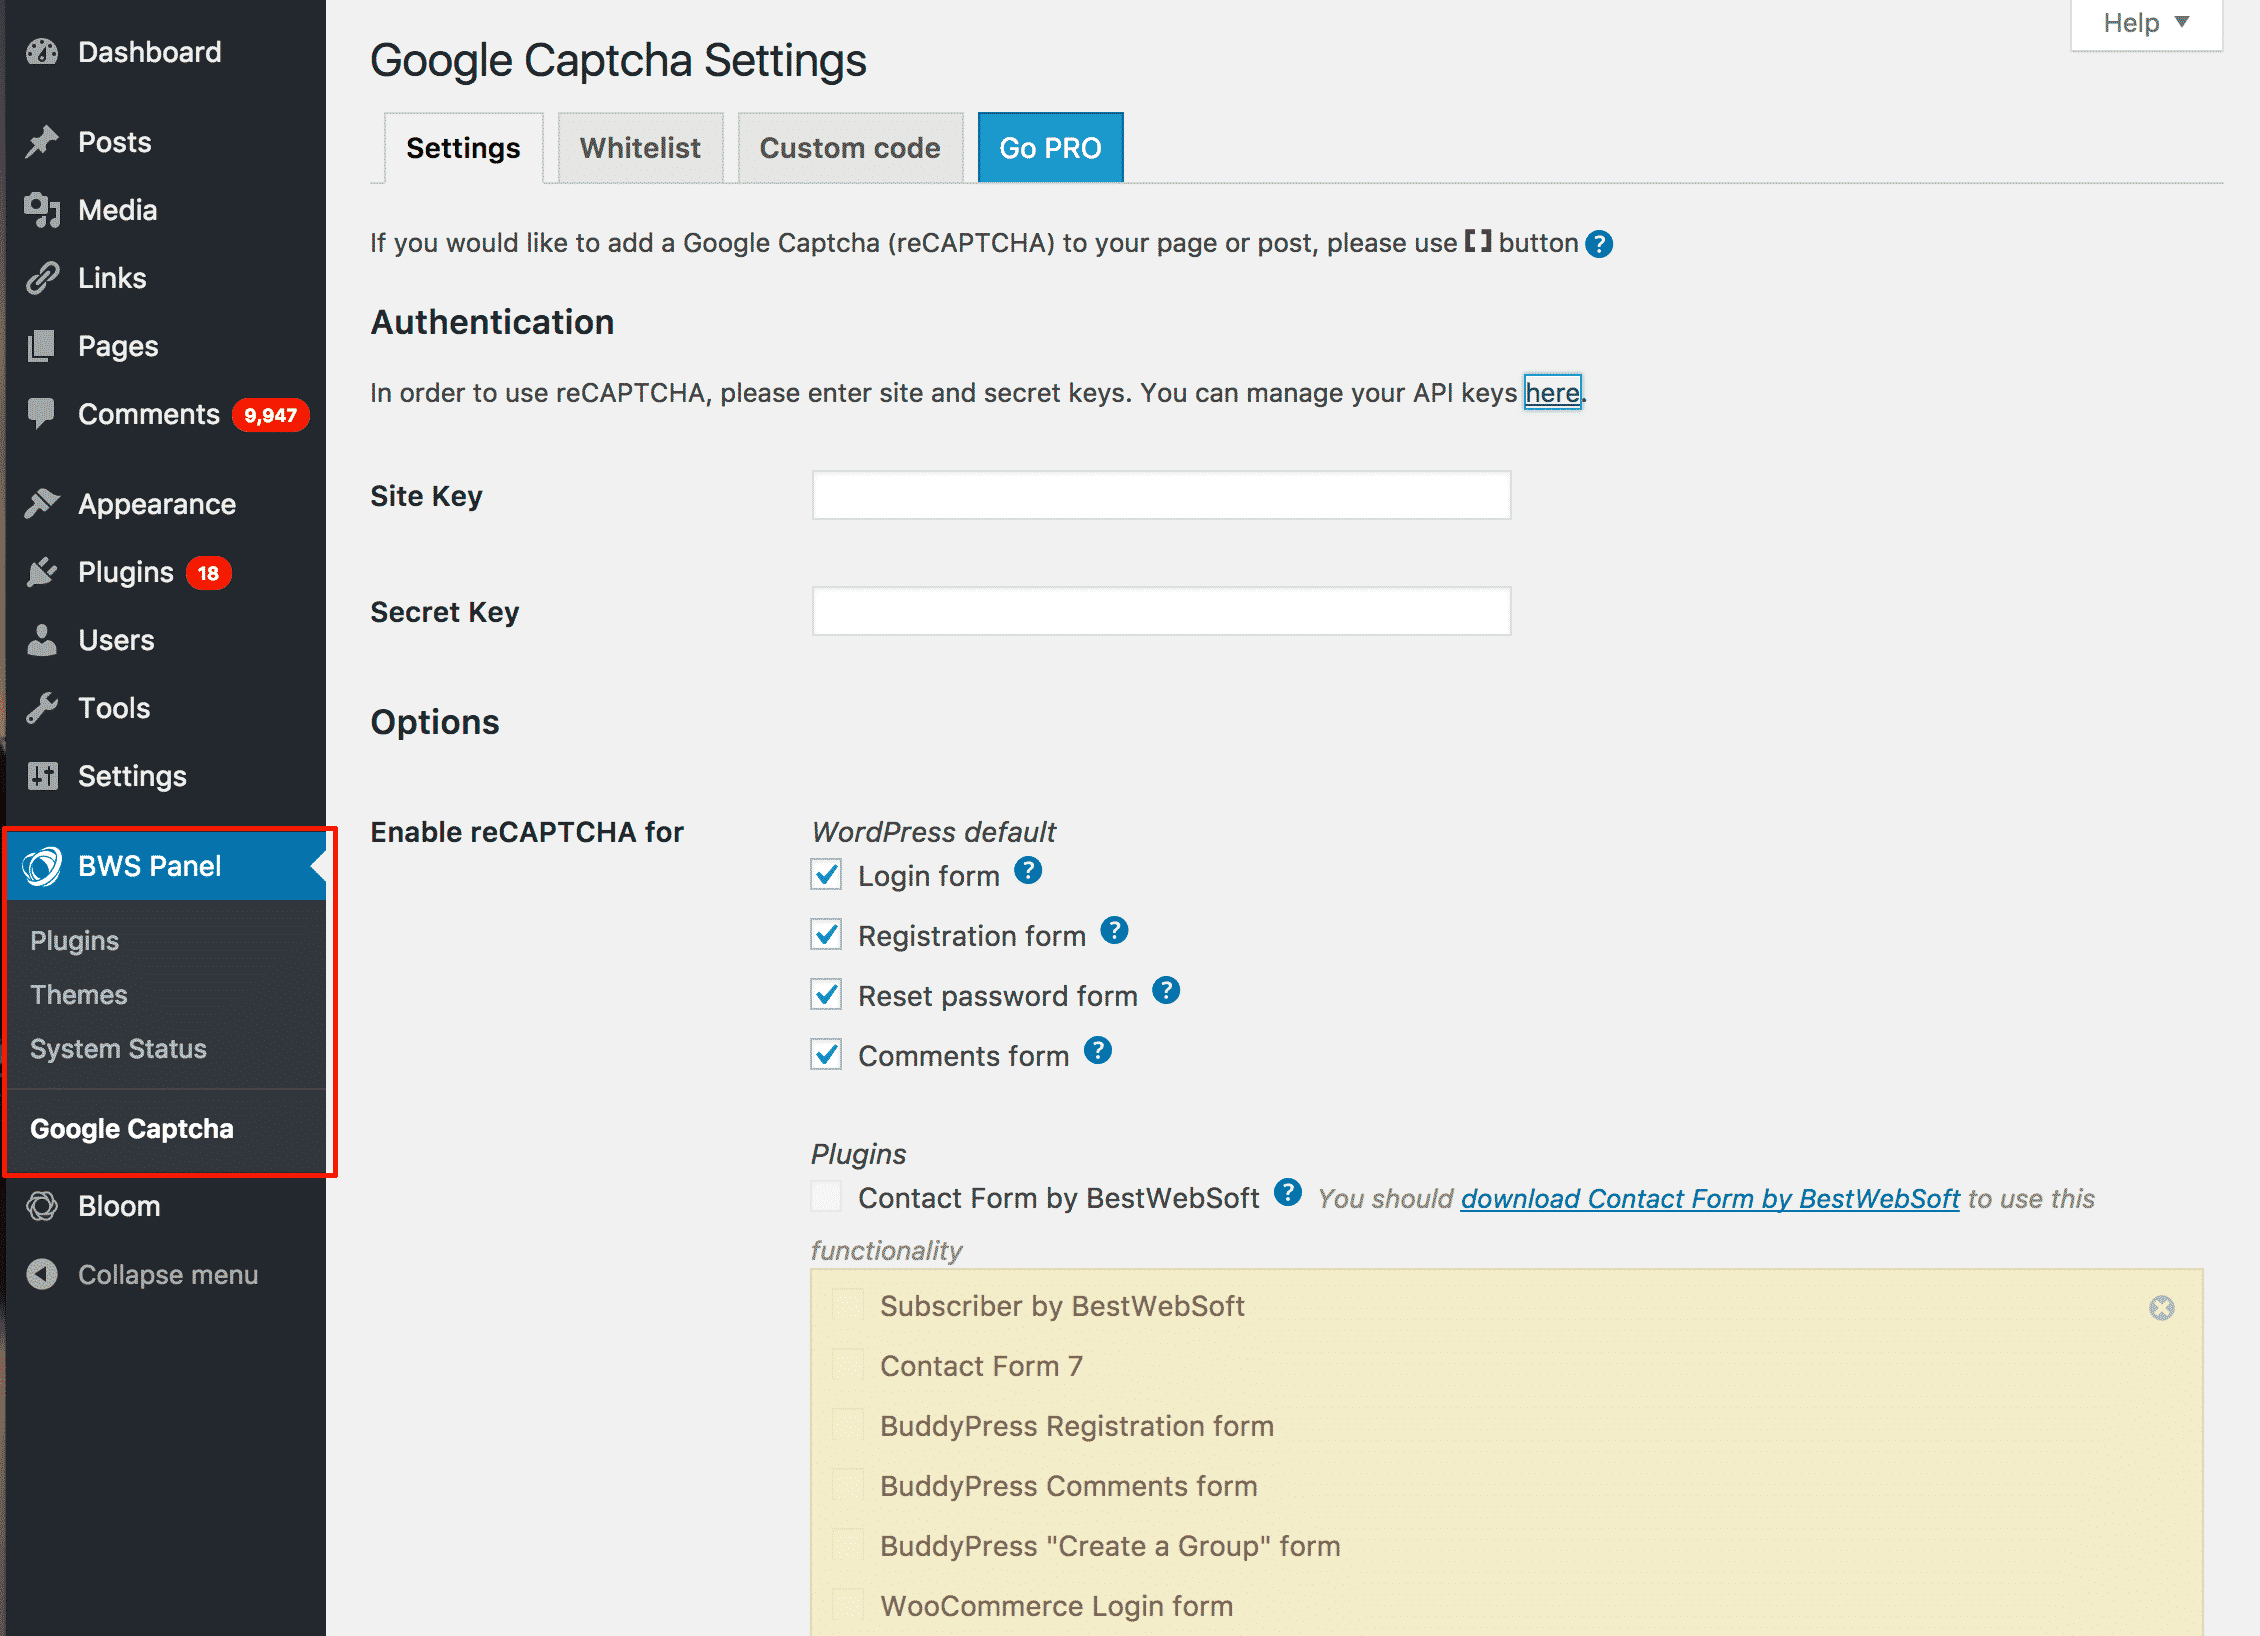
The menu items are as follows:
- Plugins: This section lists all of the WordPress plugins made by BestWebSoft. You can view the plugins you have installed and access their settings from here also.
- Themes: This is a list of the WordPress themes that BestWebSoft have to offer.
- System Status: This page displays the details of your server, database, WordPress installation, and WordPress plugins. It can often useful if you are trying to debug a problem with a plugin and require help from BestWebSoft.
- Google Captcha: This is where we will go to configure the Google Captcha plugin. If you have not done so already, click on BWS Panel > Google Captcha.
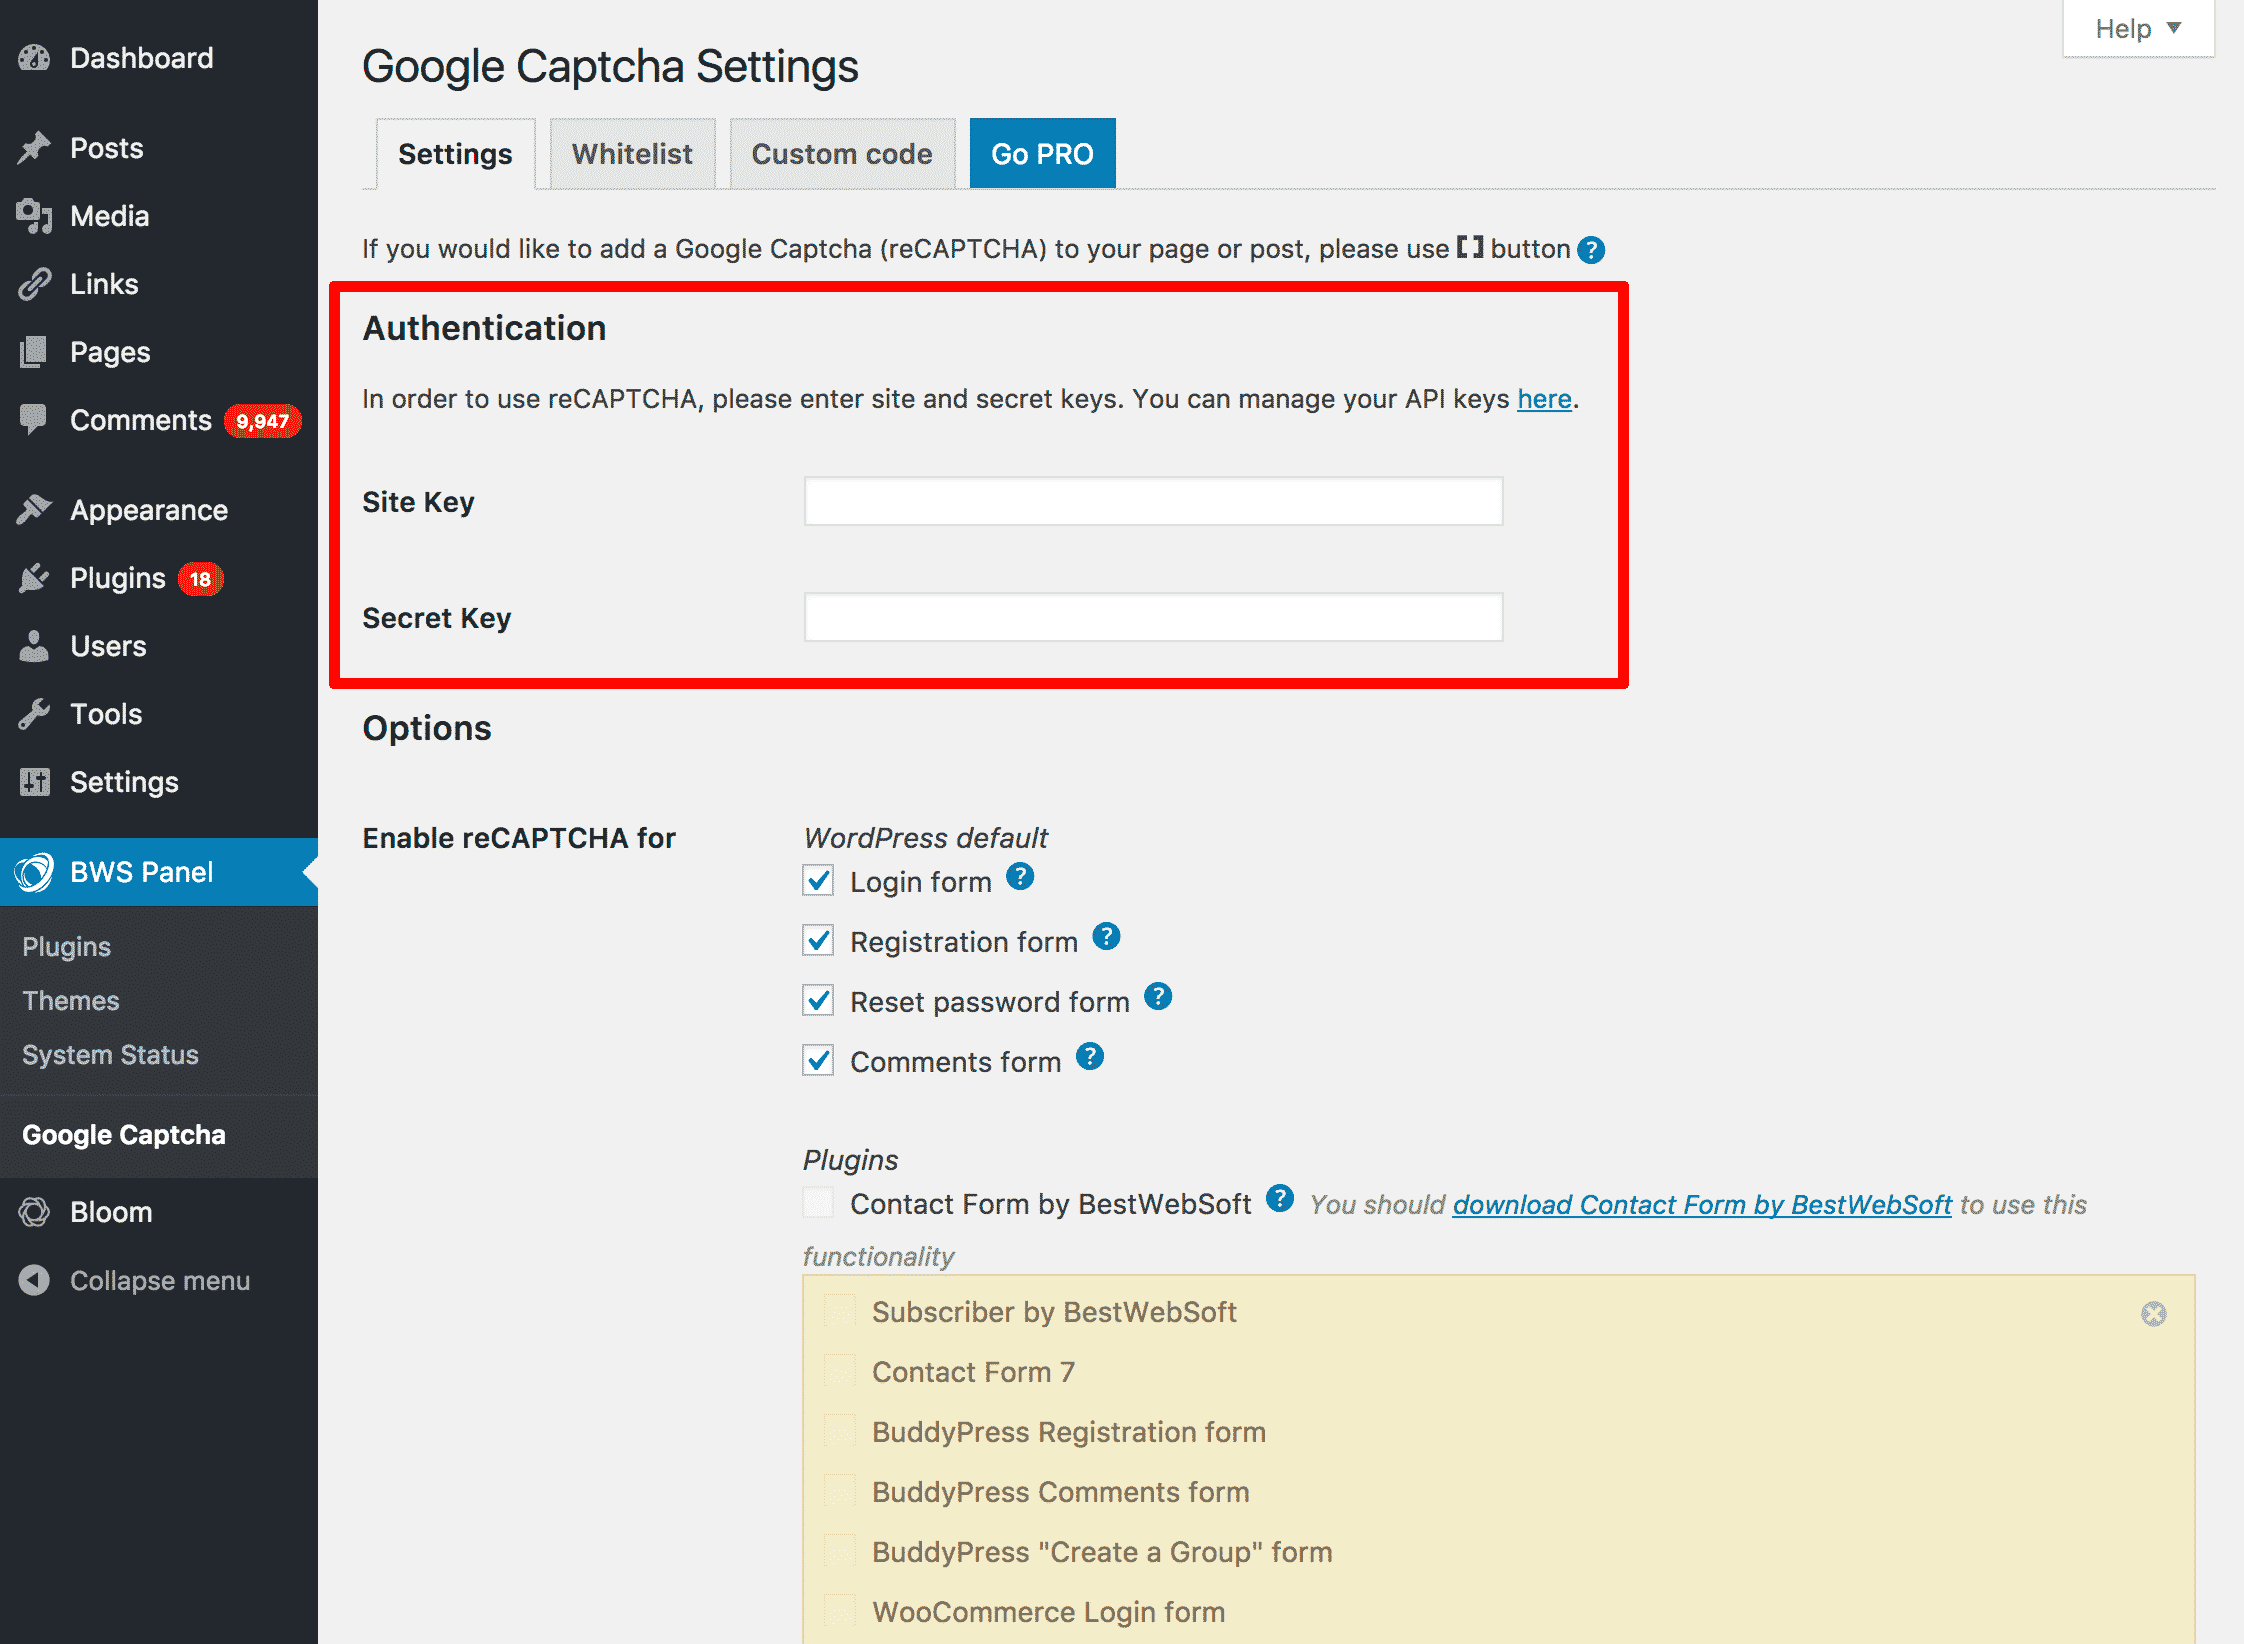
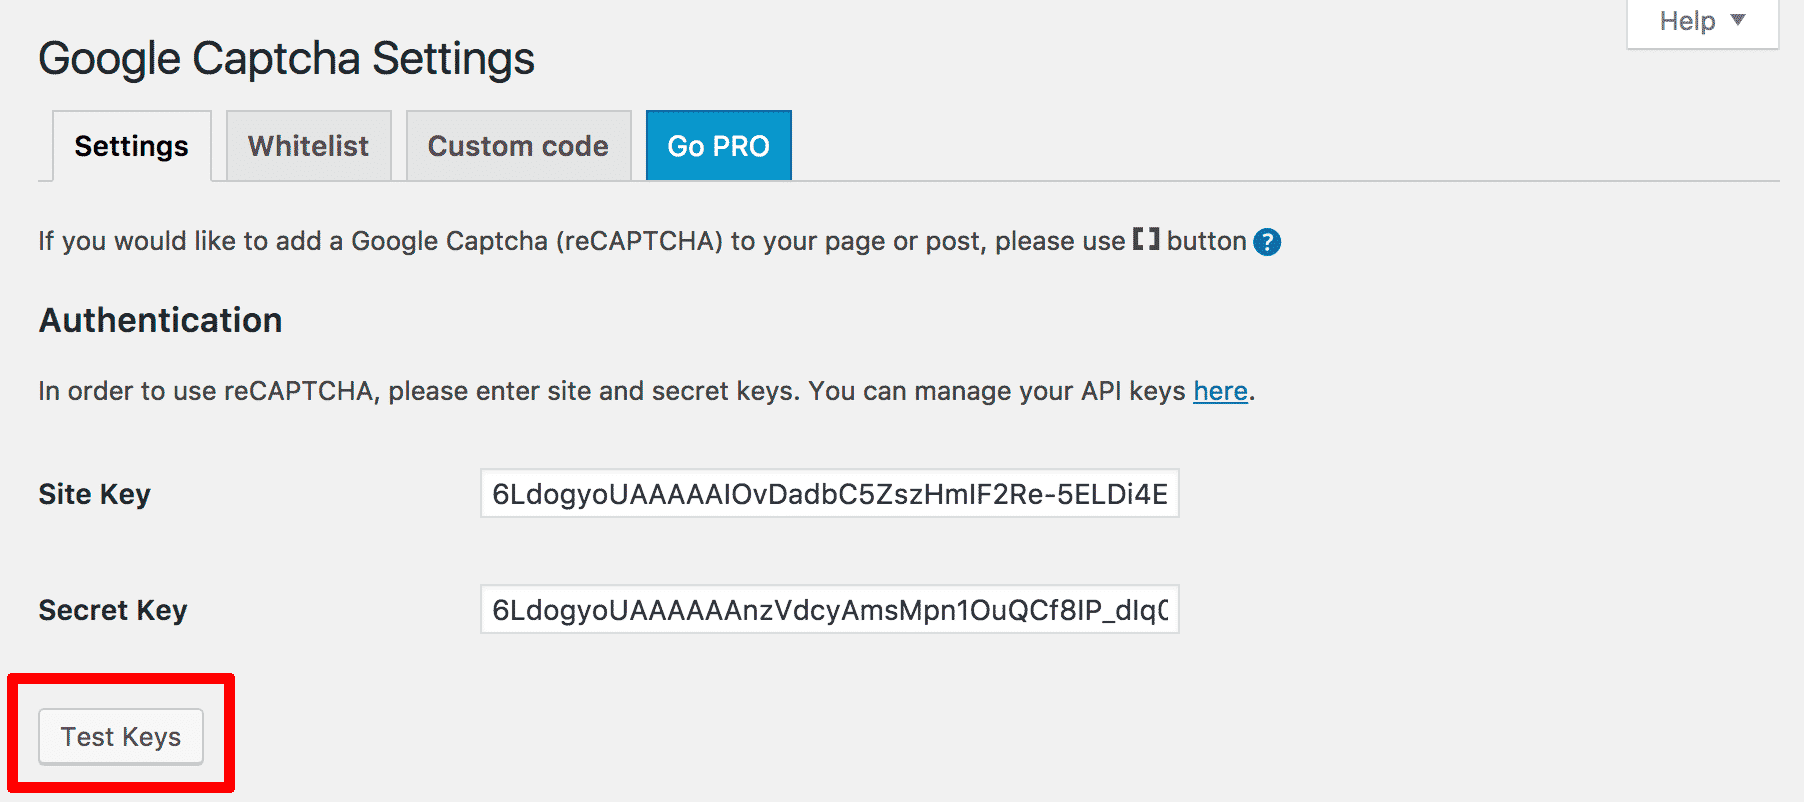
Our first step will be to complete the Authentication section. You must fill these fields with the Site Key and Secret Key you have obtained from Google.
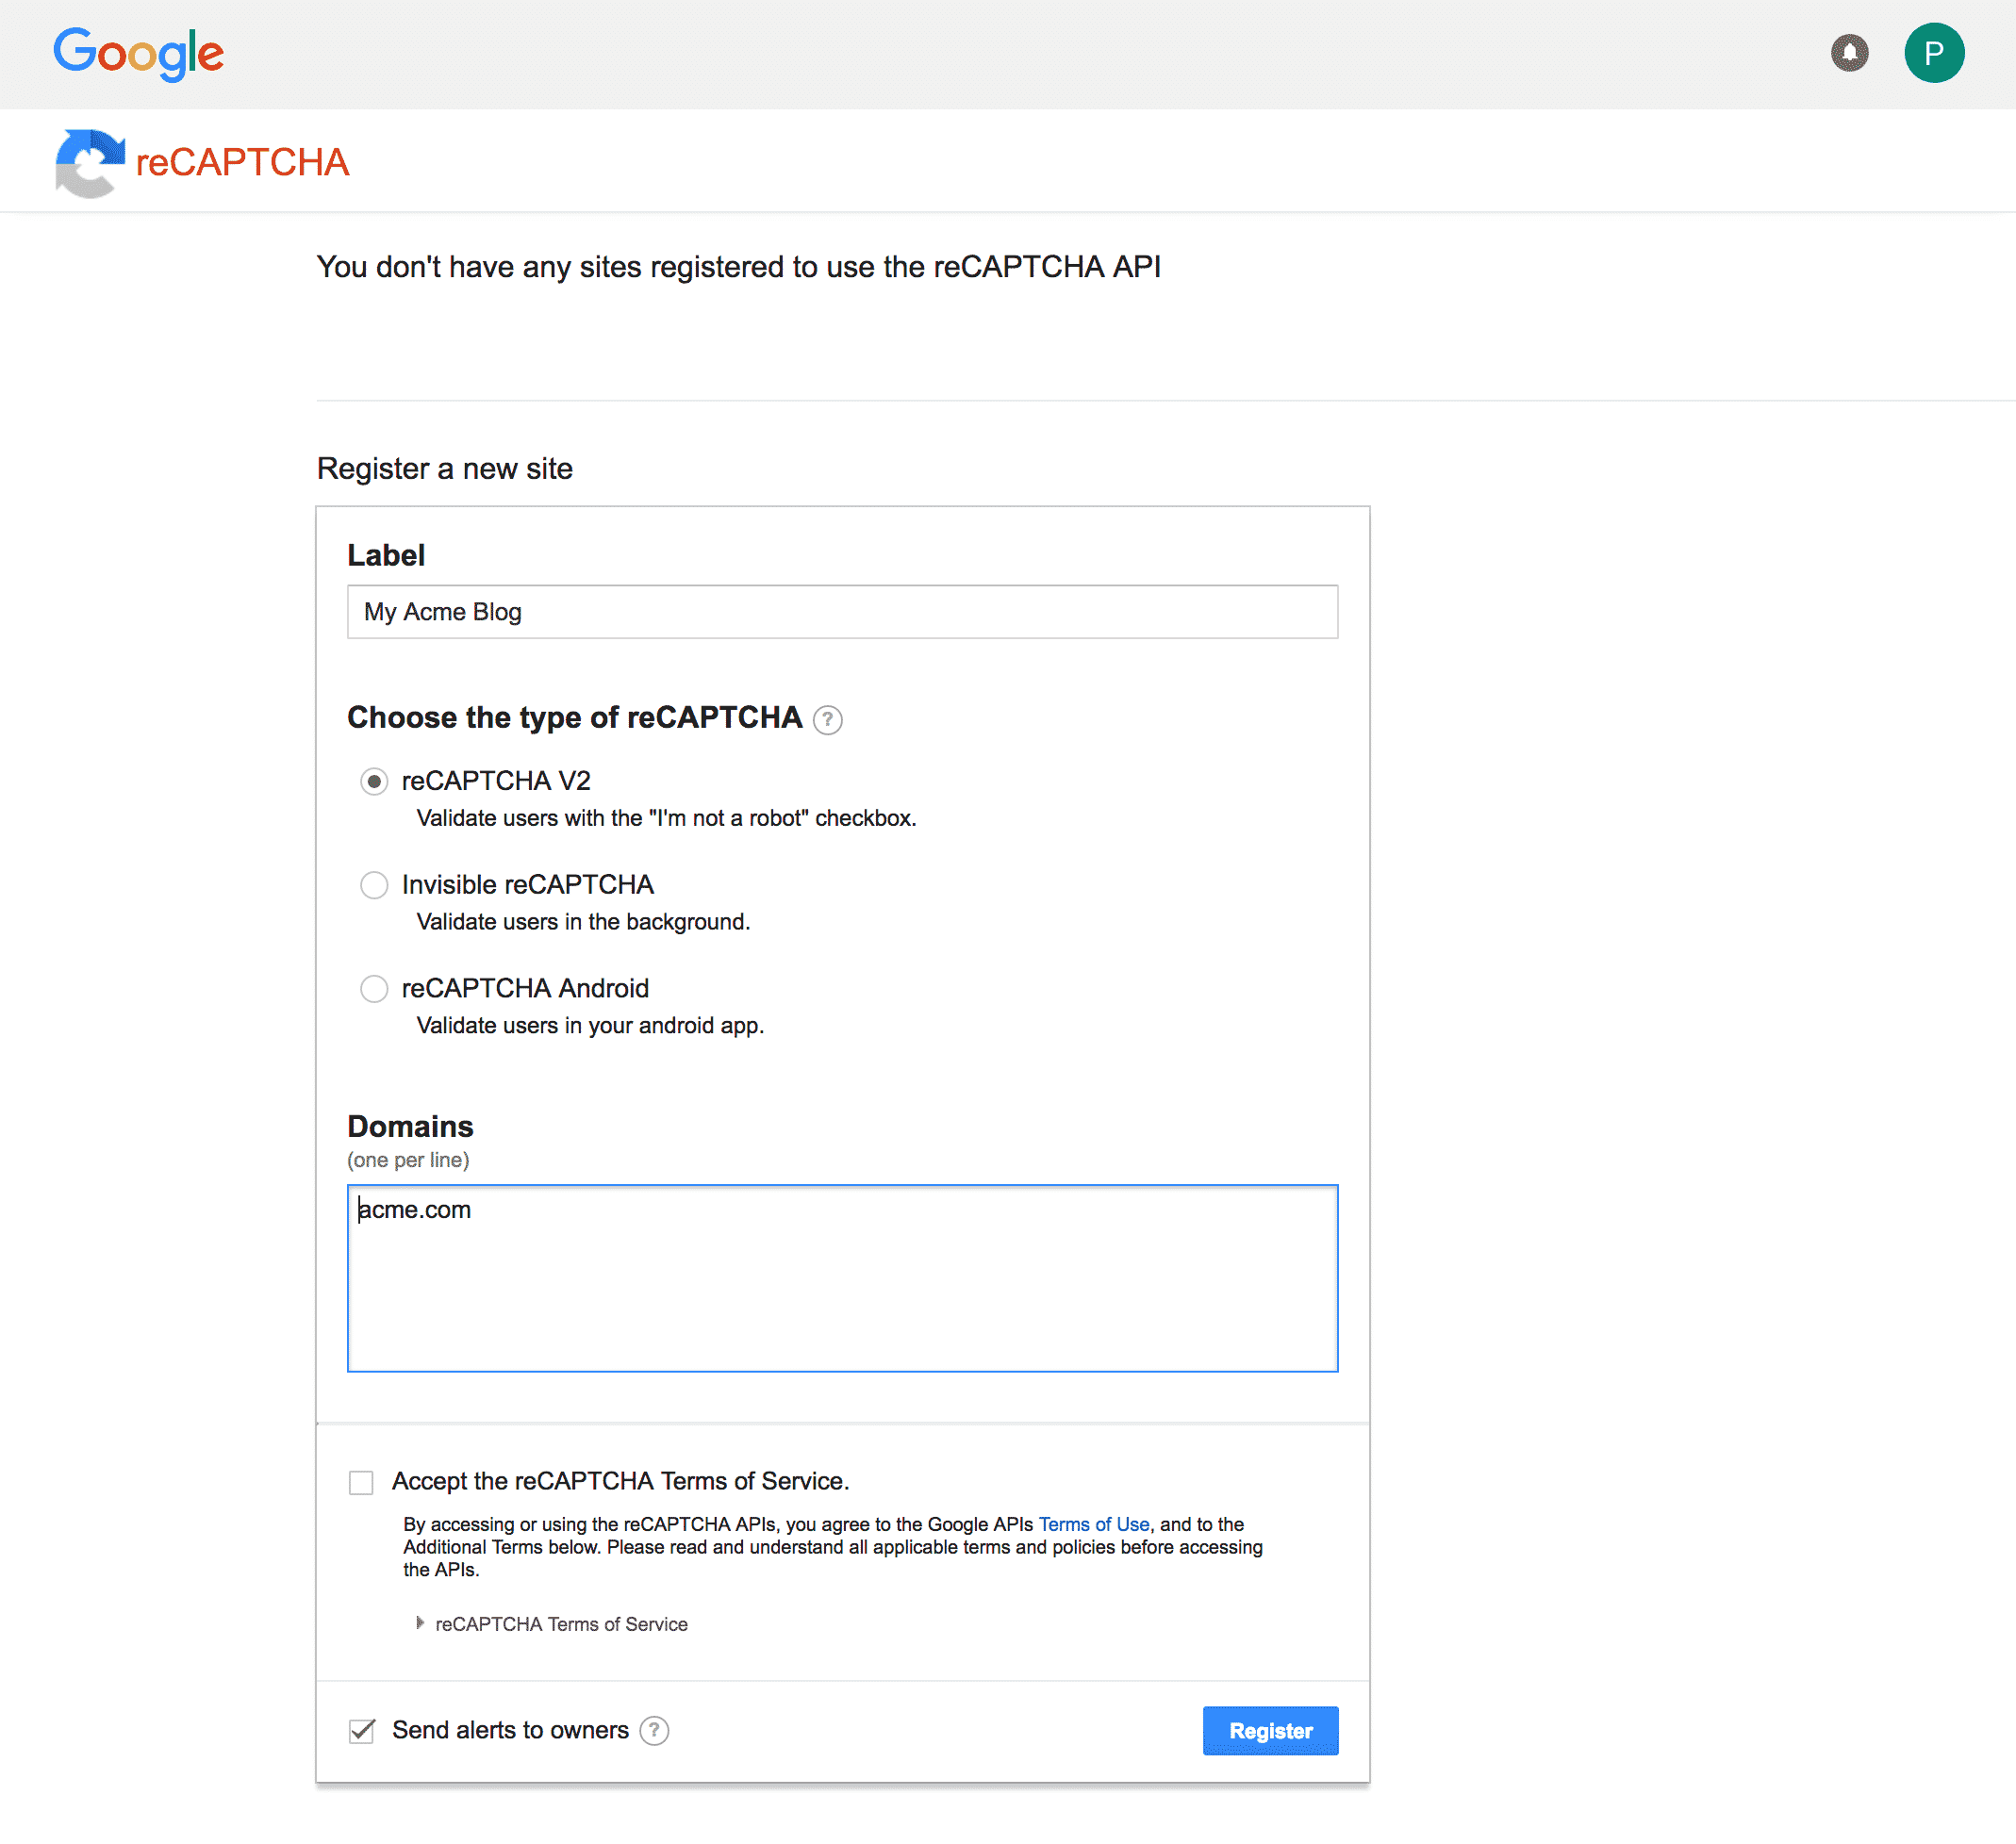
Obtaining a key is easy. Click on the link in the authentication section or visit https://www.google.com/recaptcha/admin. You will have to log in to your Google account or create a new Google account to access this page.
Once you have reached the page, you will have to fill in a simple form to receive your site key and secret key (shown below).
On the next page, you will be given your Site Key and Secret Key.
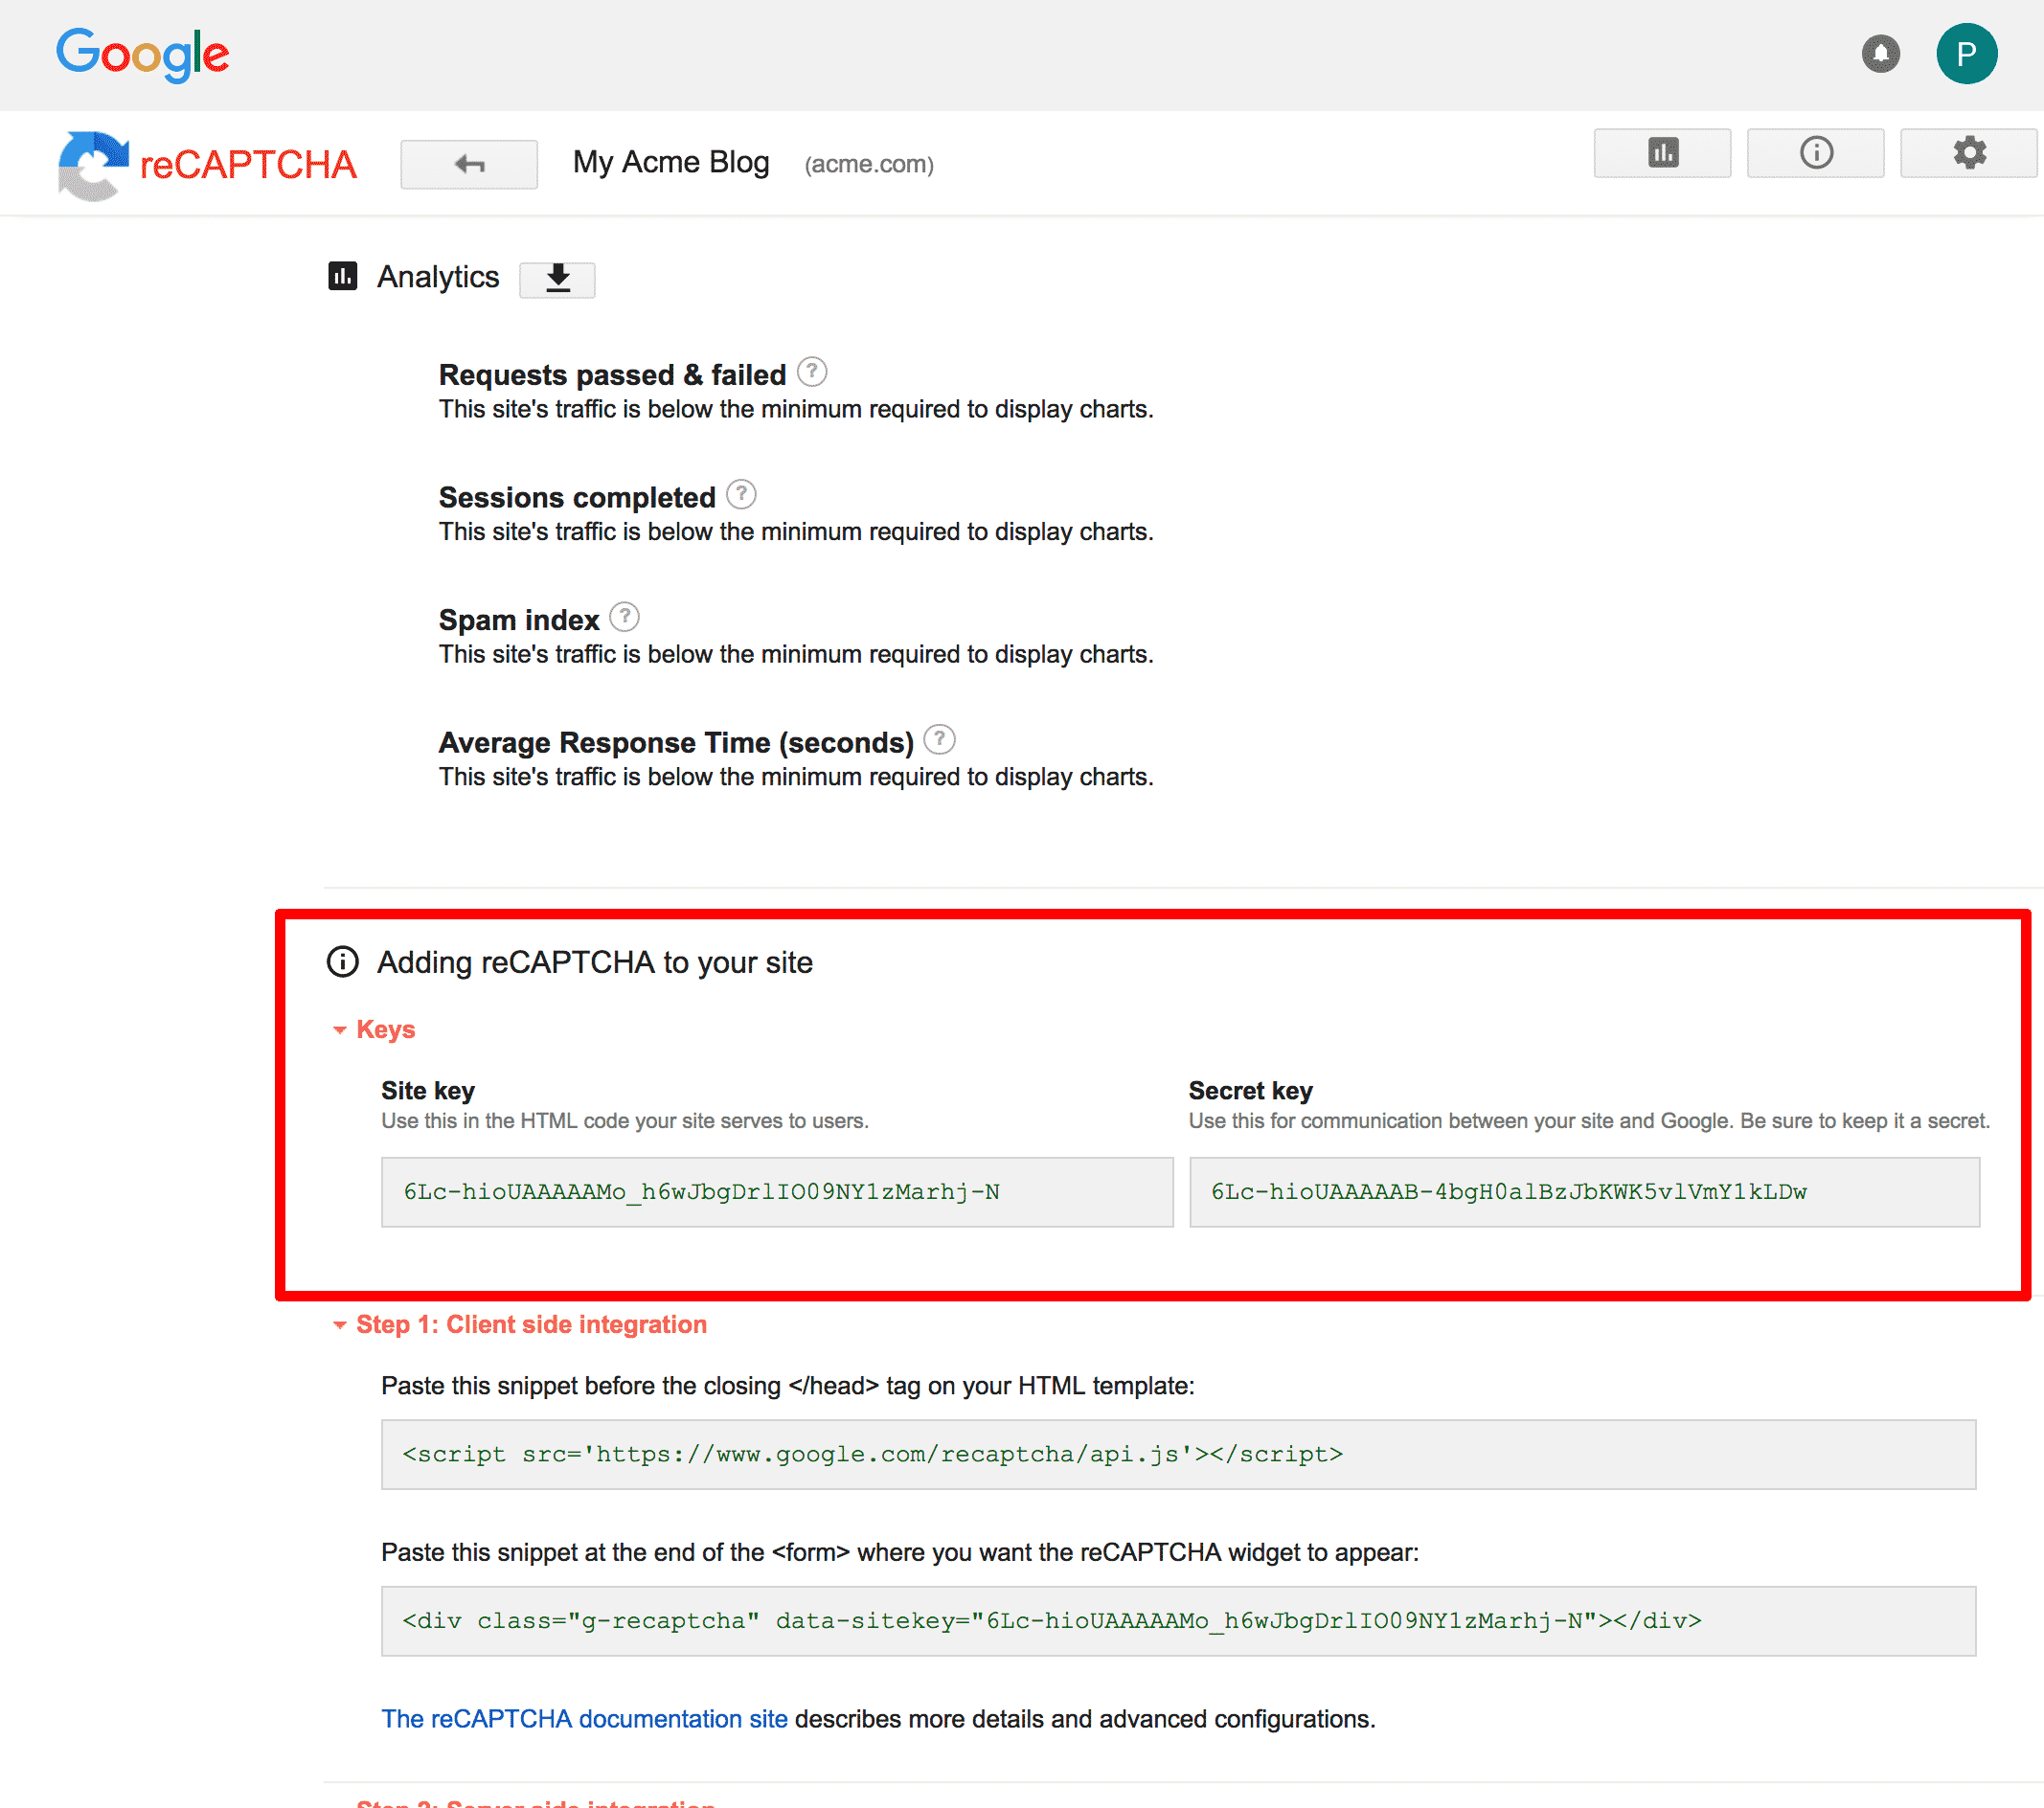
You will also be given some information on how to incorporate Google reCAPTCHA into your website. You won’t need to read these instructions because the plugin we are using takes care of everything for you. Copy the information from the fields shown below in the Authentication section of the plugin.
Once you have added your keys, press the Test Keys button to ensure you have copied them over correctly.
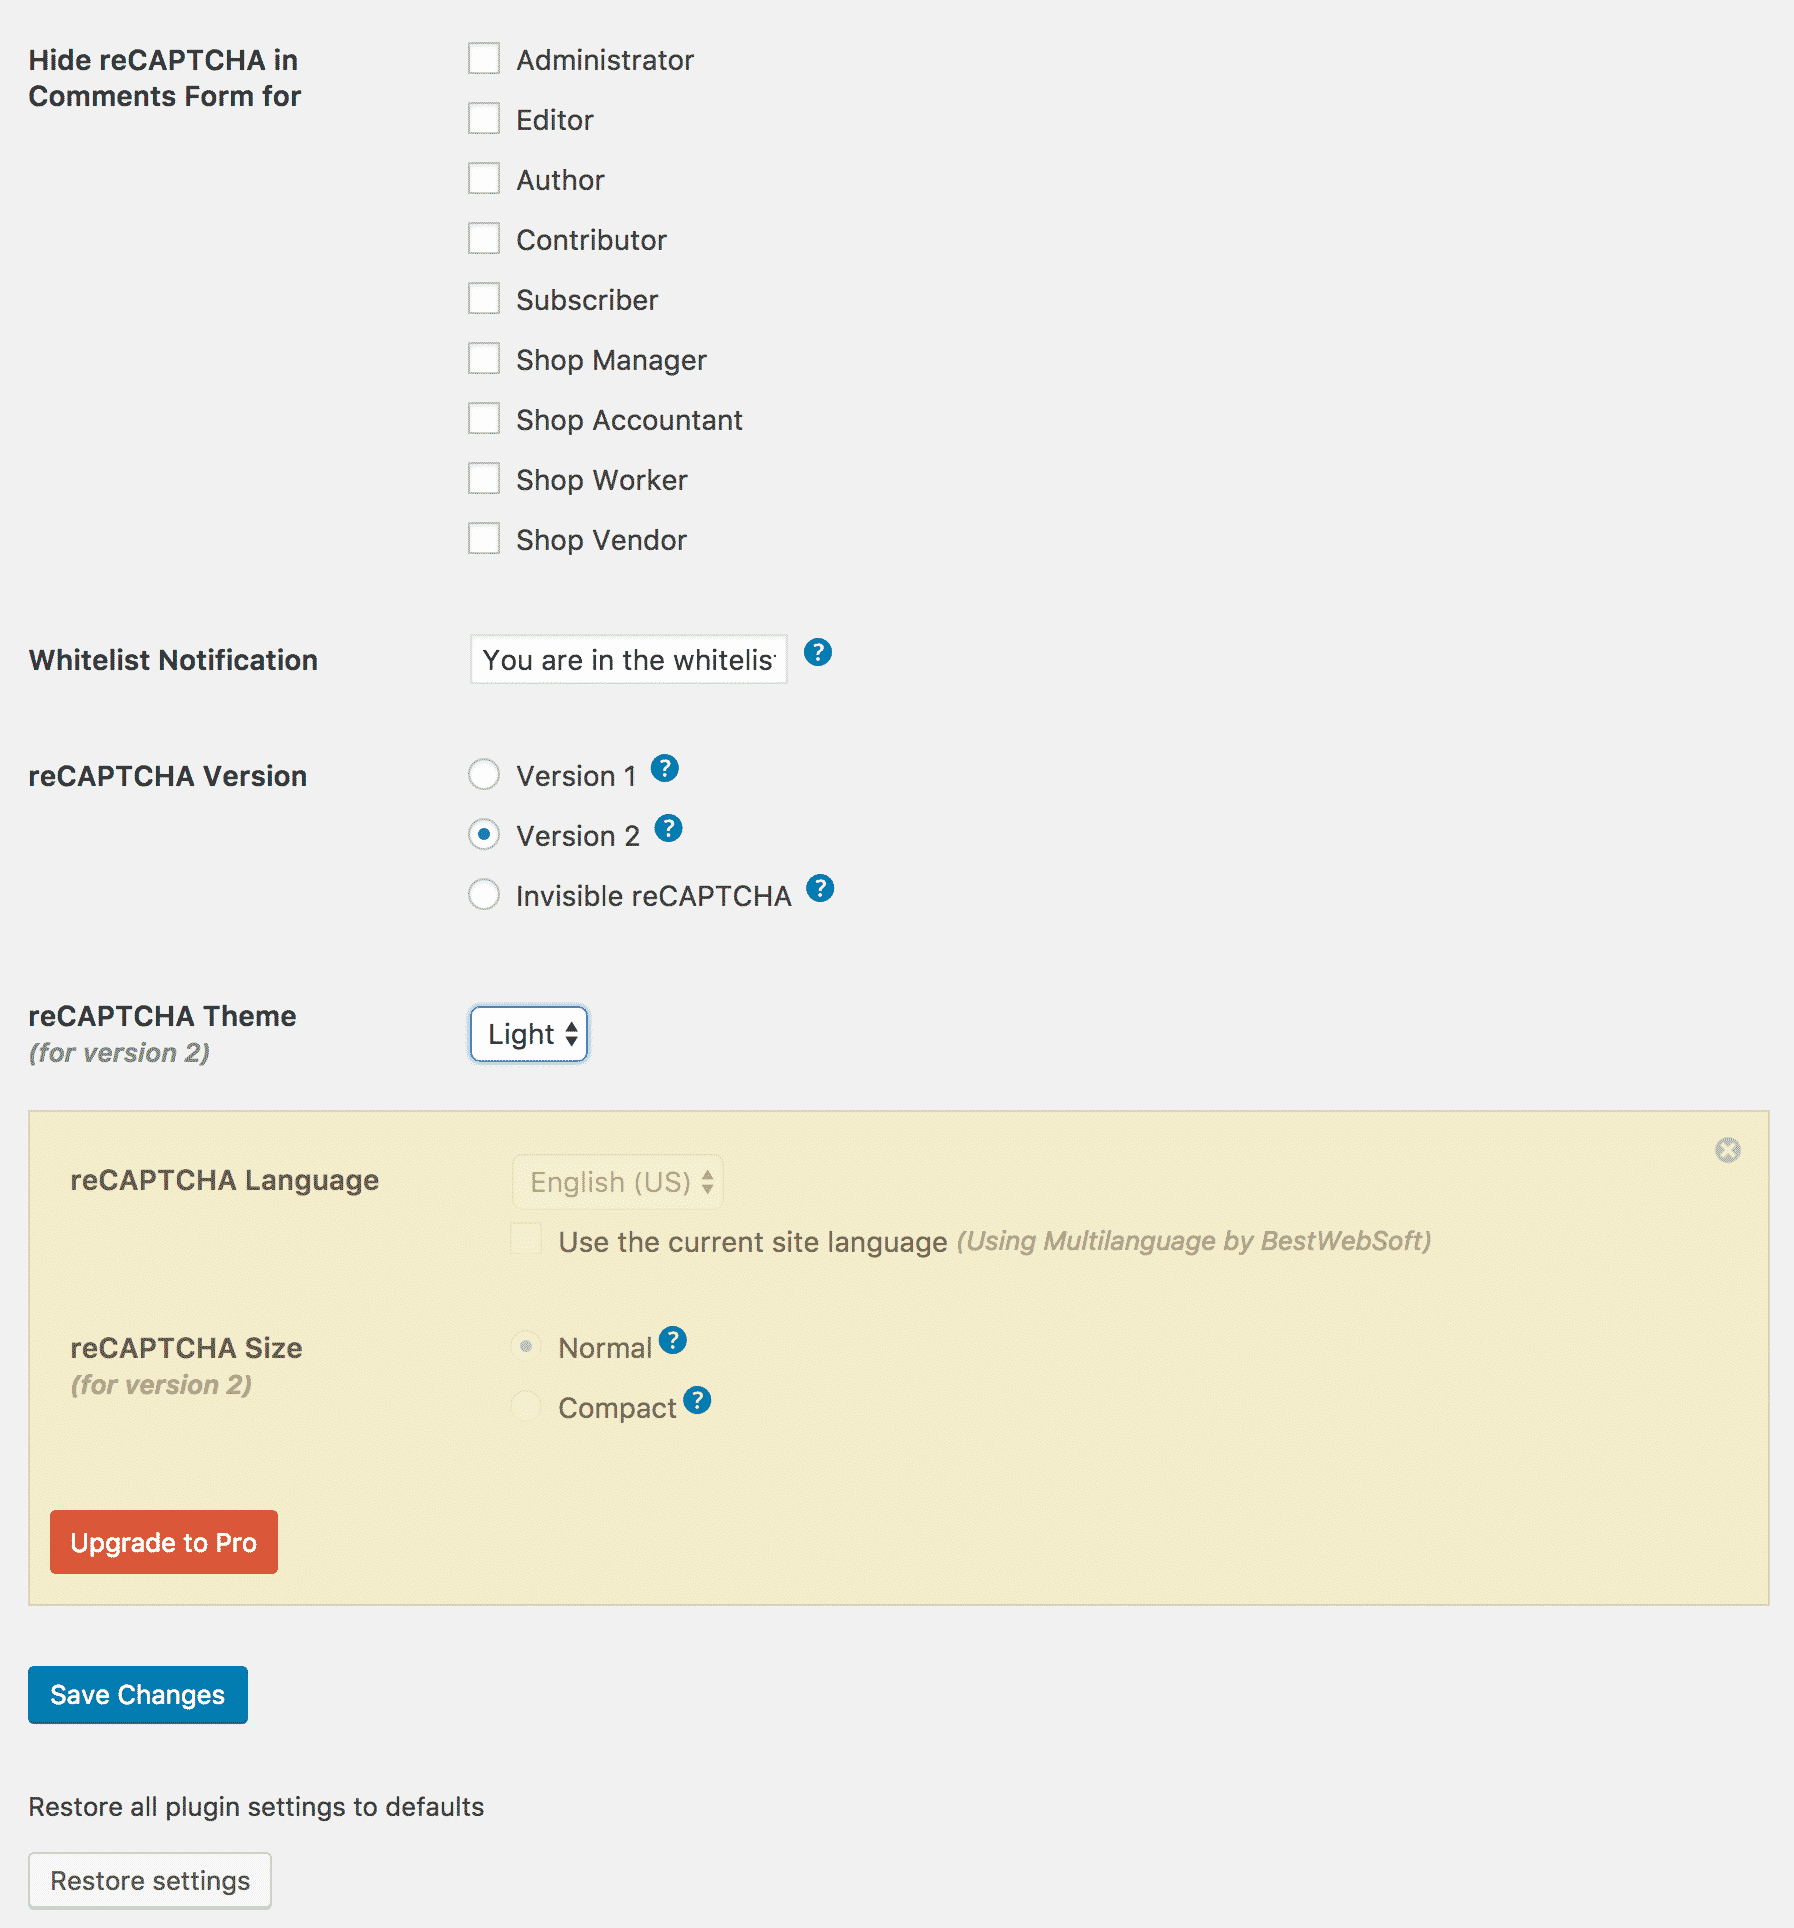
You will be shown an example of how the reCAPTCHA will look once added to your forms. The next step is to select which forms the reCAPTCHA will appear on. There are four available forms for users of the free version of the plugin and another ten options for people with the paid version.
The other options on this page include:
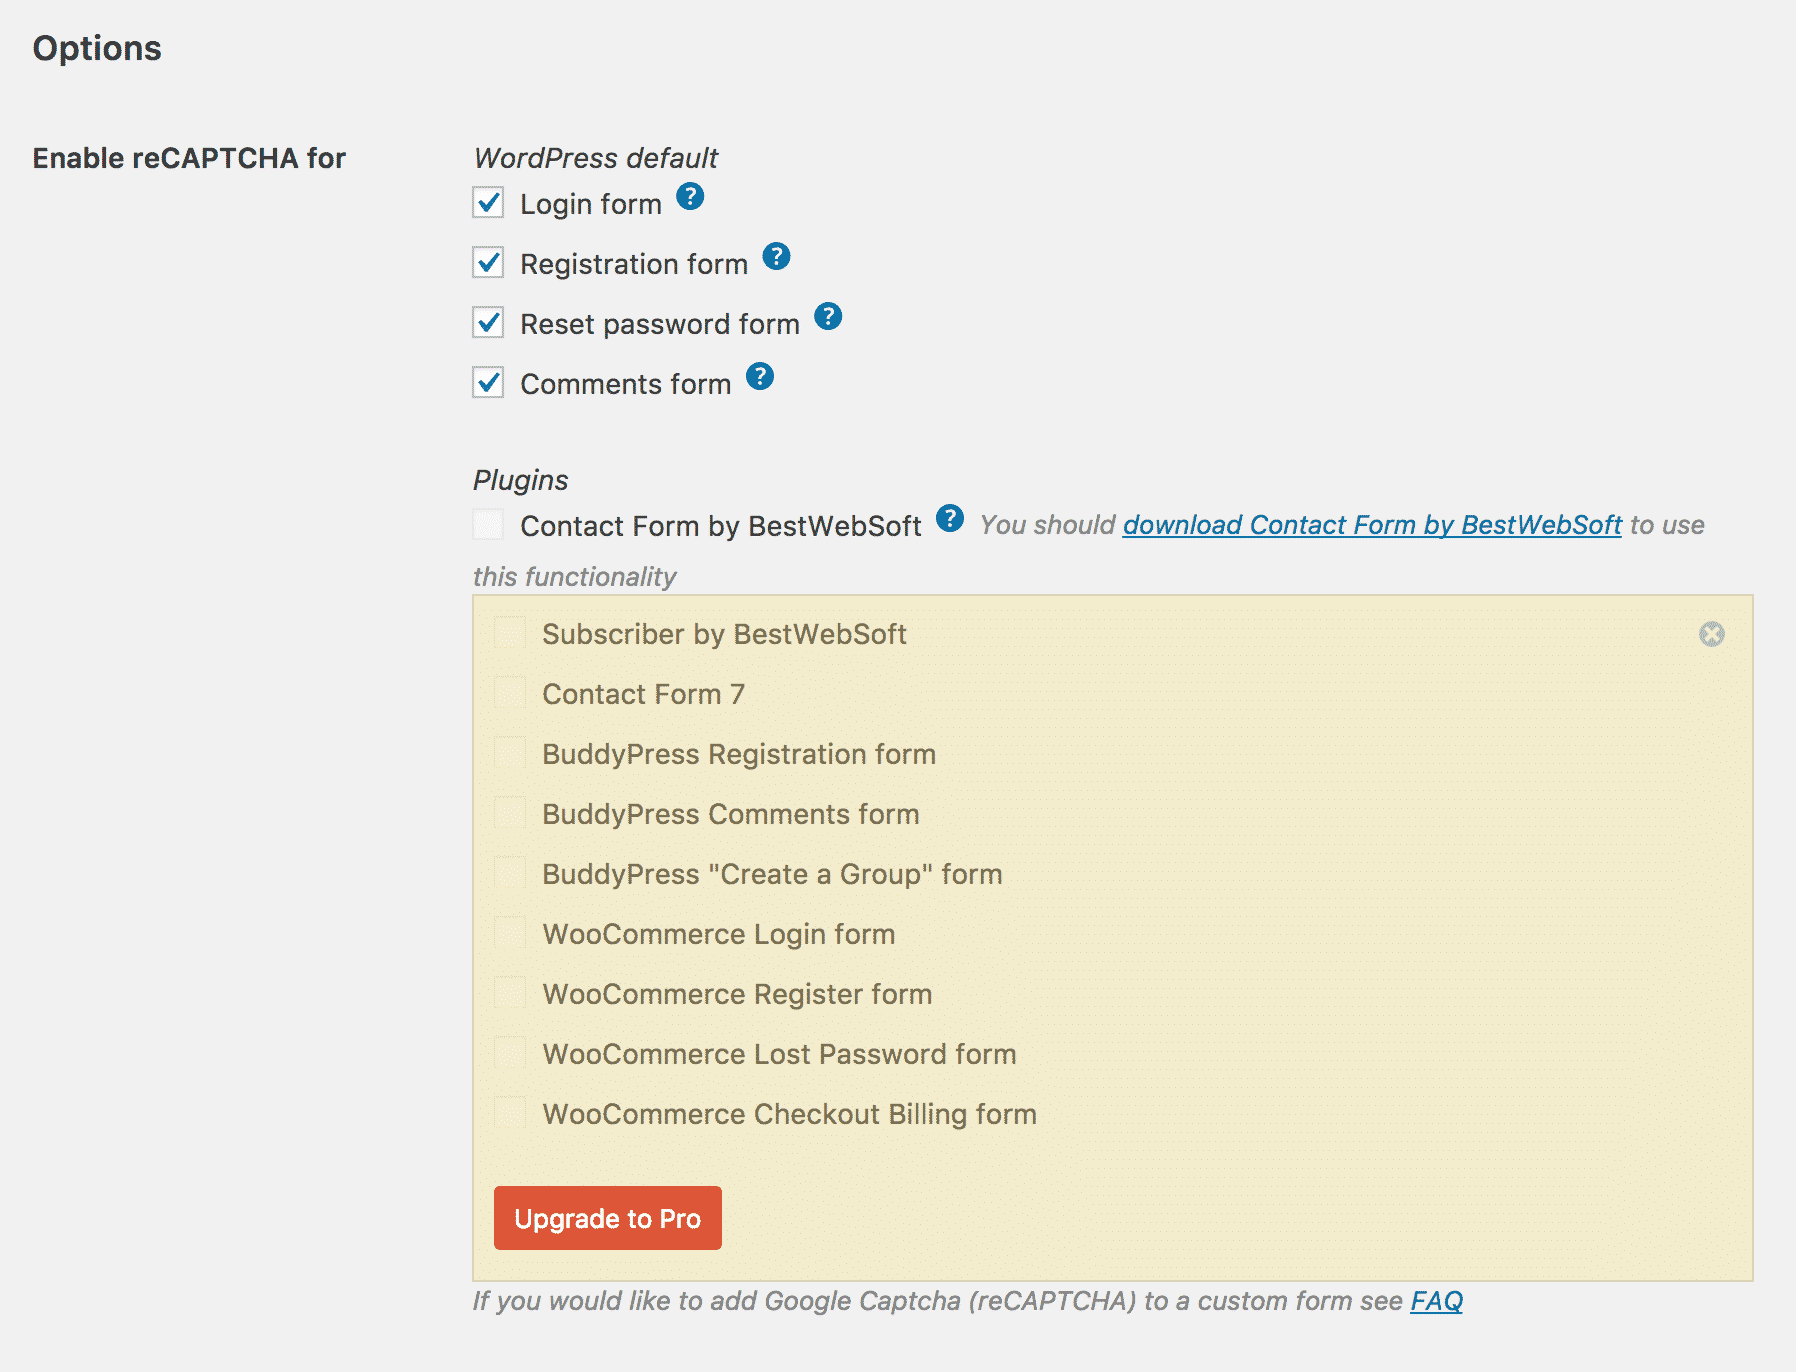
- Hide reCAPTCHA in comments form for: This option allows you to remove the reCAPTCHA for certain kinds of users.
- Whitelist notification: This tells you if you are on the Whitelist of people who do not have to complete a reCAPTCHA when submitting forms.
- reCAPTCHA version: You can choose which version of reCAPTCHA to choose.
- reCAPTCHA theme: You can change the appearance of your reCAPTCHA.
- reCAPTCHA language: Users of the Pro version can change the default language of the reCAPTCHA
- reCAPTCHA Size: Users of the Pro version can use a smaller version of the reCAPTCHA
Don’t forget to press Save Changes after making any changes.
There are three more tabs displayed at the top of the configuration page. They include:

- Google Captcha Whitelist: This section allows you to add the IP addresses of users who shouldn’t see a reCAPTCHA.
- Custom Code: You can add custom CSS code here to change how the reCAPTCHA appears on each page.
- Go Pro: If you have purchased the Pro version of the plugin, add your license key here.
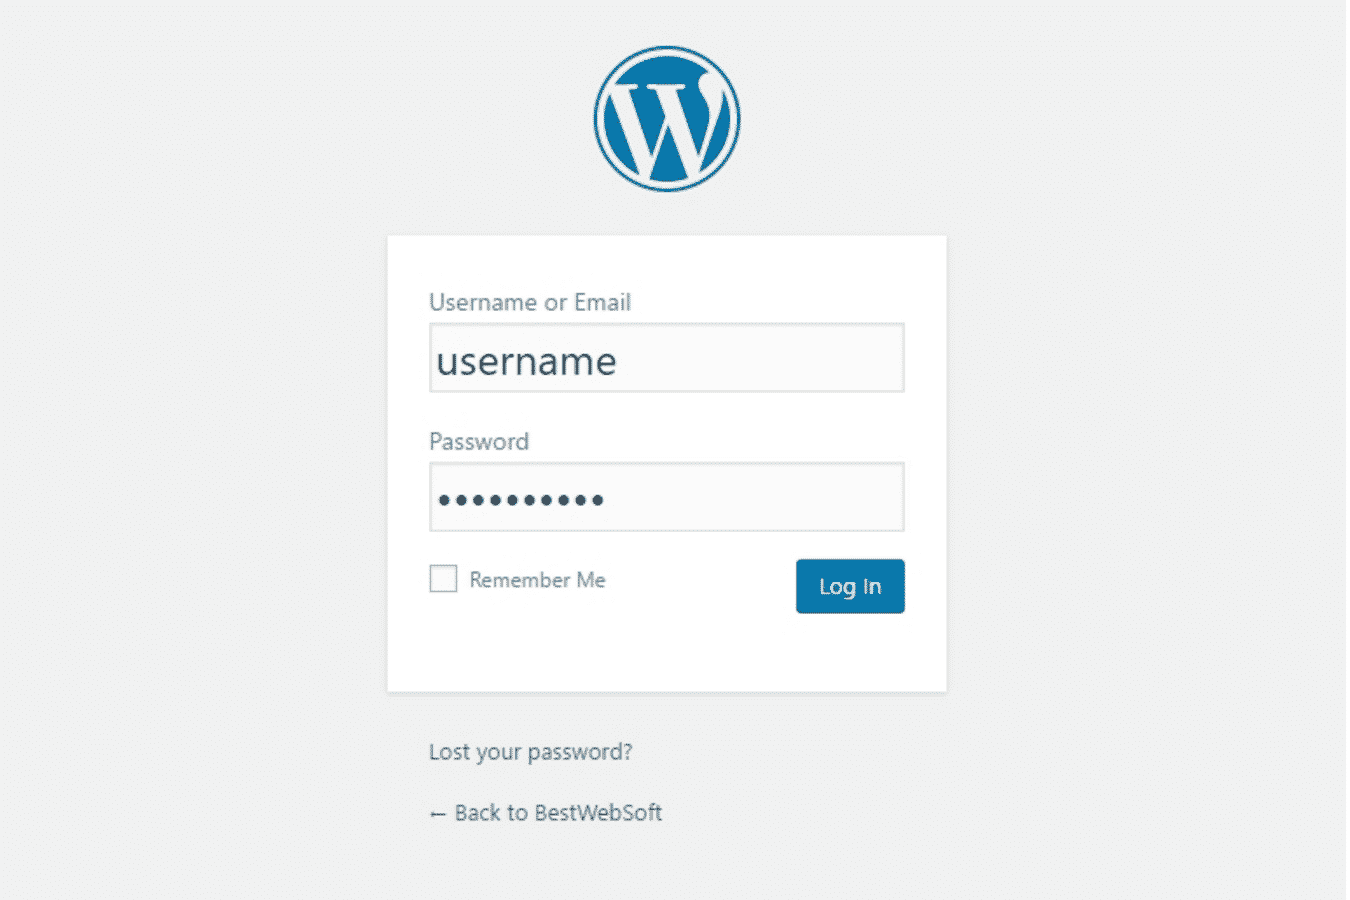
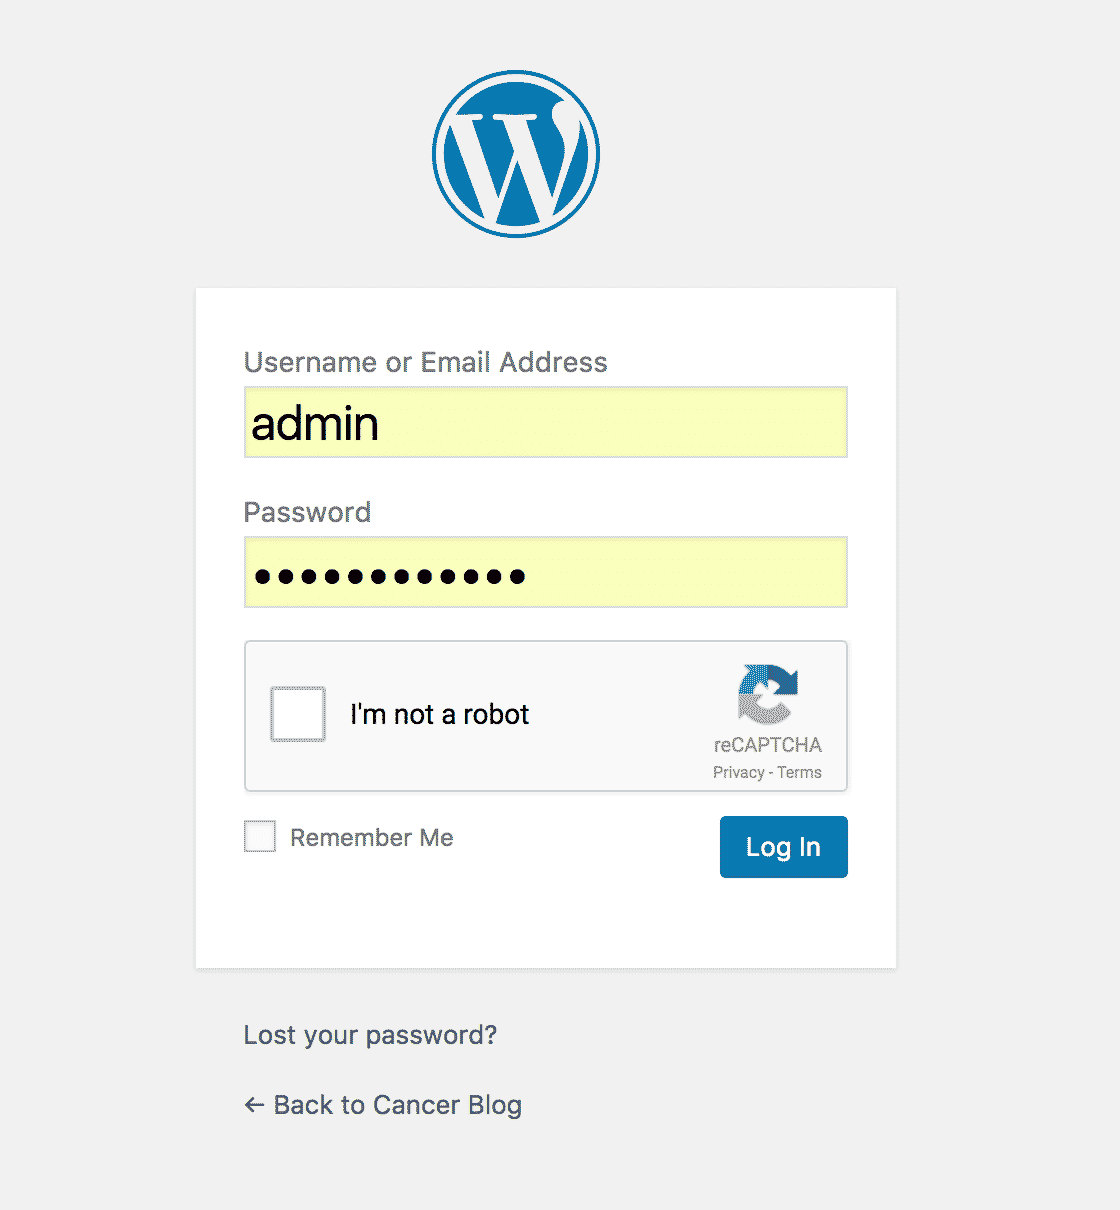
You can now test that reCAPTCHA is working by visiting the pages where it is meant to appear. For example, this is how it will appear on the log in page:
Thanks for reading How To Add Google ReCaptcha To Contact, Registration & Login Forms in WordPress! For more WordPress tips and tricks, subscribe to our blog or follow us on social media.
 234 customers signed up in the last 30 days