Generating high-quality sales leads is essential for any online business! One of the most effective methods for generating those leads is to run an opt-in email list directly on your website. It allows you to develop a relationship with your audience, build trust and eventually turn them into profitable leads.
Adding an opt-in email list to your website is made easy thanks to the Bloom plugin for WordPress. Developed by Elegant Themes, Bloom is a very powerful plugin that can add highly customisable newsletter signup forms to your website in a few minutes.
This guide will explain some of the advantages of email marketing, then show you how to install and configure Bloom. Lets’s get started!
Table of Contents
- Why Use Email Marketing For Lead Generation?
- Correctly Integrating Email Marketing Into Your Website
- The Key Features Of Bloom
- Installing Bloom
- Configuring Bloom
Why Use Email Marketing For Lead Generation?
Email marketing is one of the most effective ways to generate leads. It has some incredible advantages compared to other marketing techniques, including:
You can personalise the emails that you send: Unlike PPC advertisements and traditional forms of advertising, you can personalise the content that you send to your newsletter list. You can add each subscriber’s name and personal details to the newsletter. Your business can even craft unique newsletter campaigns for subscribers who perform certain actions on your website or fall under a specific demographics.
You can easily create targeted segments: It is simple to segment your database of subscribers and send highly targeted email newsletters. Highly targeted marketing materials obtain a much better return on investment compared to other broad-brush marketing techniques.
Your business can run more campaigns: Once you have some templates designed, an email newsletter can be sent in as little as 10-minutes. This makes email marketing a great option for sending details of specials or new products to your customer base on a daily basis. The frequency and immediacy of email marketing also make it great for building relationships with subscribers.
There is less overhead: Creating and sending an email campaign is simple compared to other forms of marketing. That means less work for you and your staff.
Advanced analytics: Email marketing services offer businesses advanced analytics. You can see various analytics including how many people opened the email, how long they spent reading it, what links they click on and much more. Your business will gain a strong understanding of the kinds of content that your subscribers engage with.
Emails can be shared: Subscribers can share the emails that you send to them very easily. Email newsletters also work well with social media marketing.
It is cost-effective: Email marketing is one of the most cost-effective forms of marketing. Even if you use a dedicated email marketing service like MailChimp, Constant Contact or Campaign Monitor, the cost of sending an email newsletter is tiny.
Correctly Integrating Email Marketing Into Your Website
Successfully integrating an email newsletter signup form into your website isn’t as simple as you may think. Business owners must promote the newsletter and convince visitors to subscribe. To really be effective your newsletter sign-up form must:
- Feature prominently throughout the site: The form must be available on most pages of the website, without being overly intrusive.
- Be well-timed: The most effective newsletter signup forms only appear after a user has engaged with a website by reading a page or spending a certain amount of time on the website. When intrusive signup forms appear at the wrong time, users are less likely to subscribe.
- Work with a range of email marketing services: Ideally, the email newsletters’ sign-up form should be connected to a professional email marketing service.
- Look professional and match the design of the website: If the signup form doesn’t look professional and doesn’t highlight the advantages of signing up, it will not be successful.
- Work on mobile devices: The percentage of web traffic using a mobile device continues to increase. Newsletter signup forms must work well on mobile and tablet devices.
The good news is that Bloom ticks all of these boxes (and more). It allows you to customise virtually every aspect of your signup forms, including pop-up timers, its appearance, the services it connects to and much more.
The Key Features Of Bloom
Bloom is an email opt-in plugin that is designed to collect emails for an emailing list. It gives you the ability to add a variety of different opt-in forms to your website, which collects the details of your users. When they signup, it sends their details to your email marketing software.
The key features of Bloom include:
- Dozens of pre-configured designs
- Six types of opt-in forms, including pop-ups, fly-ins and widgets.
- Highly customisable designs
- Integration with many popular email marketing services
- Advanced timers and the ability to customise which pages have an opt-in form.
- Mobile friendly sign-up forms
- Detailed statistics
Installing Bloom
Bloom is a paid plugin that is only available to people who have subscribed to Elegant Themes. For $89/year subscription, you get full and unlimited access to all of their themes (including the famous Divi theme) & plugins which you can use on an unlimited number of websites. Installing Bloom is simple, just follow the steps below:
1. Purchase Bloom
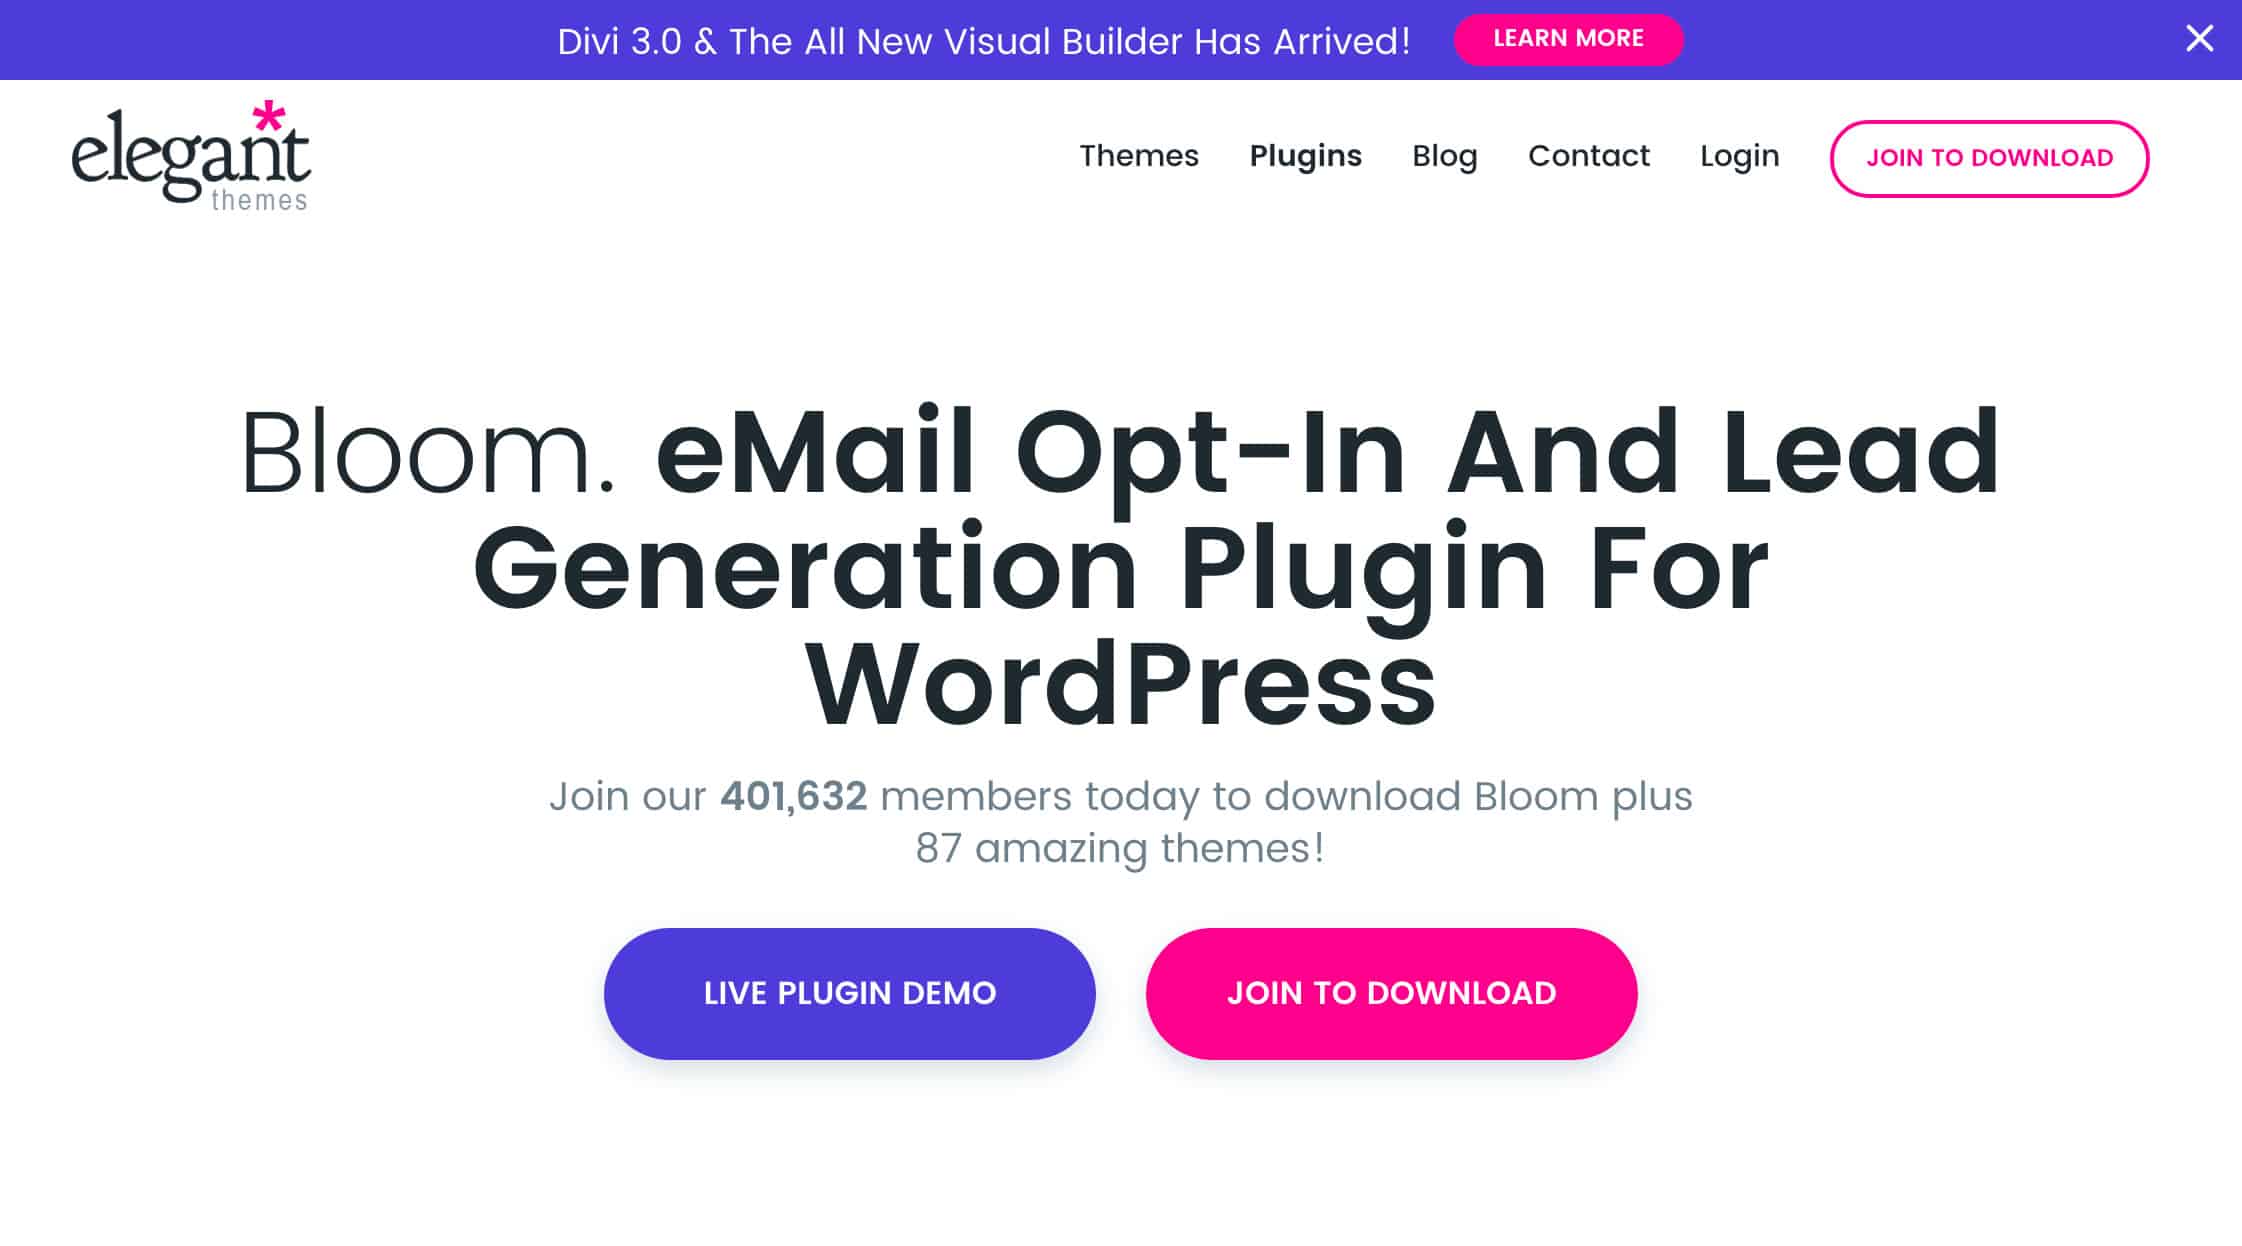
Bloom can be purchased from the Elegant Themes website.
2. Download the plugin’s files
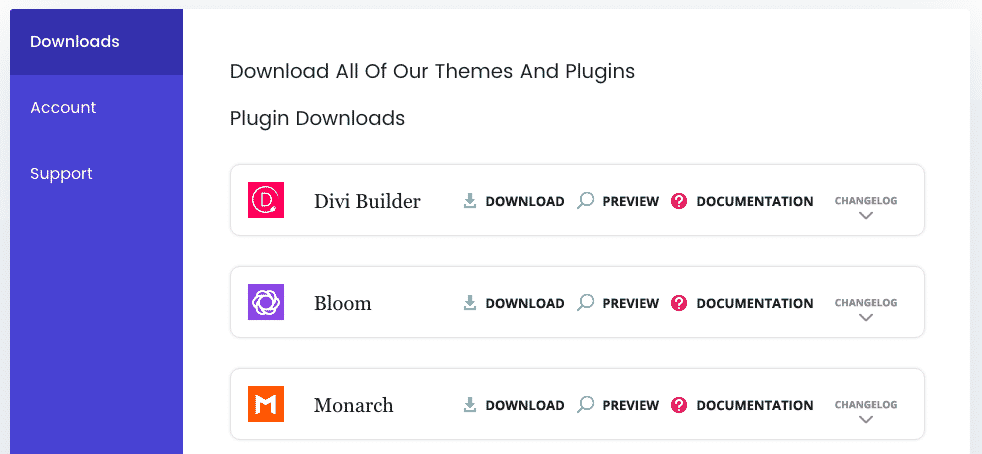
Once you have subscribed to Elegant Themes, you can log in to the Member’s Area. Simply scroll down until you see the Bloom in the Plugin Downloads section. Press the download button and download the Plugin Package. This will be a zip file that downloads to your computer.
3. Upload the plugin to WordPress
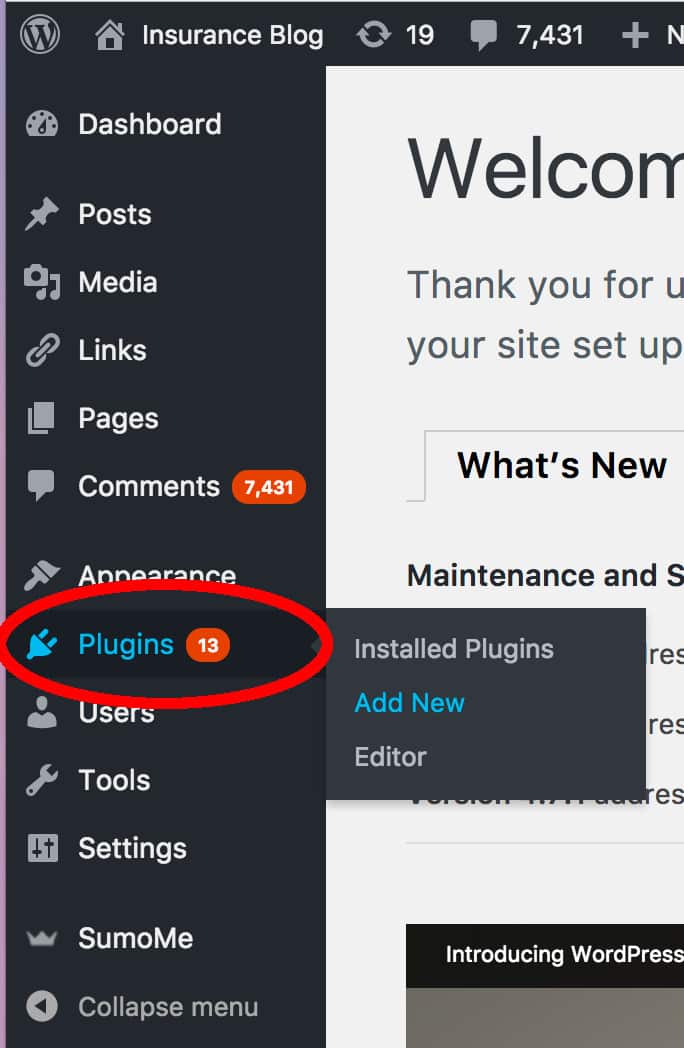
Log into the administration section of your WordPress website and click on Plugins > Add New.
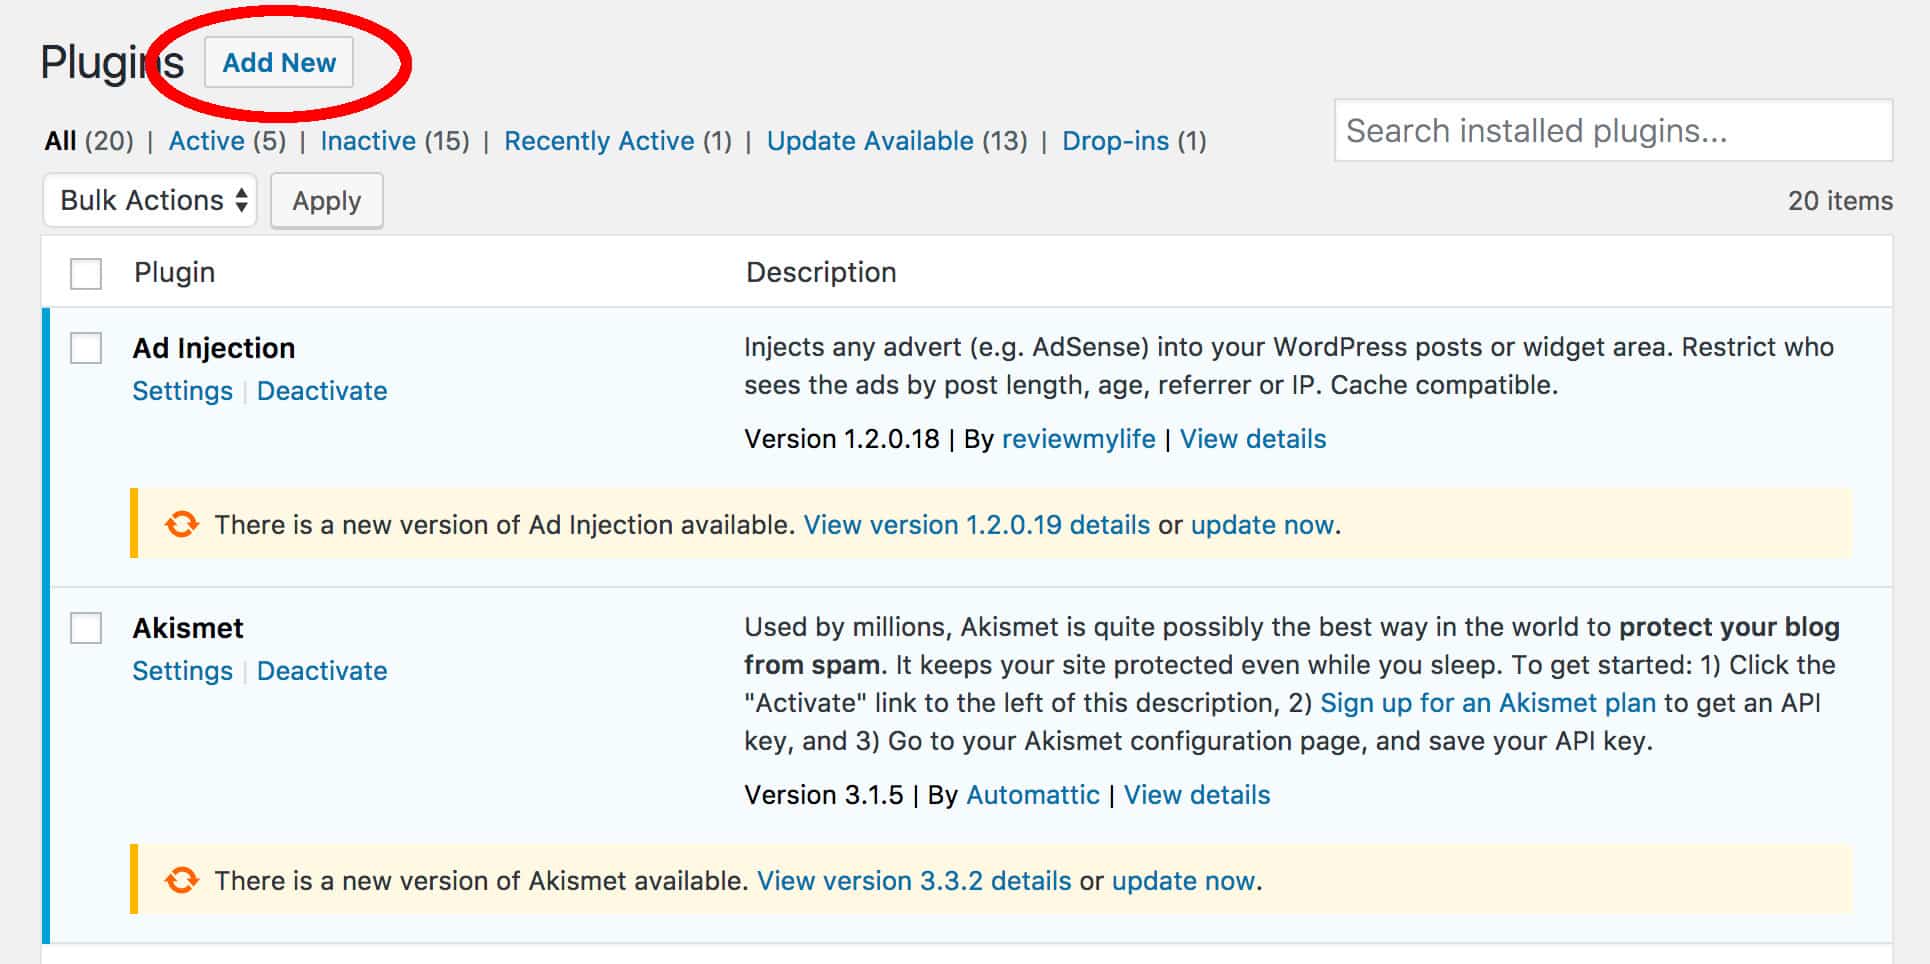
At the top of the Plugins Page, you will see a button called Add New. Click it.
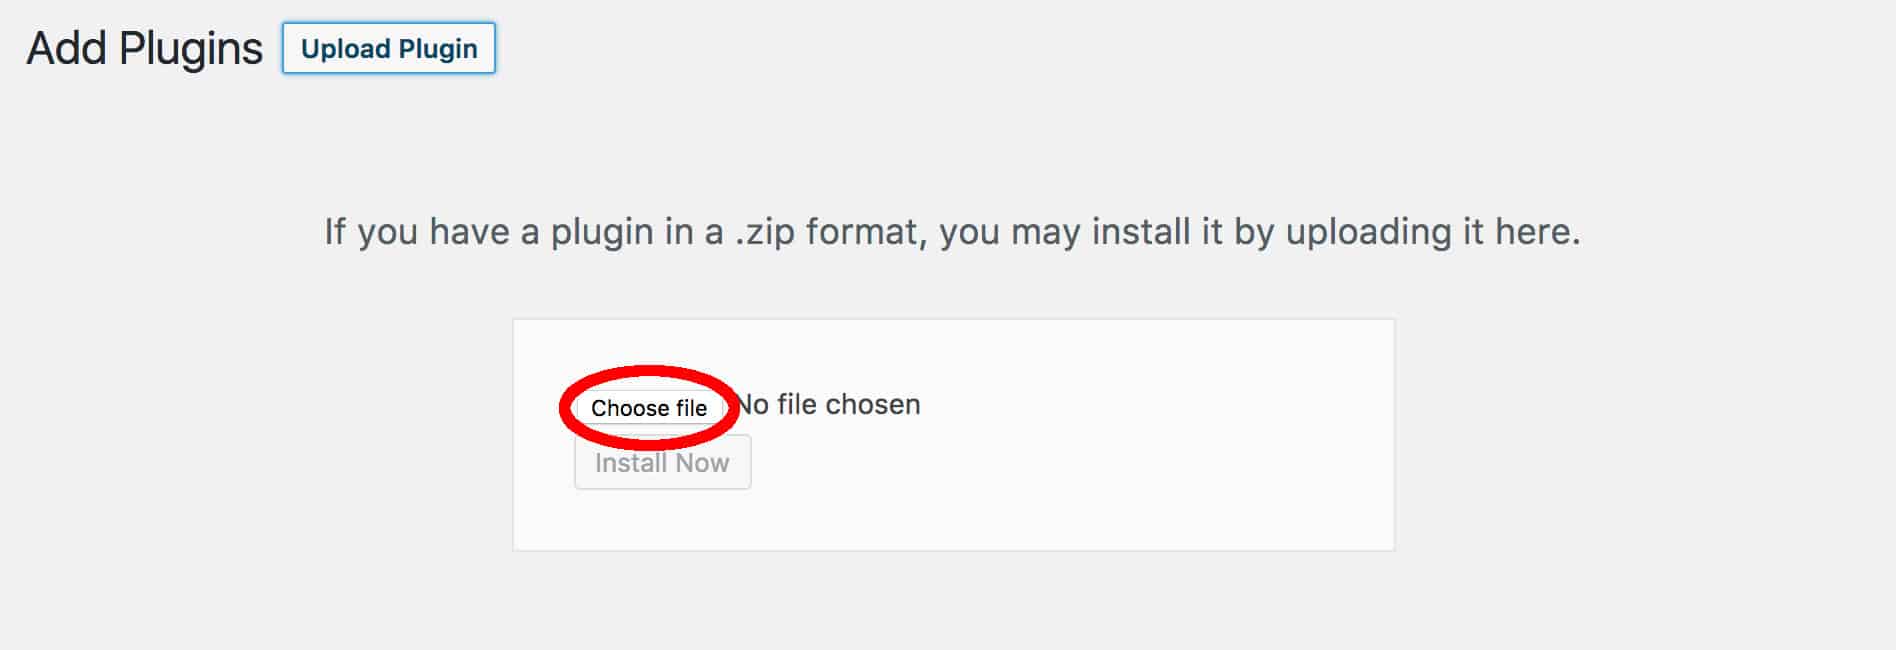
Click on the Choose File button and locate a zip file you just downloaded. Once it is uploaded, simply click the Activate button to activate the plugin.
Configuring Bloom
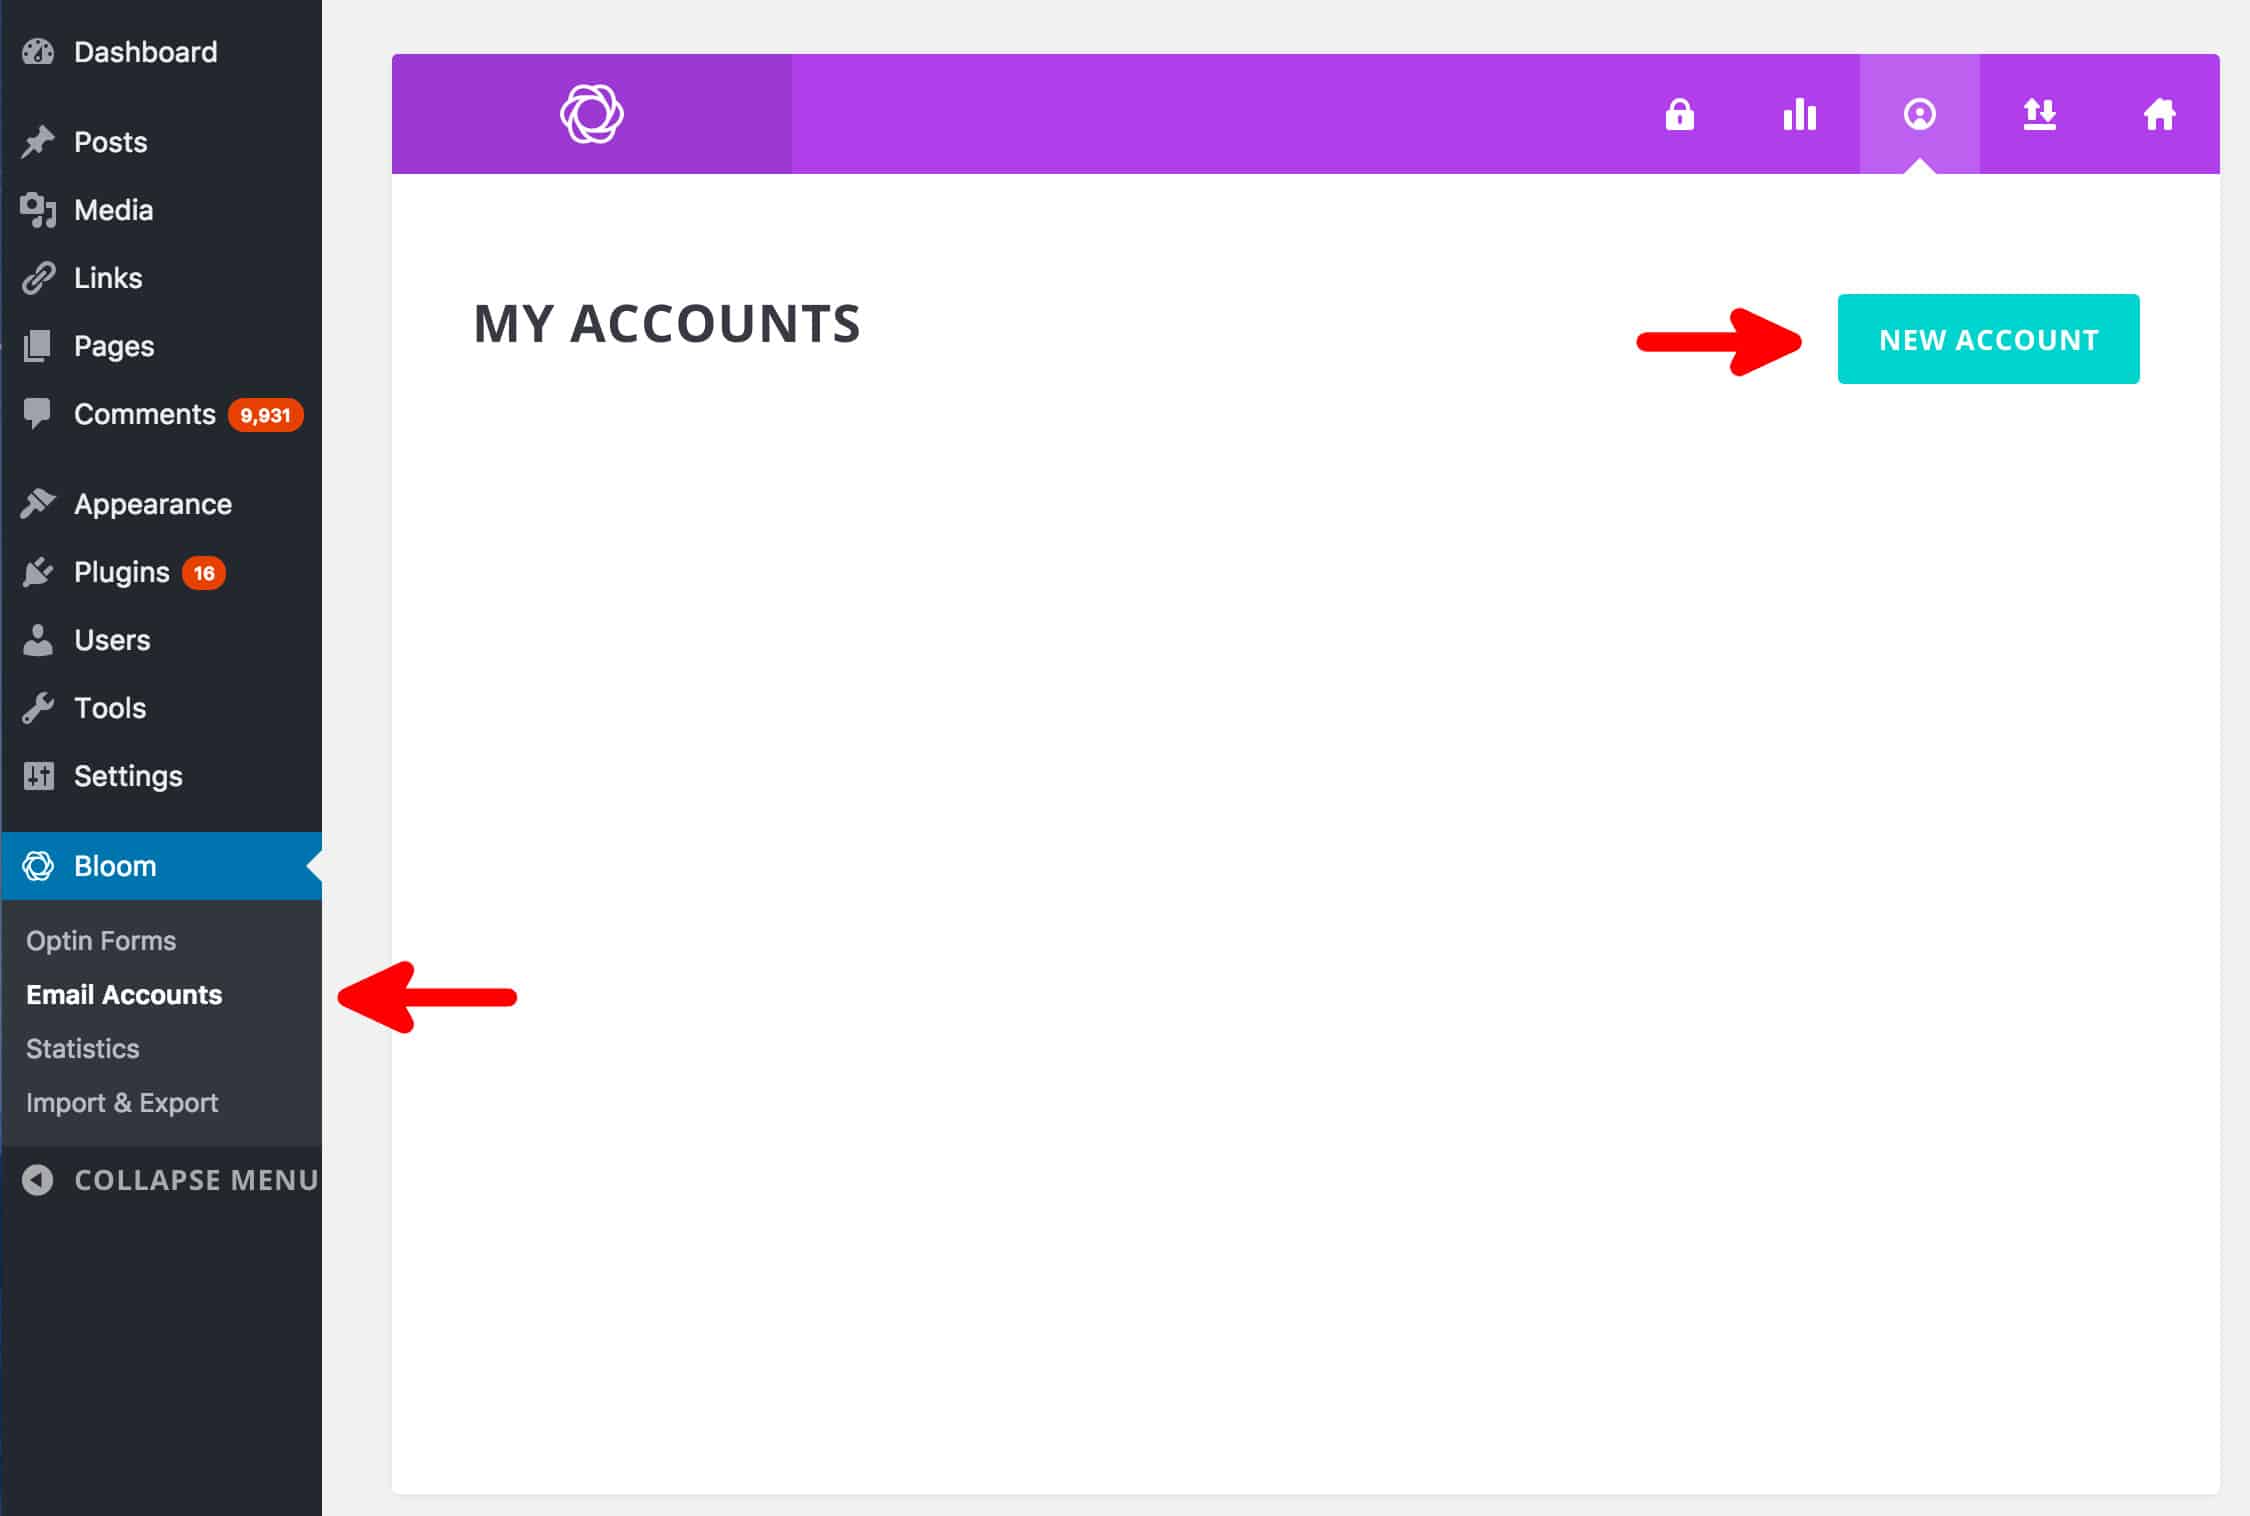
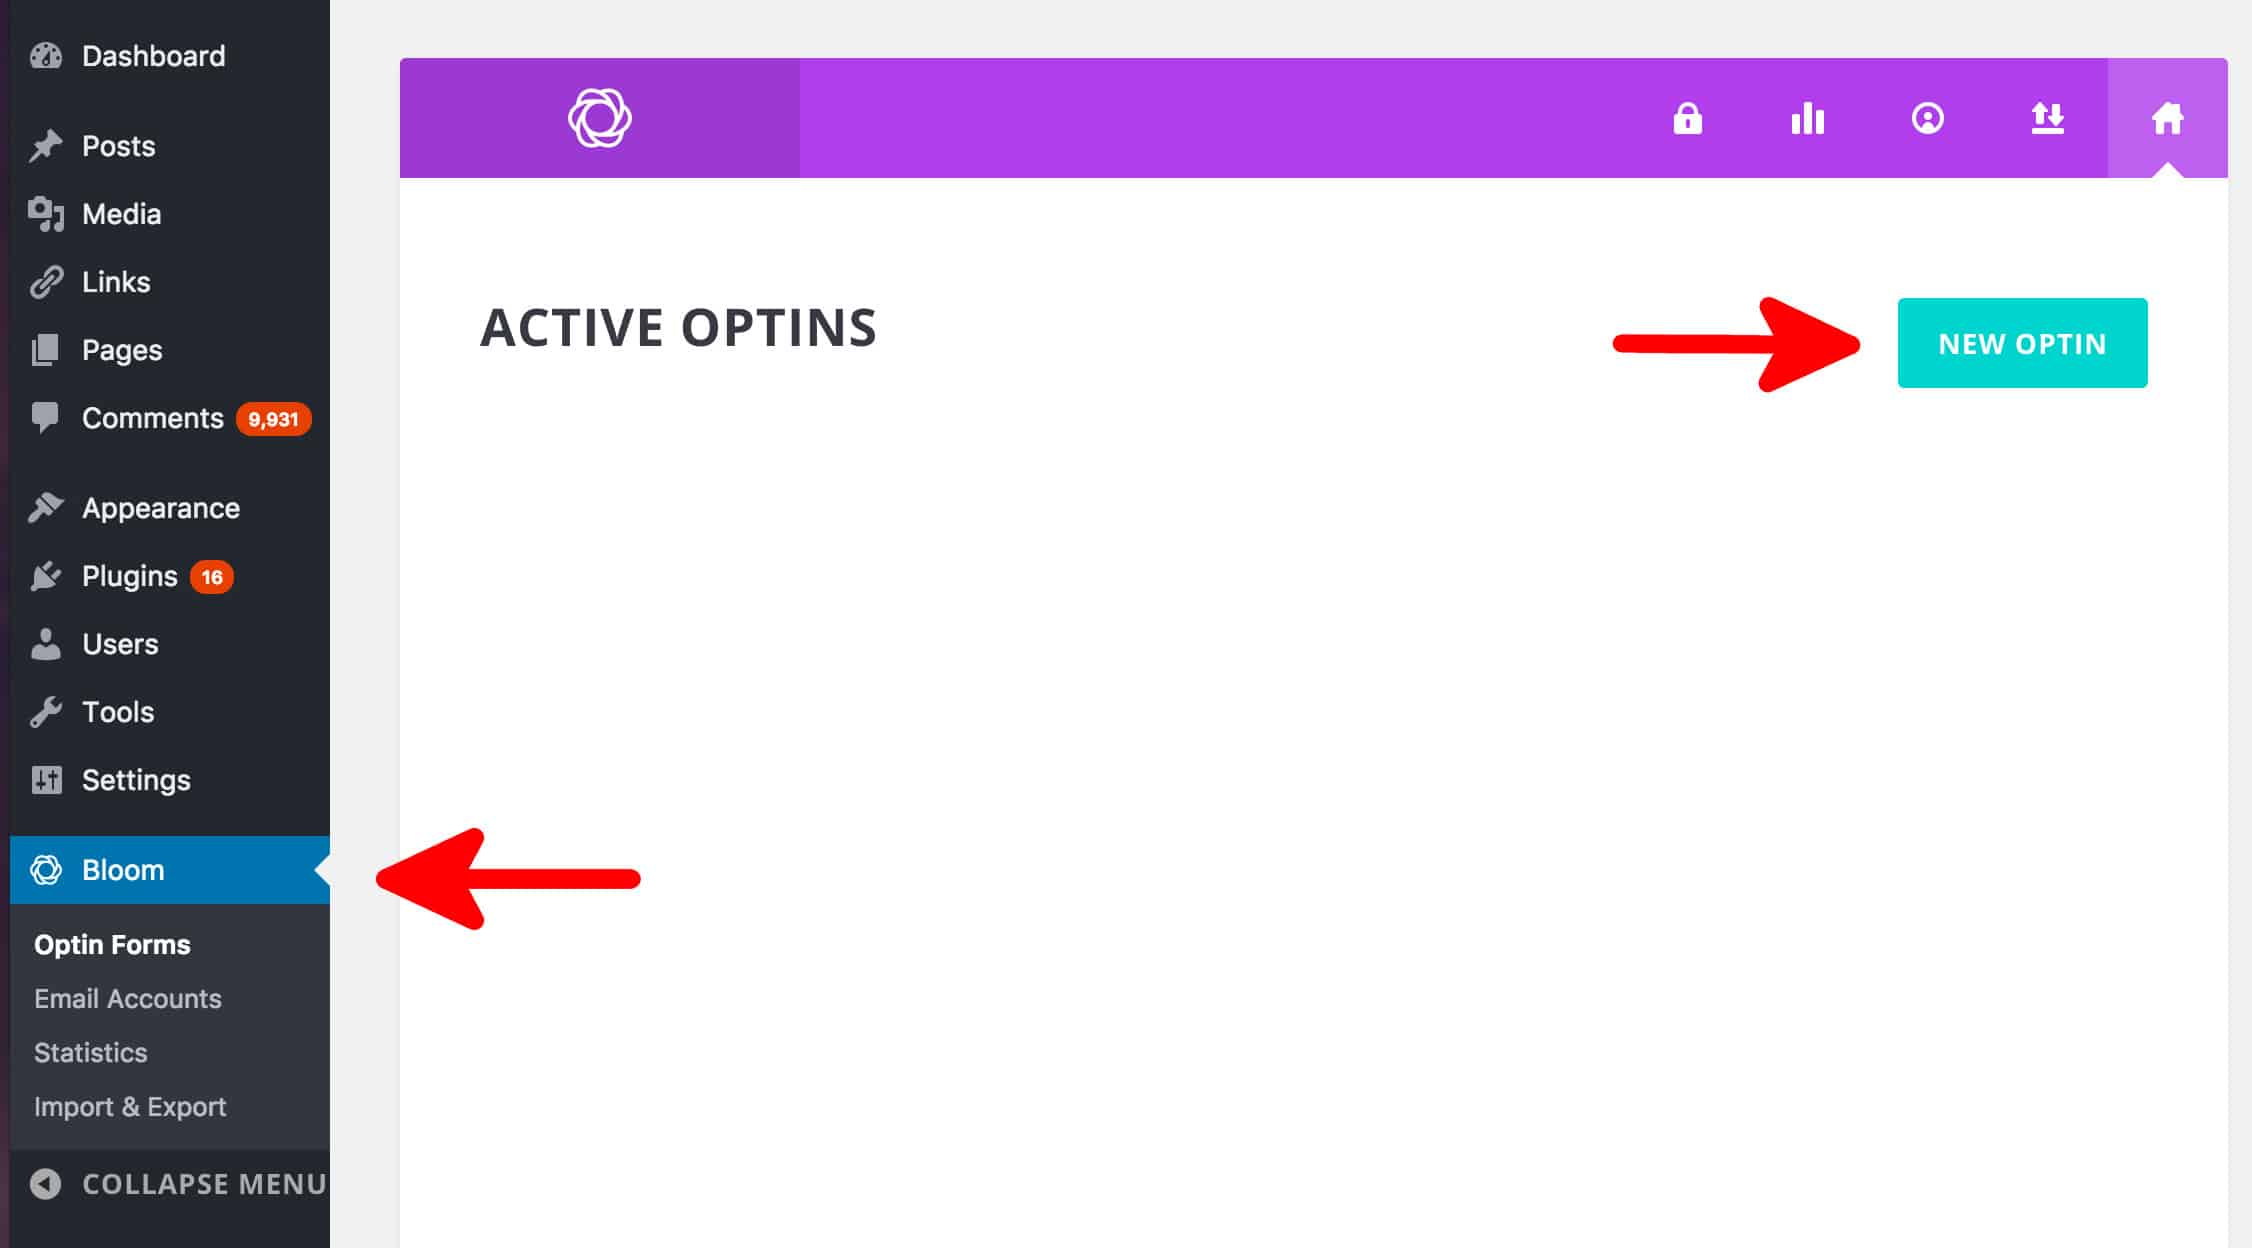
Once Bloom has been installed and activated, you will see a new Bloom menu item on the left-hand side of the screen. We will start by connecting Bloom to your email marketing software package. Click on Bloom > Email Accounts, then click on New Account.
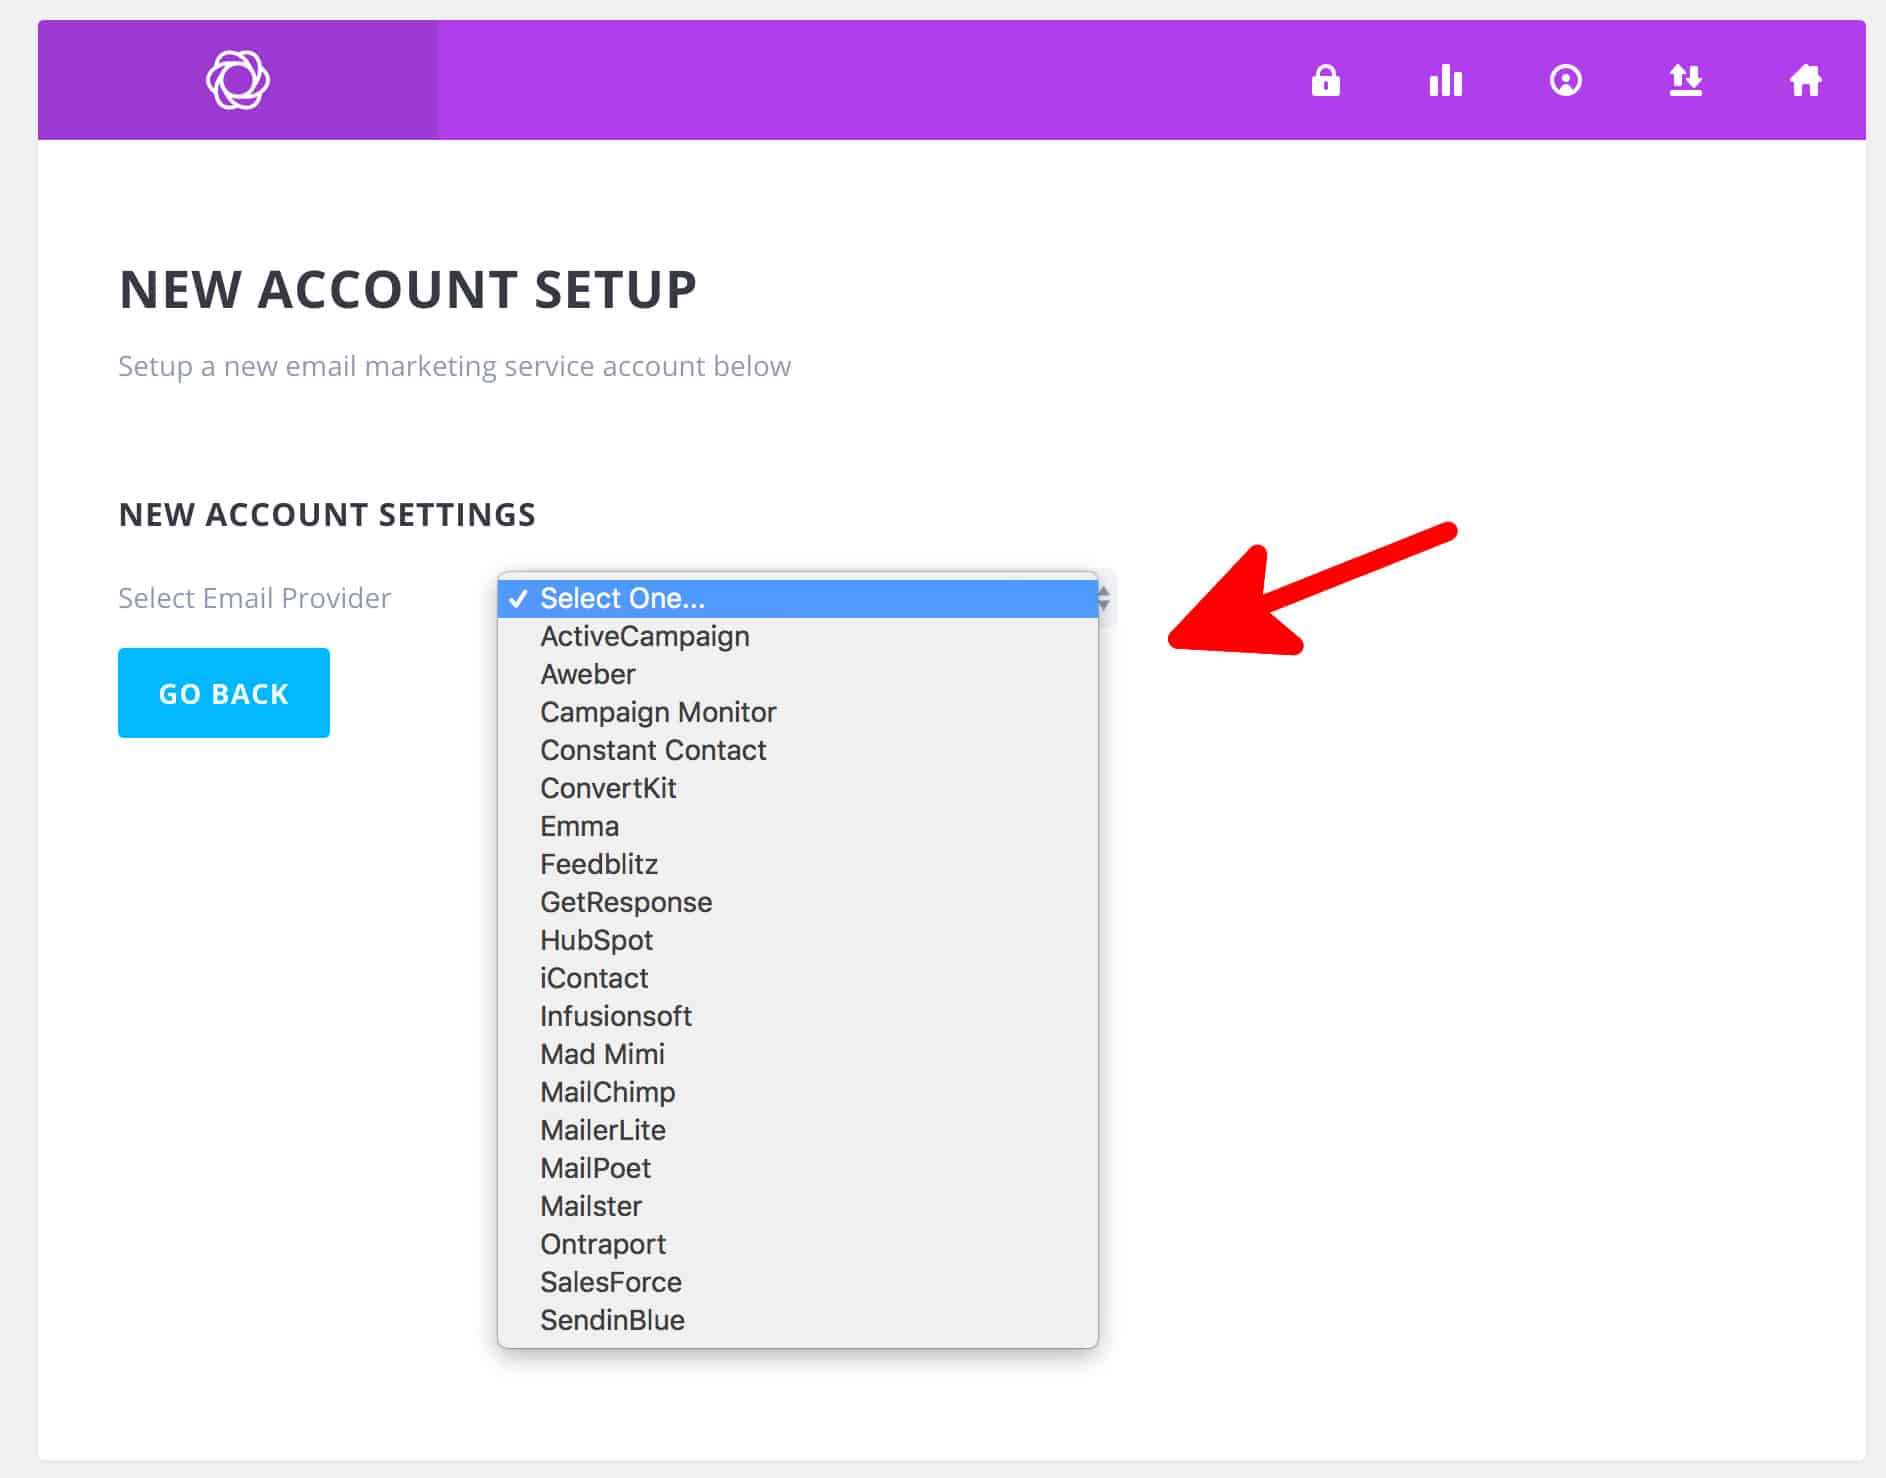
You will now see a page called New Account Setup. Click on the drop-down box and select your preferred email marketing software platform.
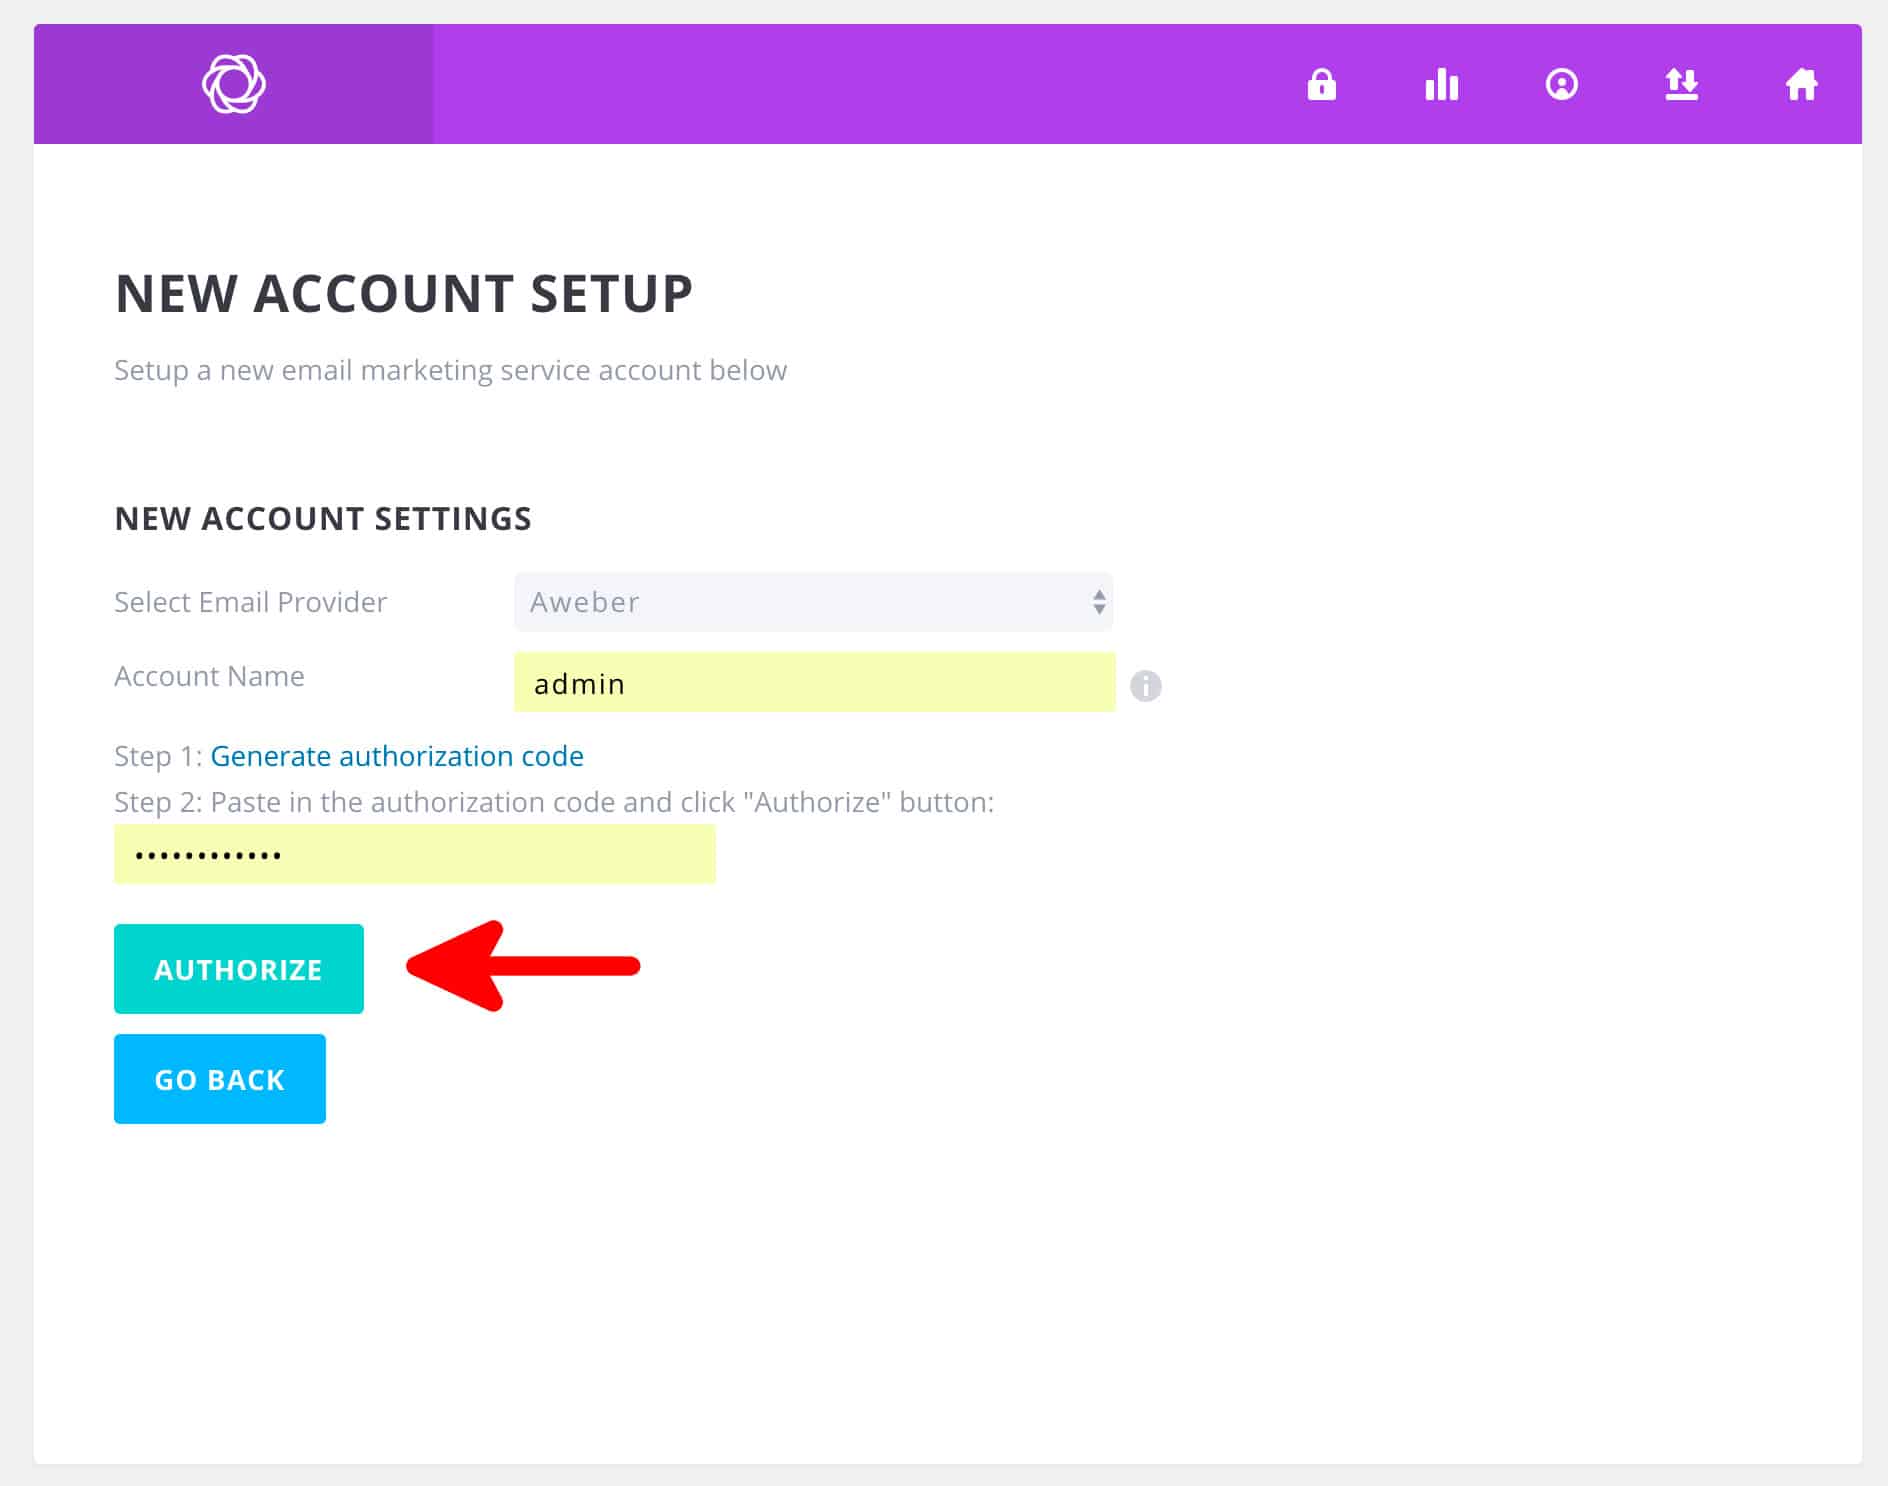
When you click on the name of your chosen software package, you will be asked for some details. Depending on the platform you are using, this may include your username or account name and an API key. Fill in the form and press the Authorize button.
Congratulations! The plugin can now communicate with your chosen email marketing platform to store the personal details of subscribers. That was simple, wasn’t it?
The next step involves creating a new “Optin”. Opt-in is the term Bloom uses to describe newsletter signup forms because users are “opting into” your newsletter. Click on Bloom > Optin Forms icon then click on new Optin.
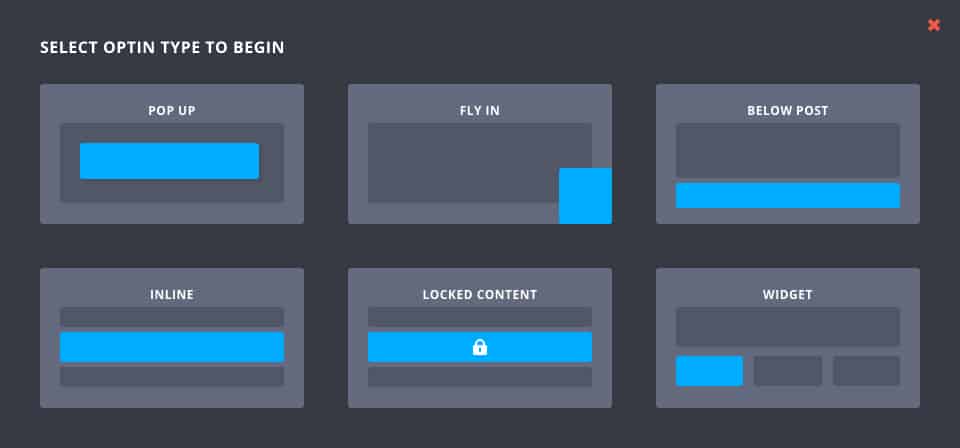
When you click on New Optin, you will see six options available. They are the six different ways that your newsletter signup form can be displayed. These are:
- Pop Up: This is a full page lightbox popup that contains the newsletter signup form. Bloom can trigger this popup so it appears after a certain amount of time or when a user performs a certain action.
- Fly-In: This opt-in is similar to the full page pop-up, but it creates a smaller form box that slides up from the bottom of the page. A variety of triggers can be assigned to this opt-in, which tells it when to launch.
- Below Post: This is a very useful type of opt-in that adds a form to the bottom of your posts and/or pages. The theory is that readers will be more likely to subscribe after they have enjoyed a page of your wonderful content!
- Inline: This option generates a shortcode that can be placed anywhere in your posts or pages. This shortcode inserts a small opt-in box. This option is handy for very long posts or pages.
- Locked Content: This option locks the content on a page until the reader has subscribed to your newsletter. If you have an extremely valuable piece of content, this option can bring in many new subscribers. Although we must say that this type of email ‘capturing’ isn’t recommended for SEO.
- Widget: This option generates a widget that appears in your WordPress dashboard. You can then drag and drop this widget into any area of your website that accepts widgets, for example – sidebar.
Once you have selected the opt-in you wish to use, you will be taken to the configuration section. For this demonstration, we will use the pop-up opt-in type.
In the first configuration section, you can name your opt-in and link it with the email marketing platform you are using. We will name the opt-in MyPopUp and send the data it collects to our Aweber account.
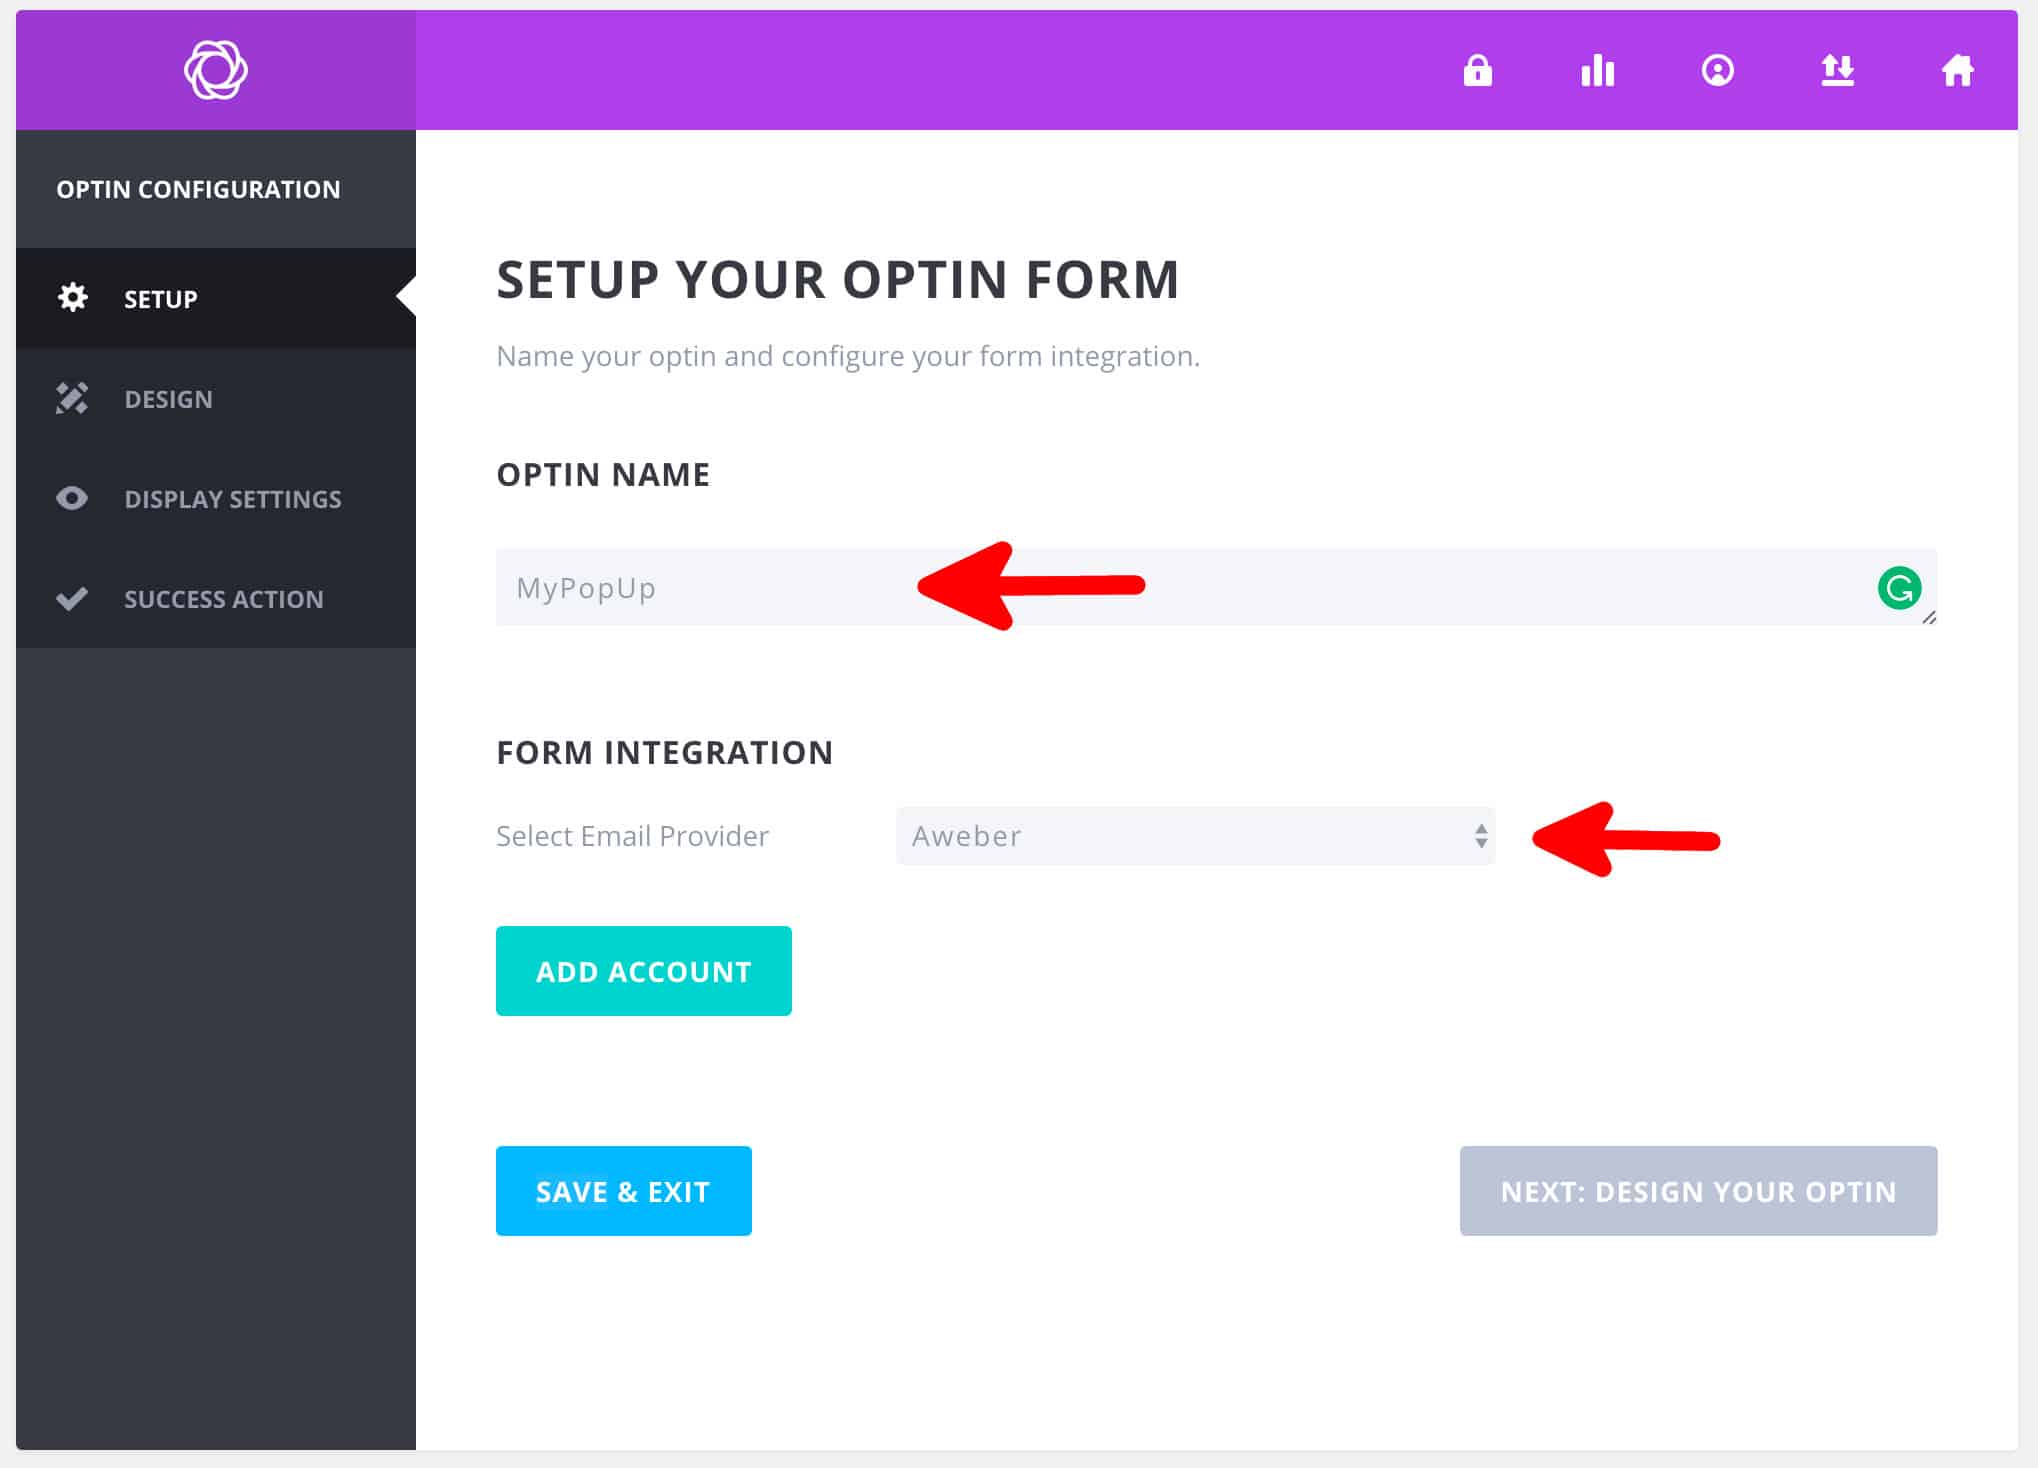
Click on the Next: Design Your Optin to move to the next configuration item.
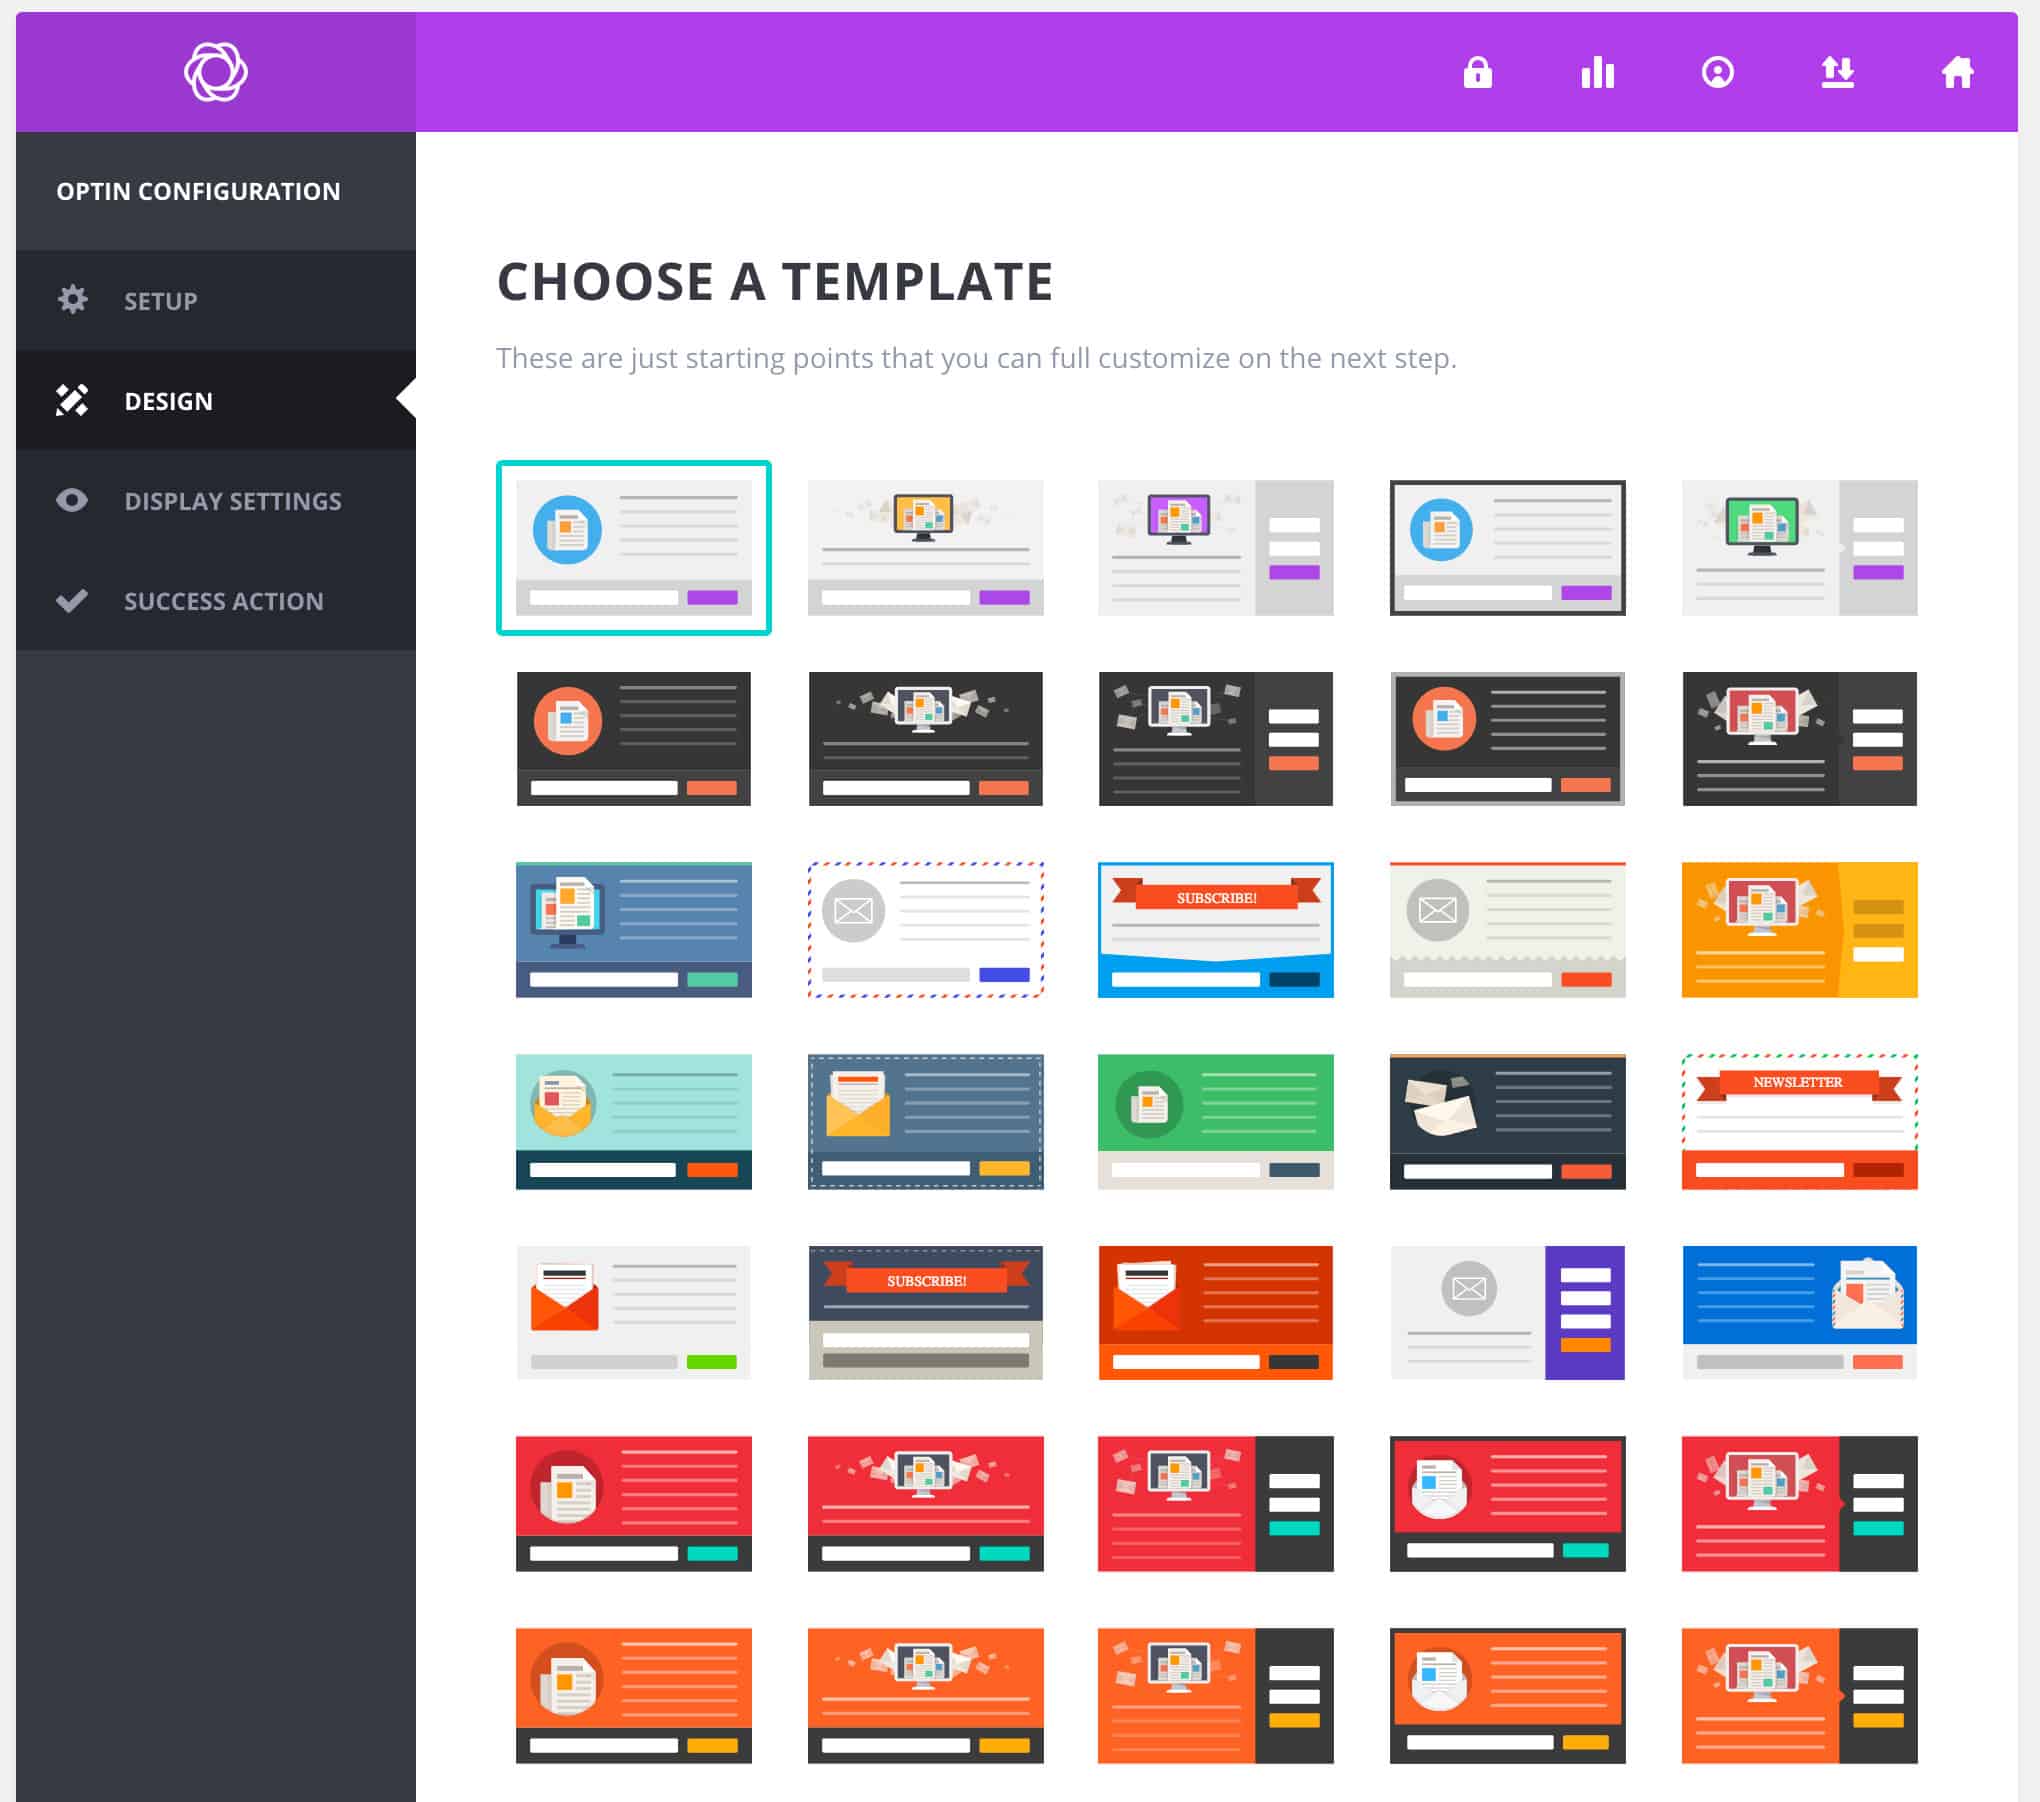
In this section, we can choose from dozens of pre-made templates. These templates are professionally designed and are ideal for attracting more subscribers. You can customise the template in the next configuration section. Select a theme and scroll down to click Next: Customise.
Bloom Design Settings
The next section is packed with design options for your opt-in. It includes:
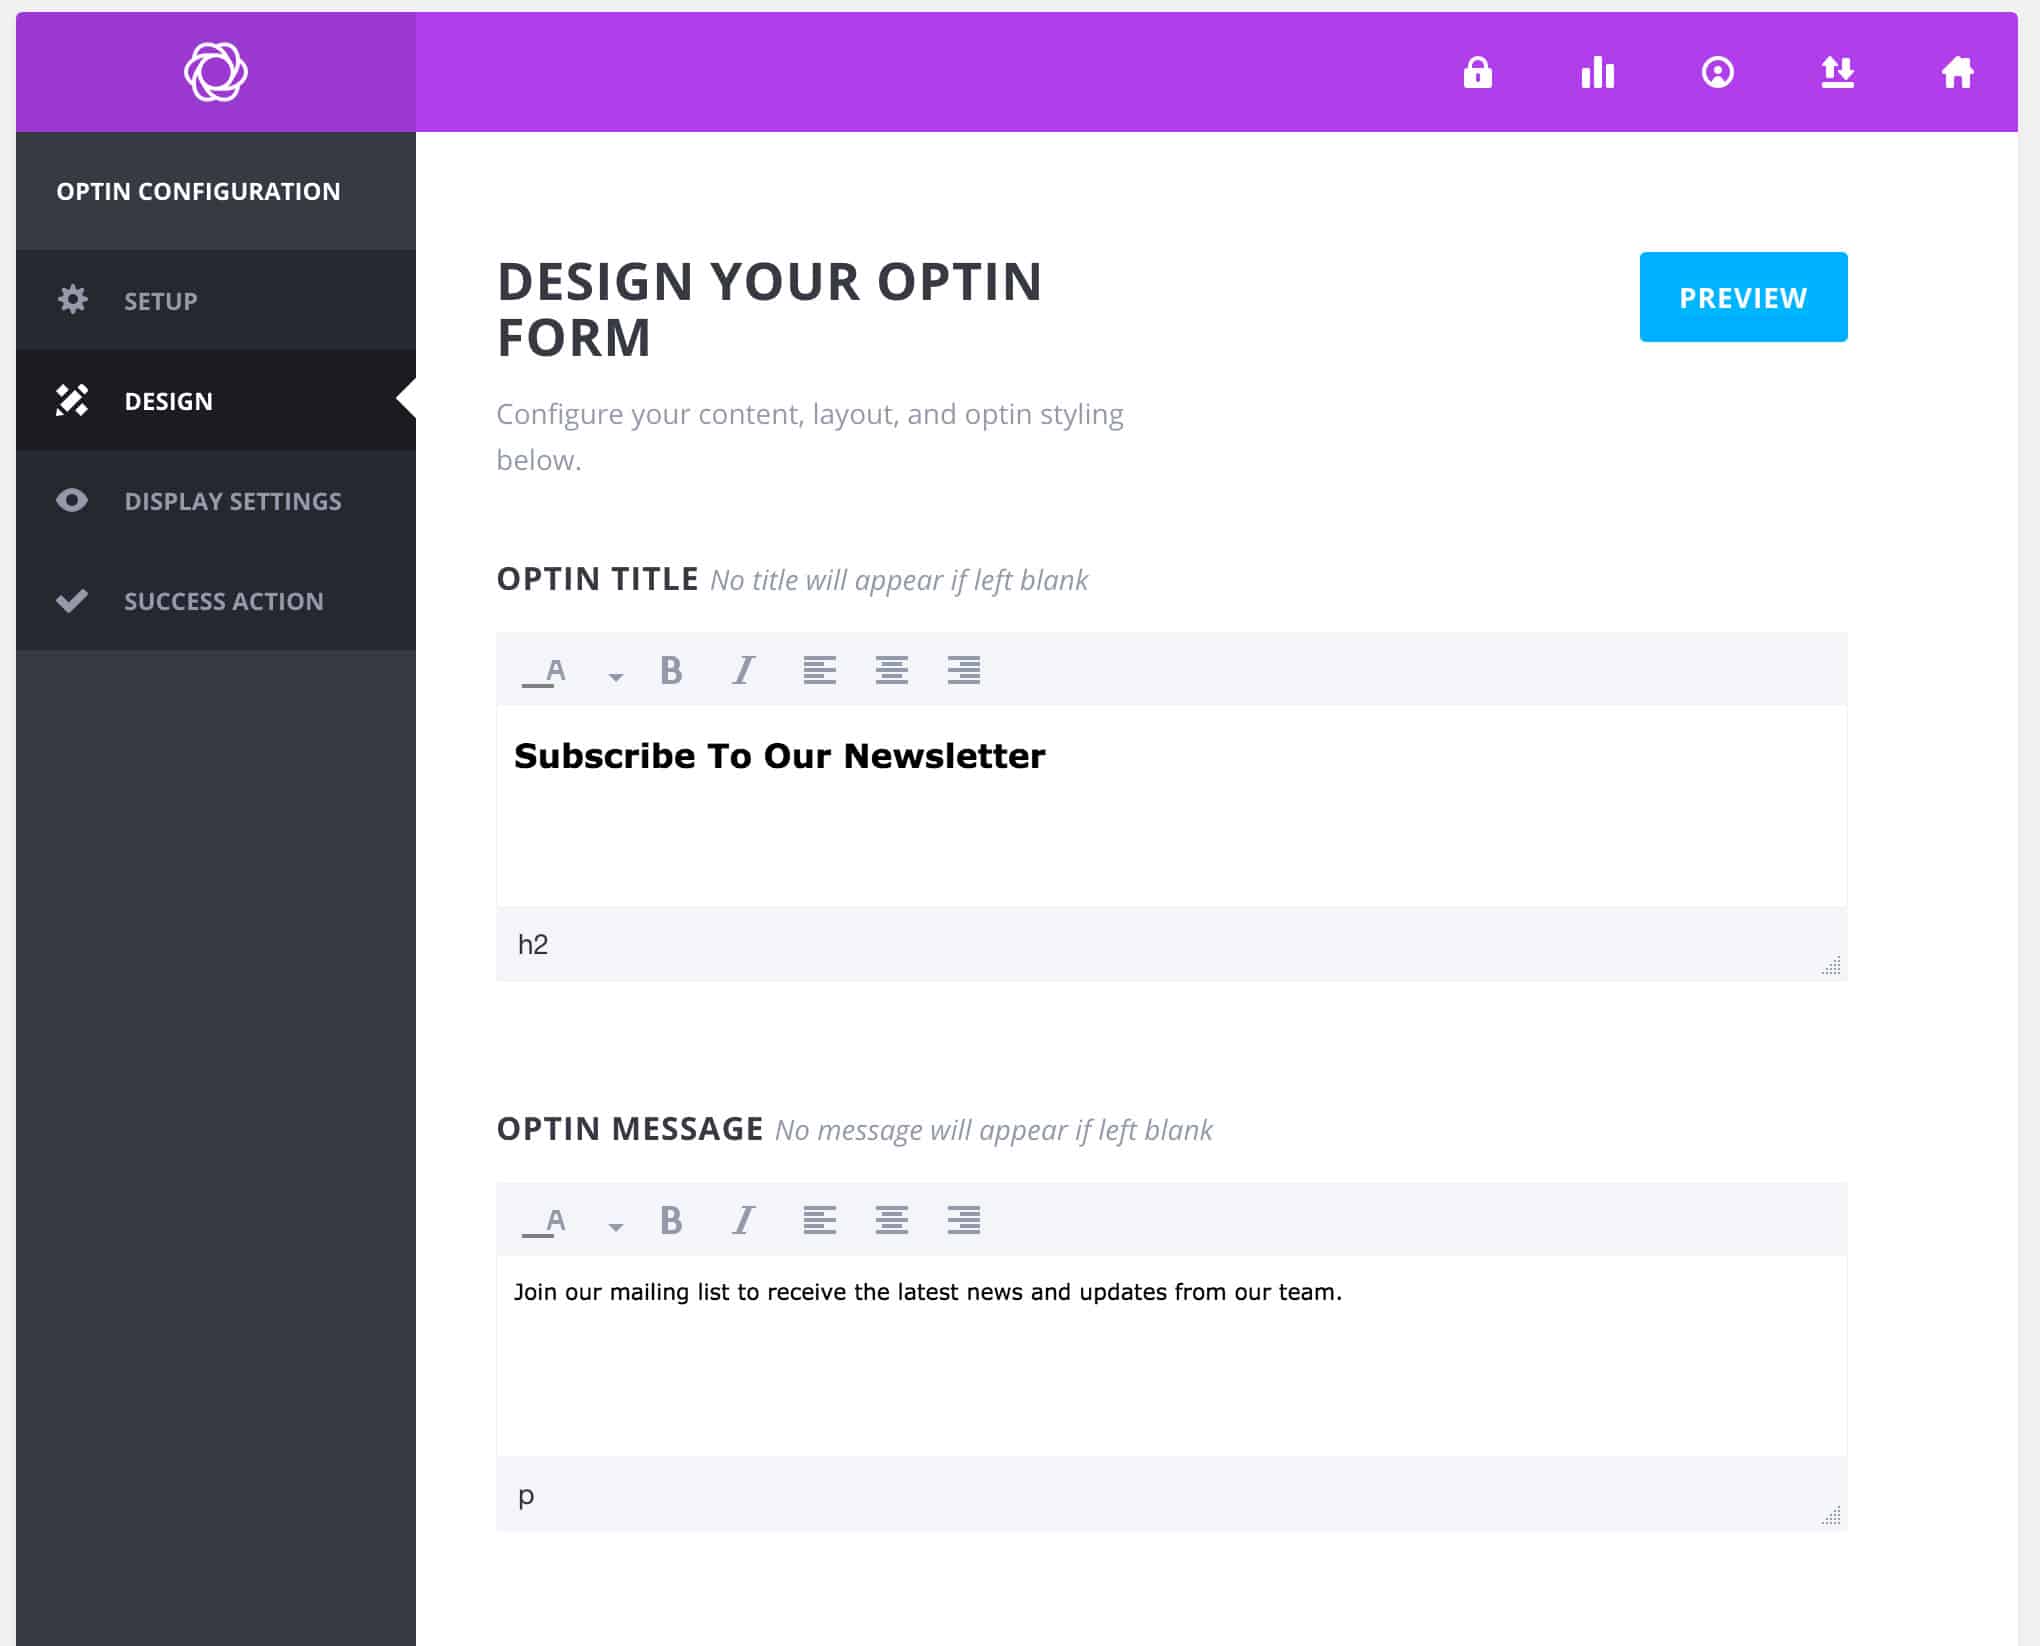
Design: Titles and text
You can customise all of the text on the opt-in, including the titles and message body. Describe the benefits of subscribing to your email list in a clear and succinct manner to get the most subscribers. You can also add a form footer text (listed at the bottom of this section).
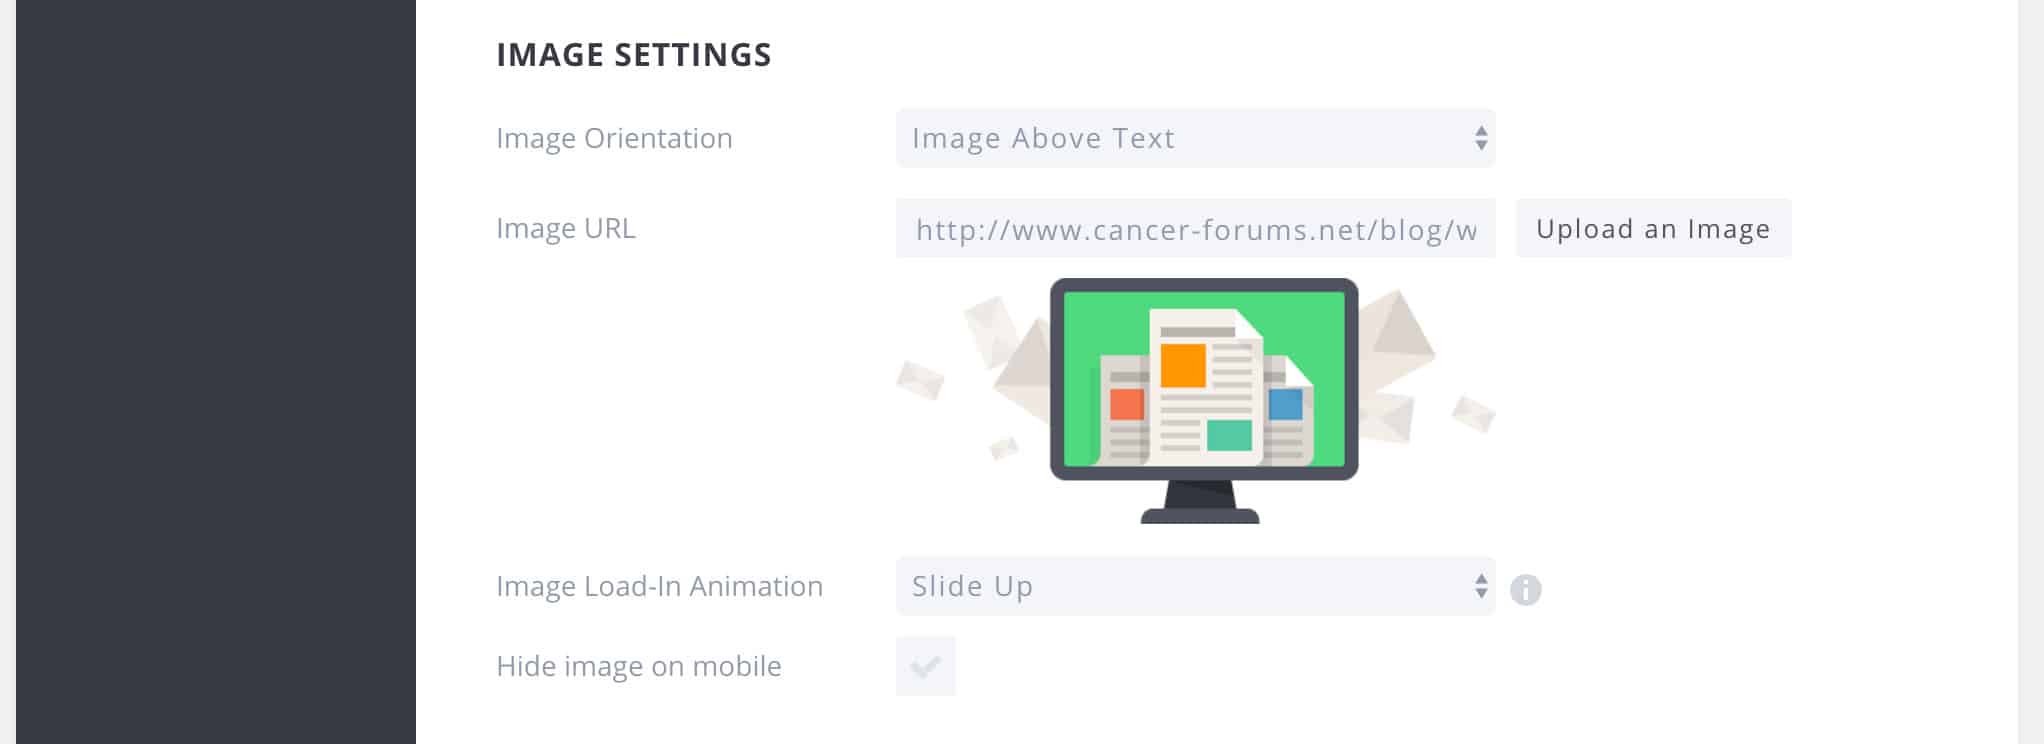
Design: Image settings
Here, you can change the image that the opt-in uses and change the opt-in’s animation. You might also choose to hide the image on mobile devices, as they have less screen space available.
Design: Opt-in Styling
Change the fonts, colours and border in this section.

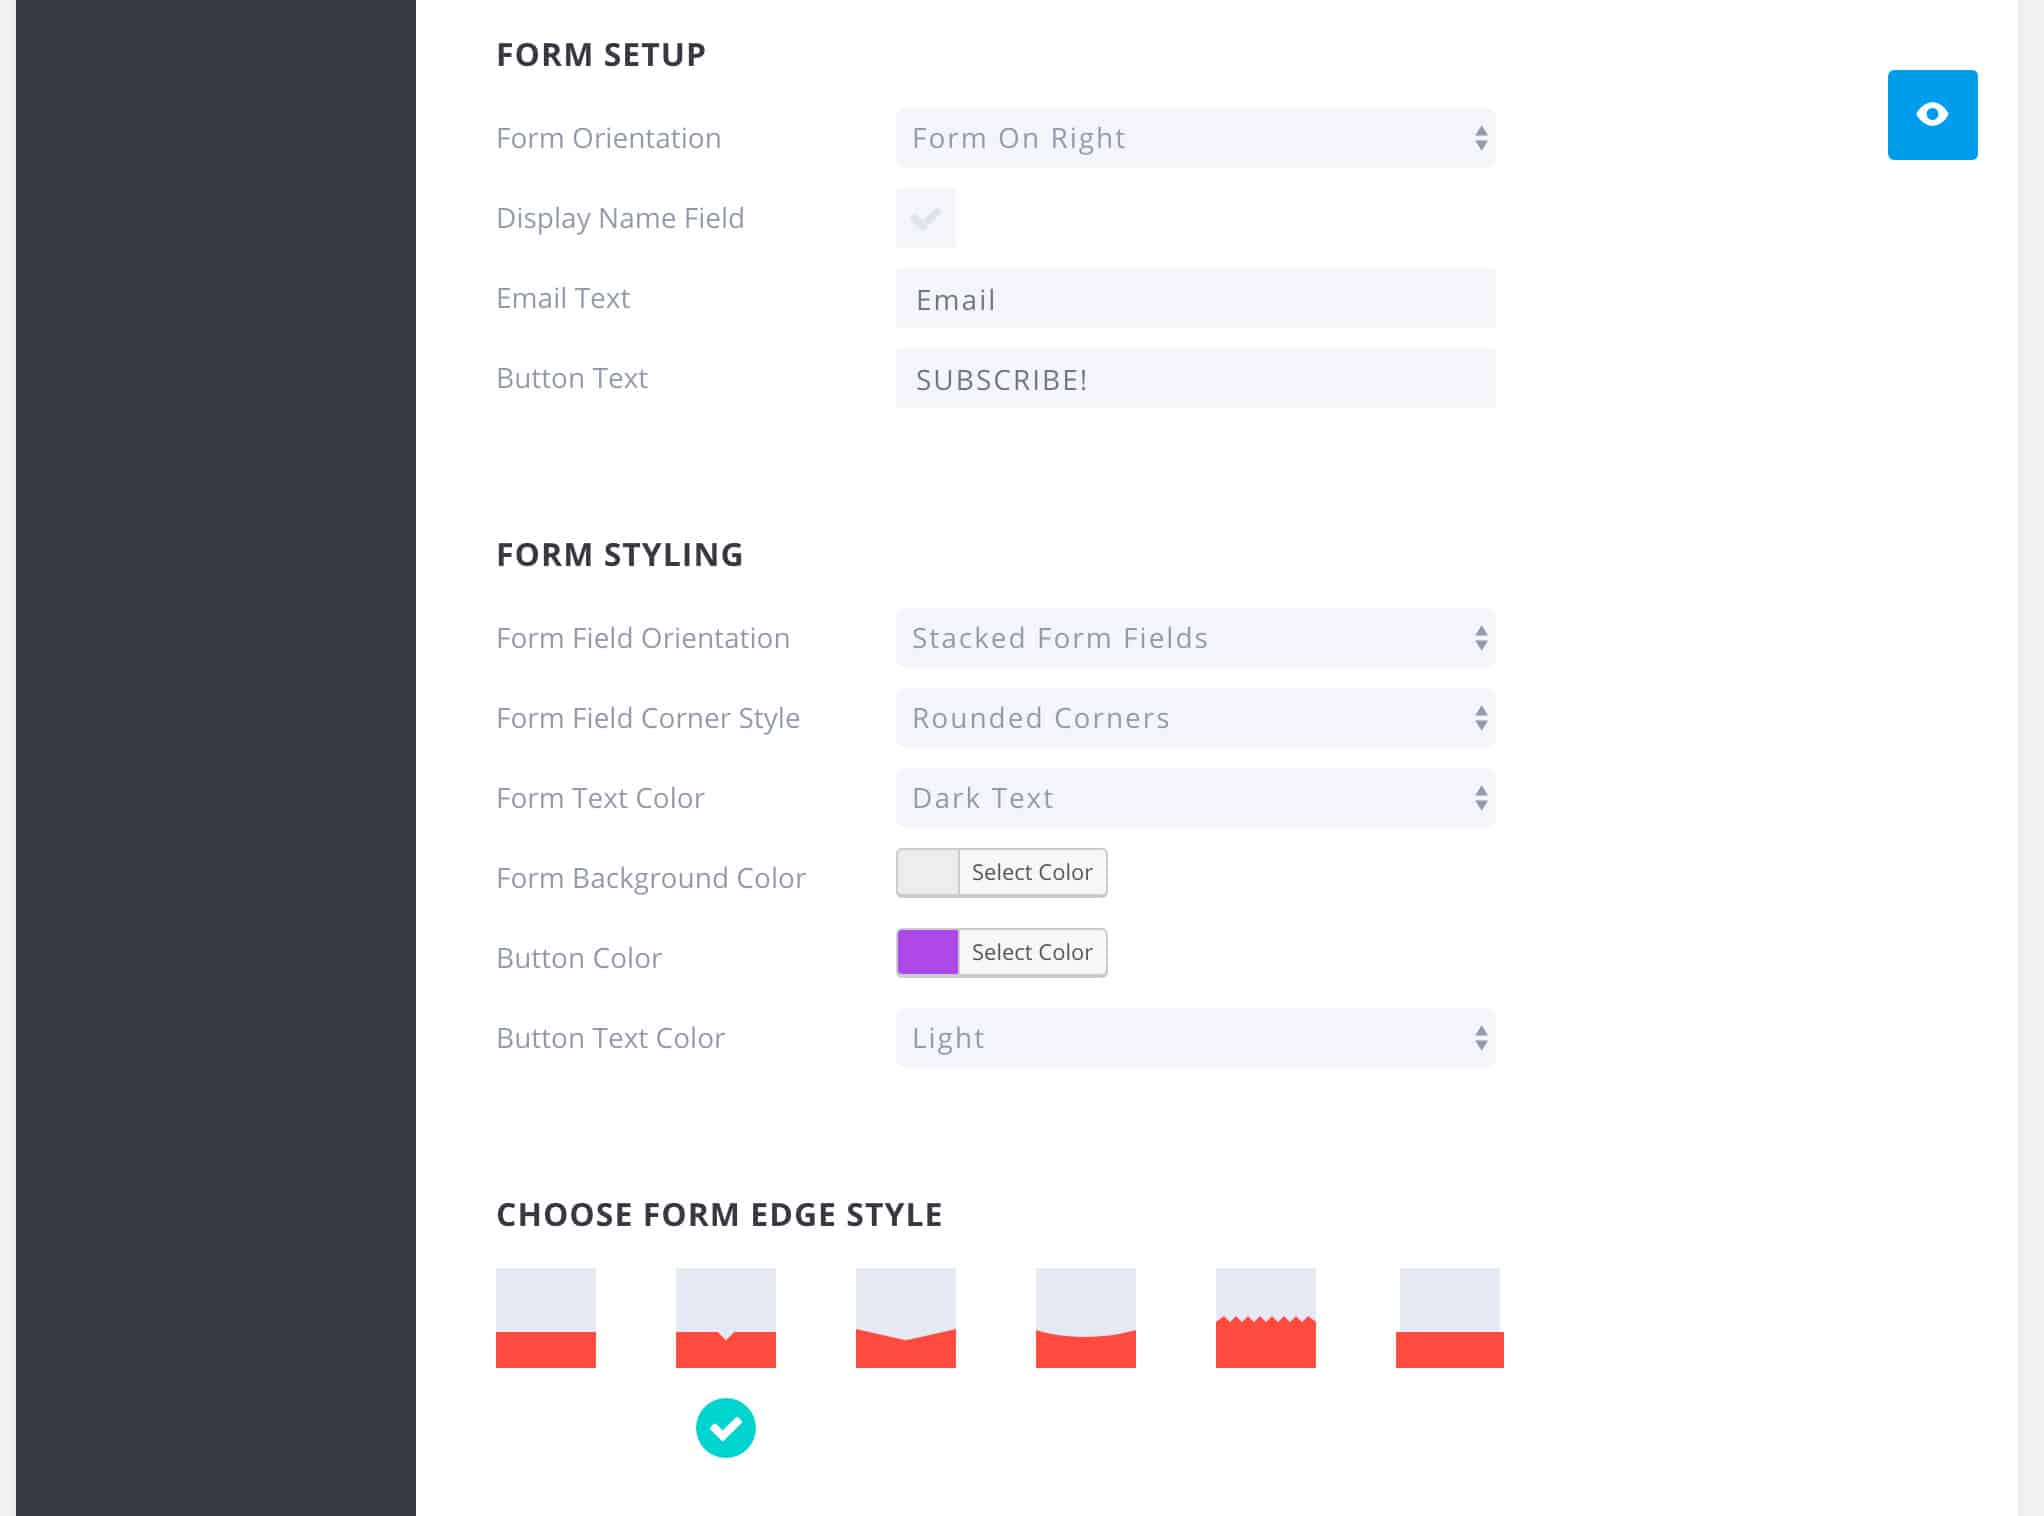
Design: Form setup and form styling
In this section, you can alter how the form looks inside of the opt-in box. Some of the changes that are available include form orientation, button text, background colour, form text colour, form edge style and form field orientation. You can preview your changes at any time by clicking the blue eye icon on the right-hand side of the screen. Have a play with all of the features and test how they look!
Design: Custom CSS and success message
You can alter the message that users receive after they have subscribed in this section. There is also a section for custom CSS, which allows you to insert special code that alters the design of the opt-in. Leave that one for your web designer!
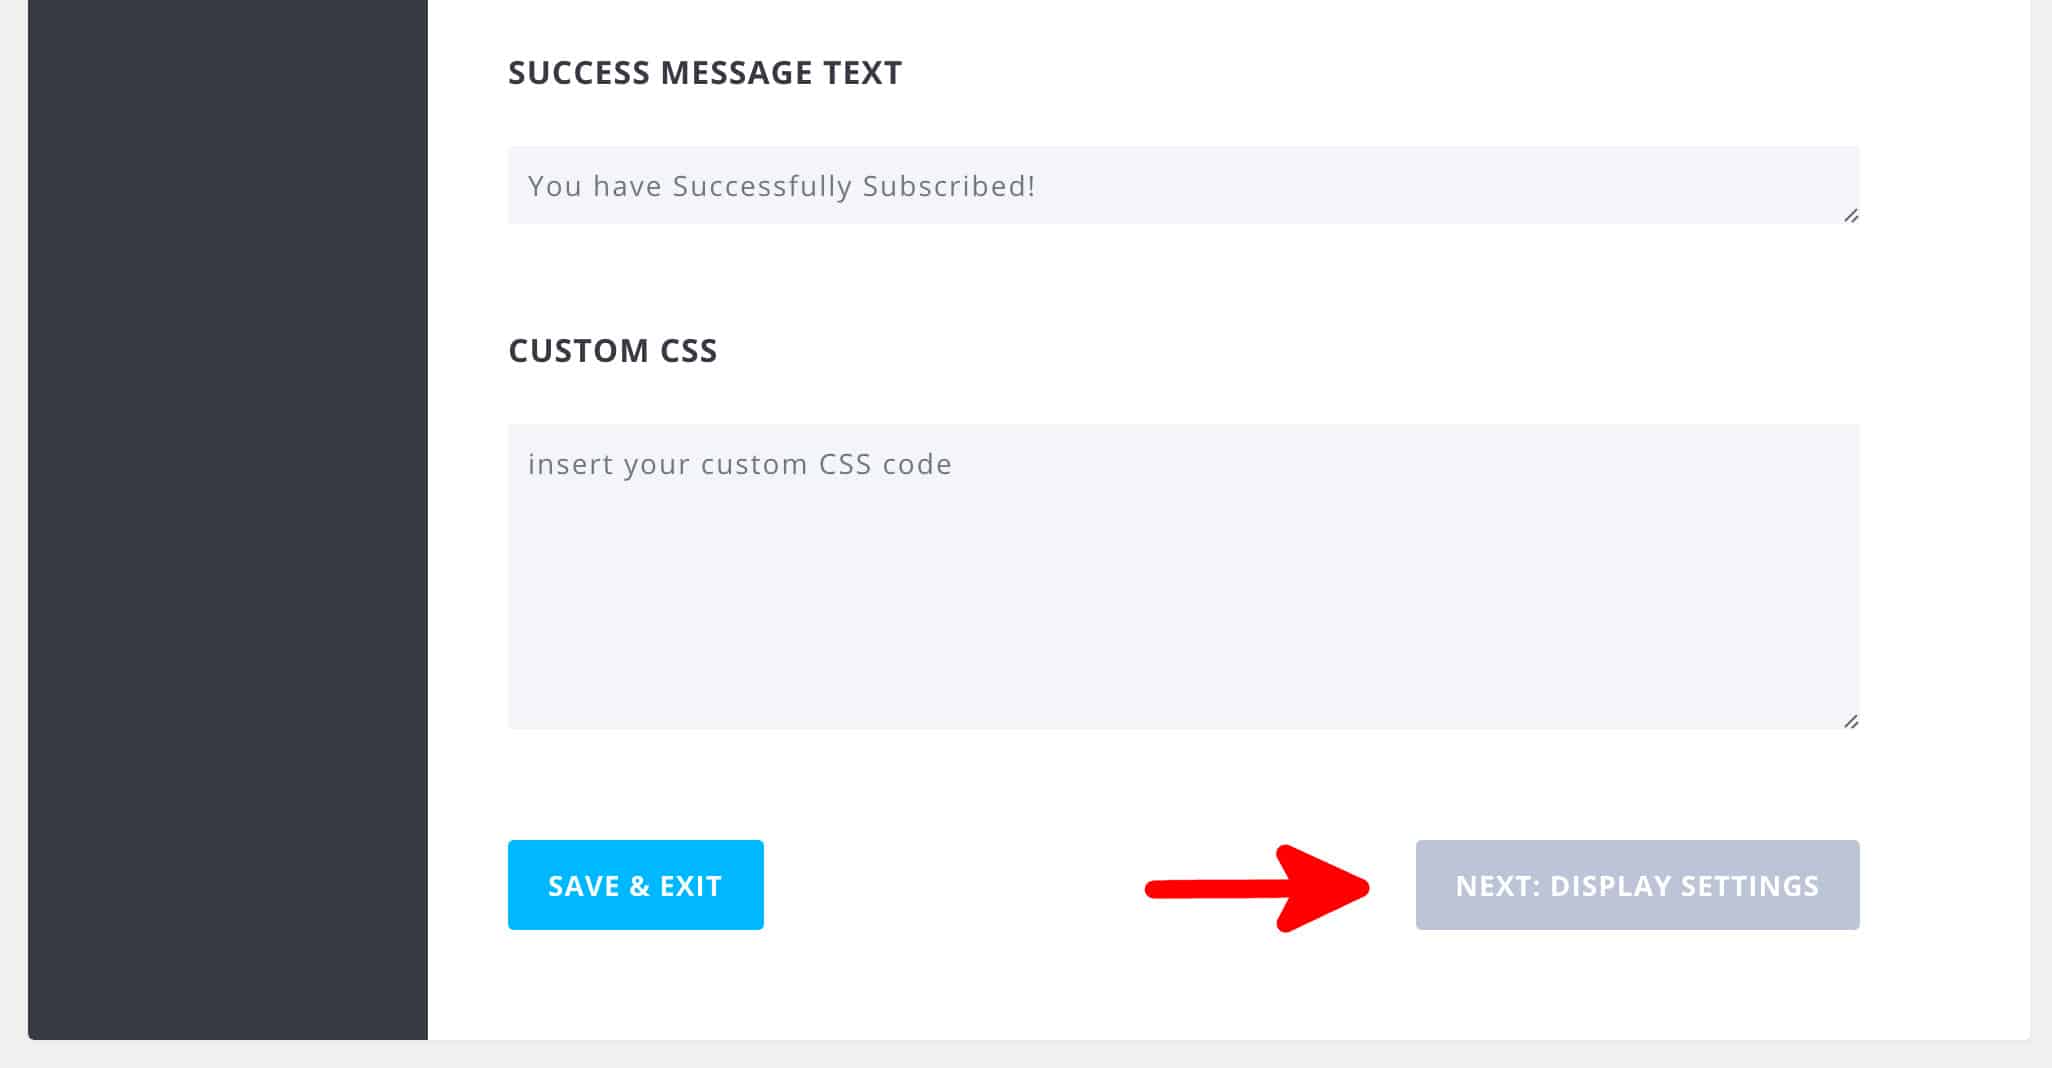
Take another look at your opt-in to make sure you are happy with its appearance, then click Next: Display Settings.
Bloom Display Settings
The Display Settings define where and when the opt-in appears on your website. By carefully tweaking these settings, you can greatly improve the sign-up rate for your newsletter.
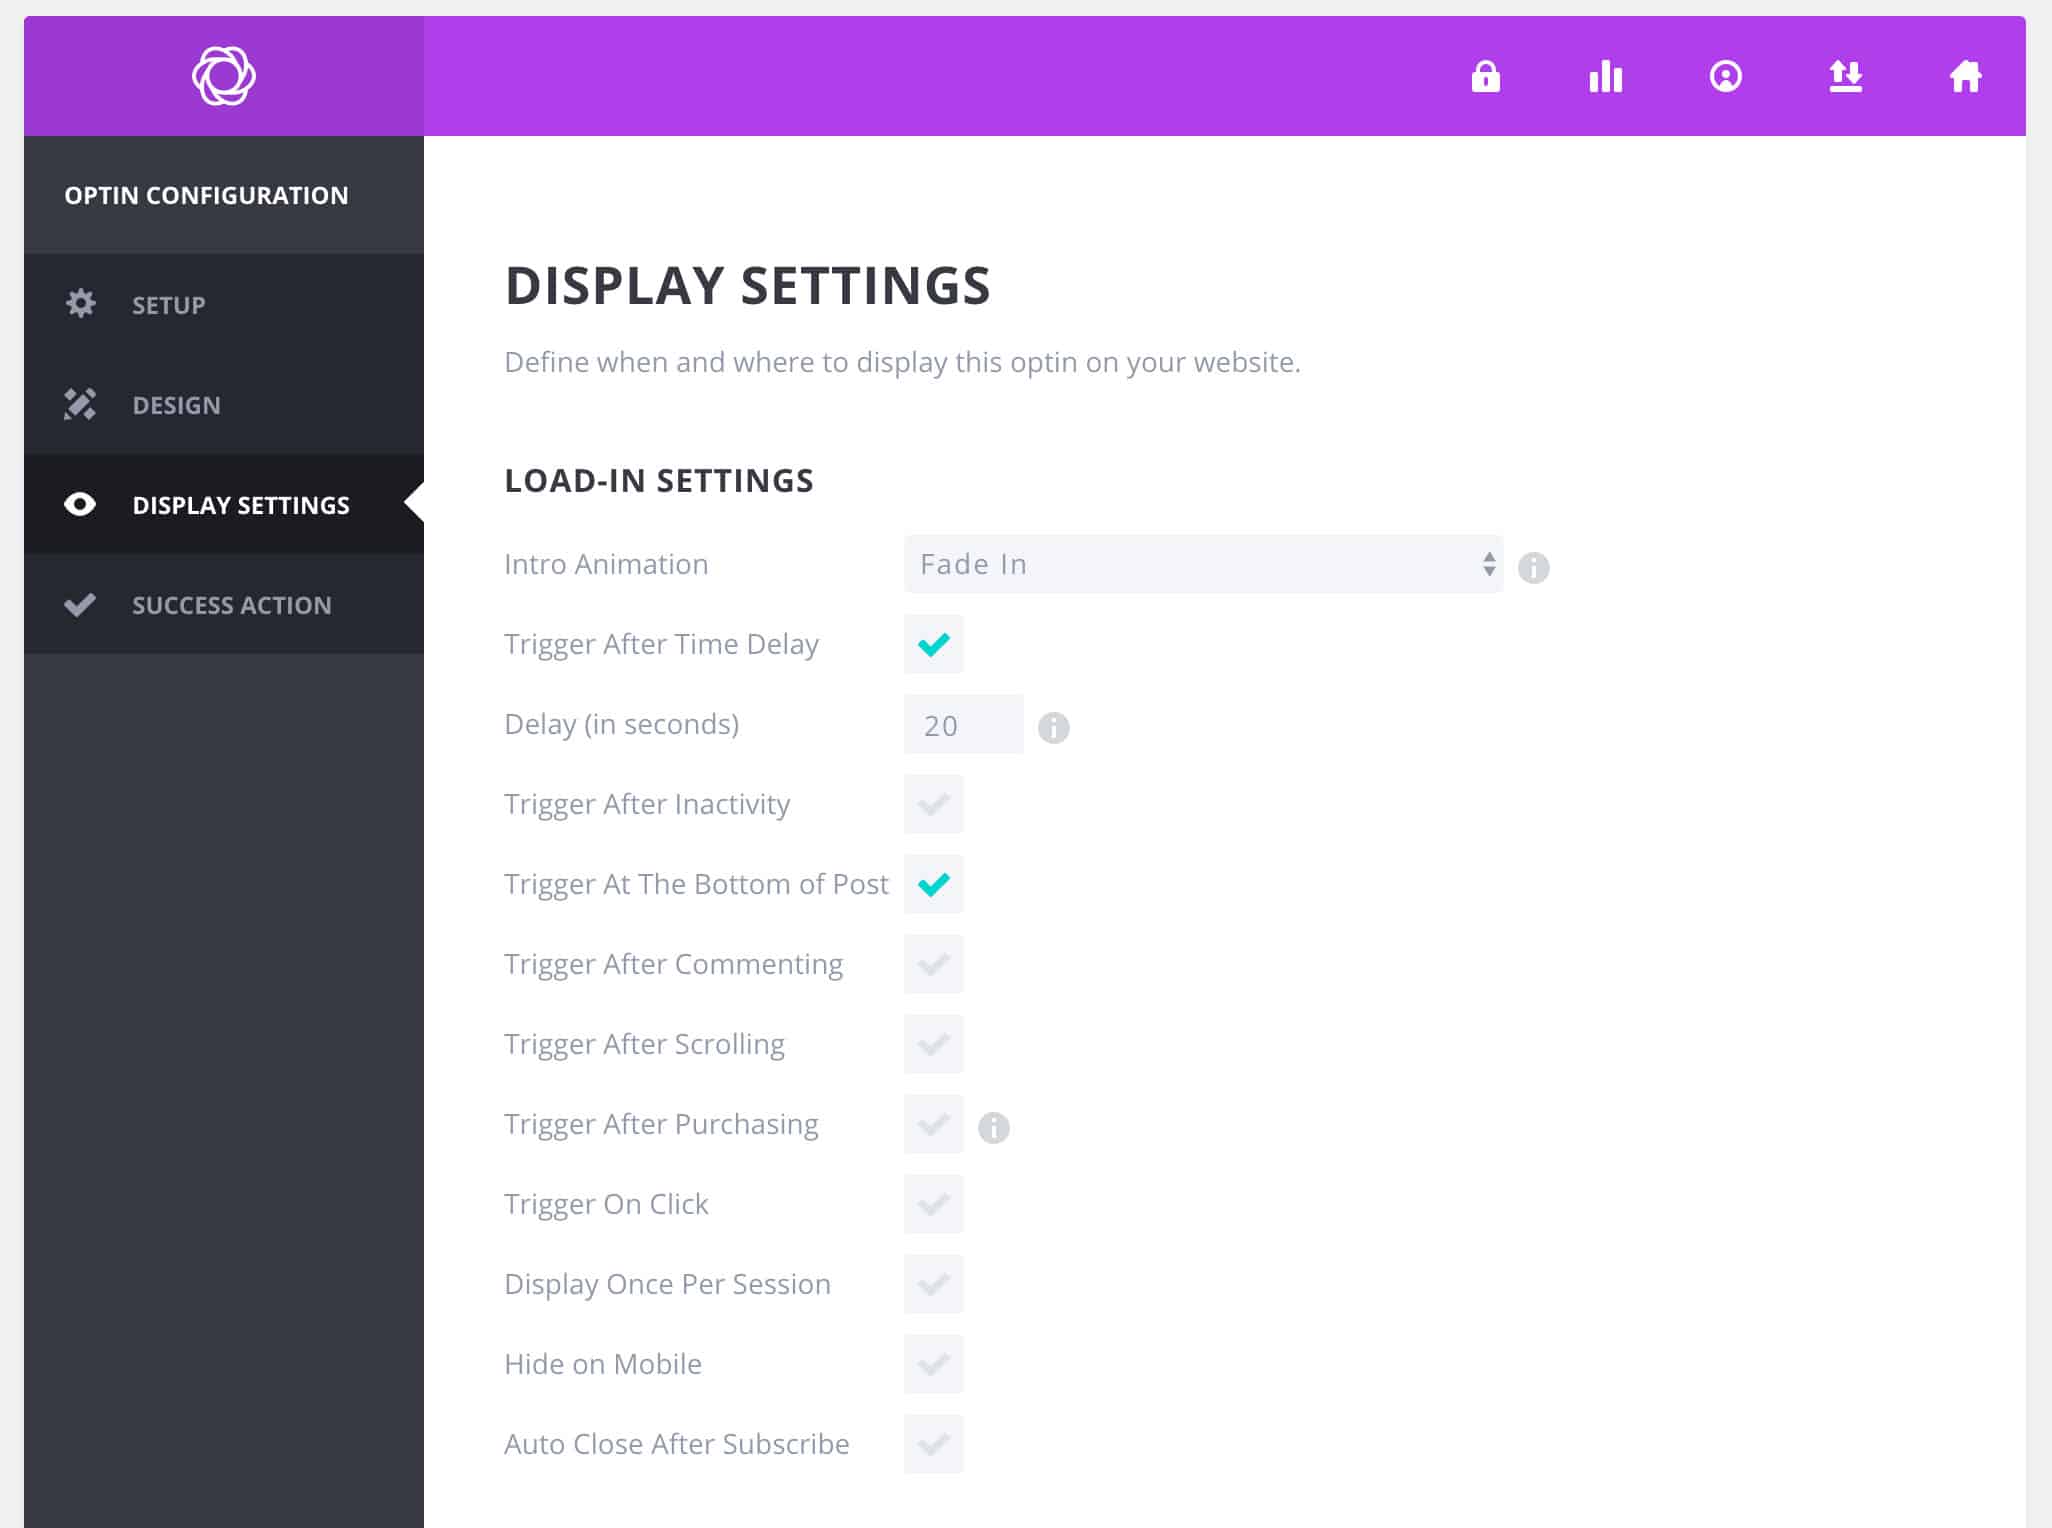
This section allows you to change when the form first appears on a page. Some of the options include:
- Intro animation: The animation that plays when the opt-in appears
- Trigger after time delay: You can have the opt-in trigger after the user has browsed the page for a specific time. This can be a great option if you want your user to check out your great content before offering them an opportunity to subscribe.
- Trigger after inactivity: This option triggers the opt-in after a period of inactivity.
- Trigger at bottom of post: This ensures that only users who have read an entire page are asked to subscribe. This is a less intrusive option that can work well.
- Trigger after commenting: If a user comments on a post, you can be fairly certain they are engaged with your content and may be interested in signing up to your newsletter.
- Trigger after scrolling: This option allows you to trigger an opt-in form after user scrolls down the page
- Trigger after purchasing: Display an opt-in form on a Thank You page once user buys something on your site
- Trigger on click: Displays an opt-in form once someone clicks on a Call-To-Action (e.g. button)
- Display once per session: Using this option ensures you are not ‘spamming’ the opt-in at your readers too much while they browse around your website.
Display Settings: Display On
The Display On configuration section lets you specify which pages the opt-in appears on. It allows you to have a very nuanced approach for an opt-in placement.
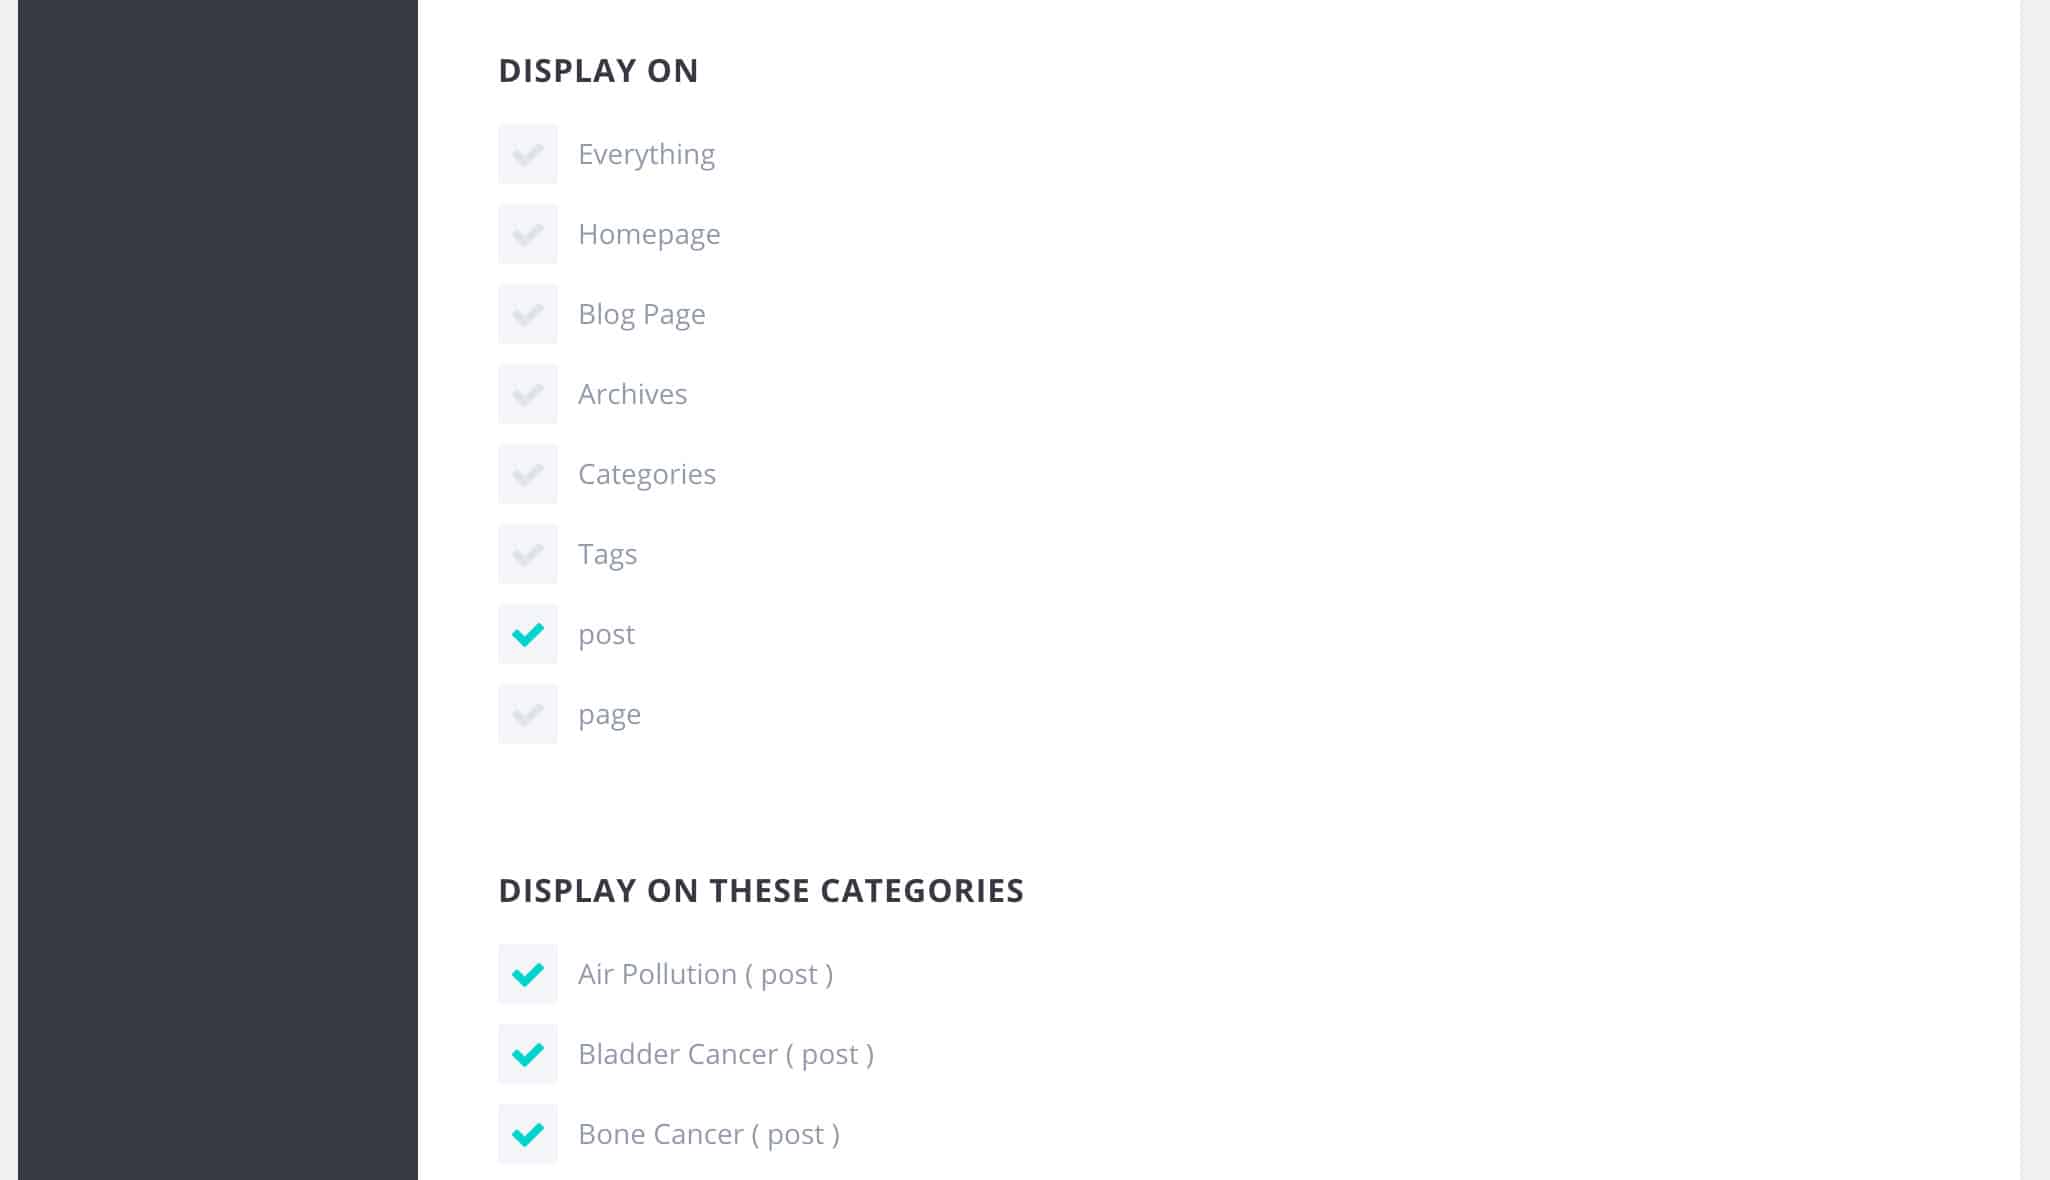
The options include:
- Display on page type: You can choose to only display the opt-in on certain types of pages. For example, you might prefer to only have this opt-in on the front page or blog posts.
- Display on categories: The opt-in can also be limited to certain blog post categories
- Display on these pages: You can specify the pages where it is displayed
- Display on these posts: The same option, but for blog posts
Once you have finished setting the Display On options, click on Next: Success Action.
Success Action
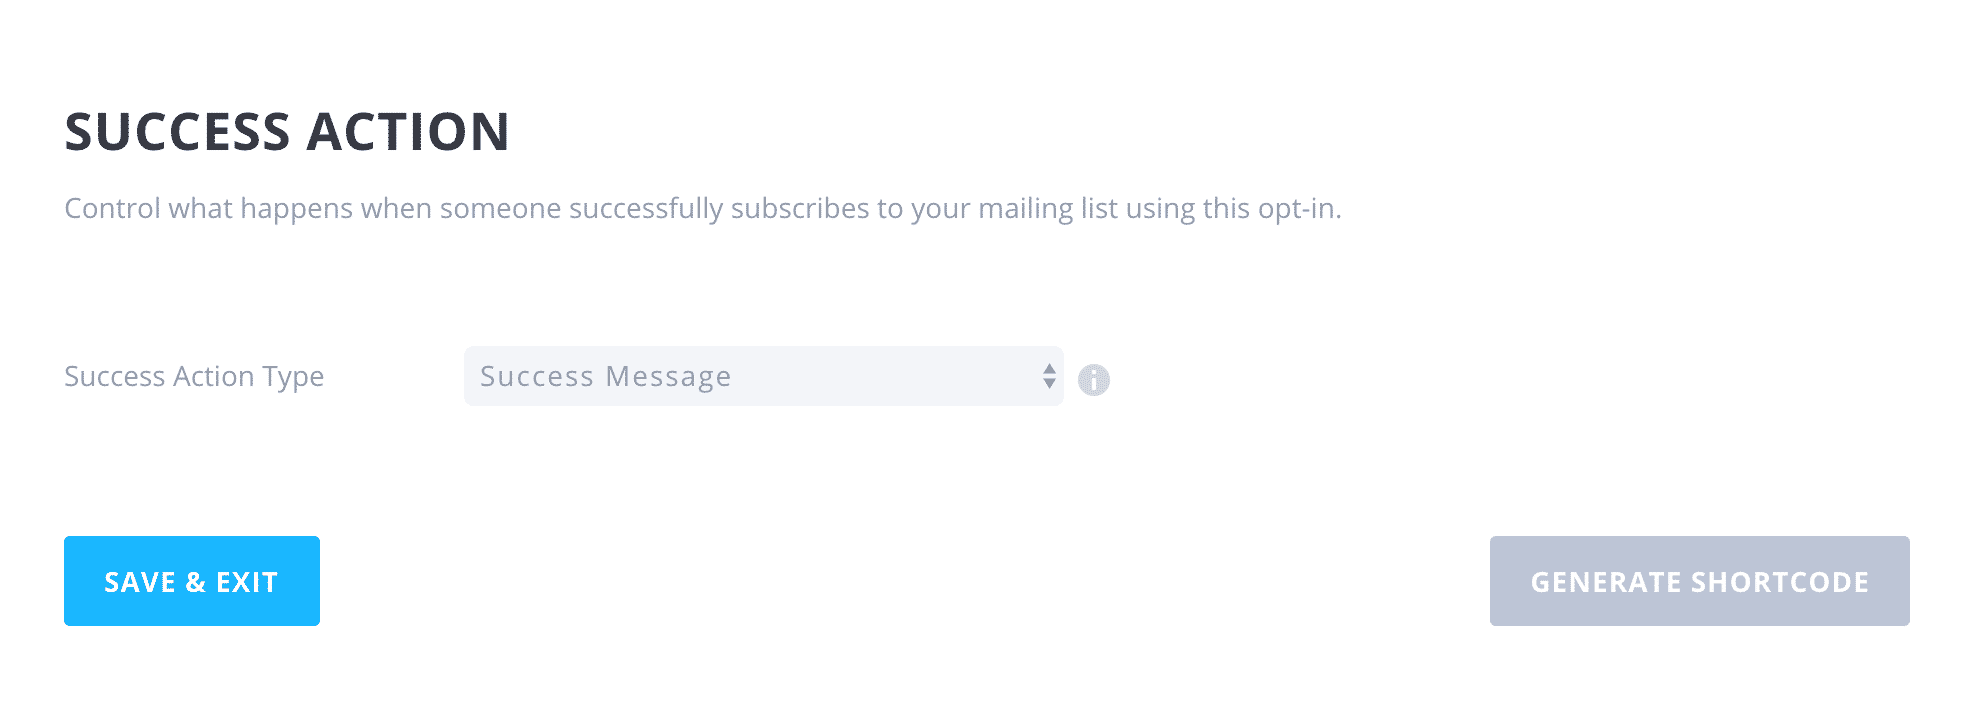
The Success Action section allows you to change what happens to a user after they have subscribed to the newsletter. They can either be redirected to a new page or shown a message.
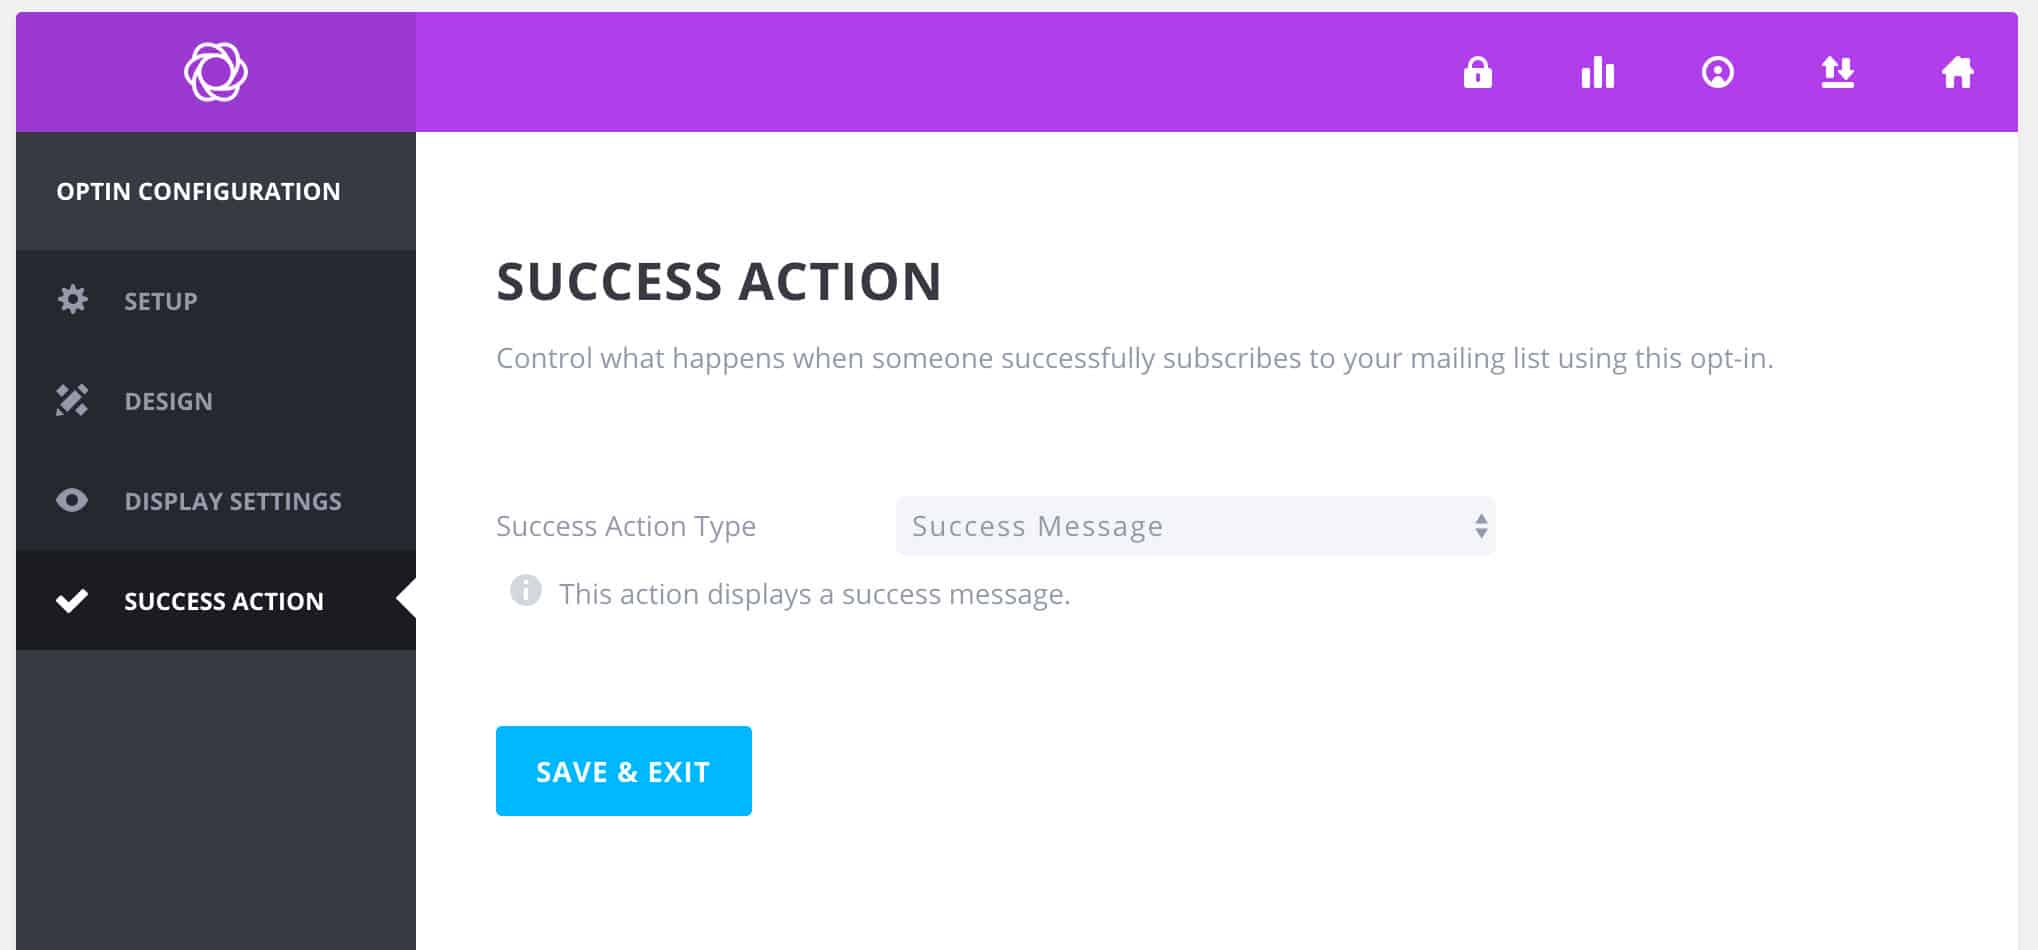
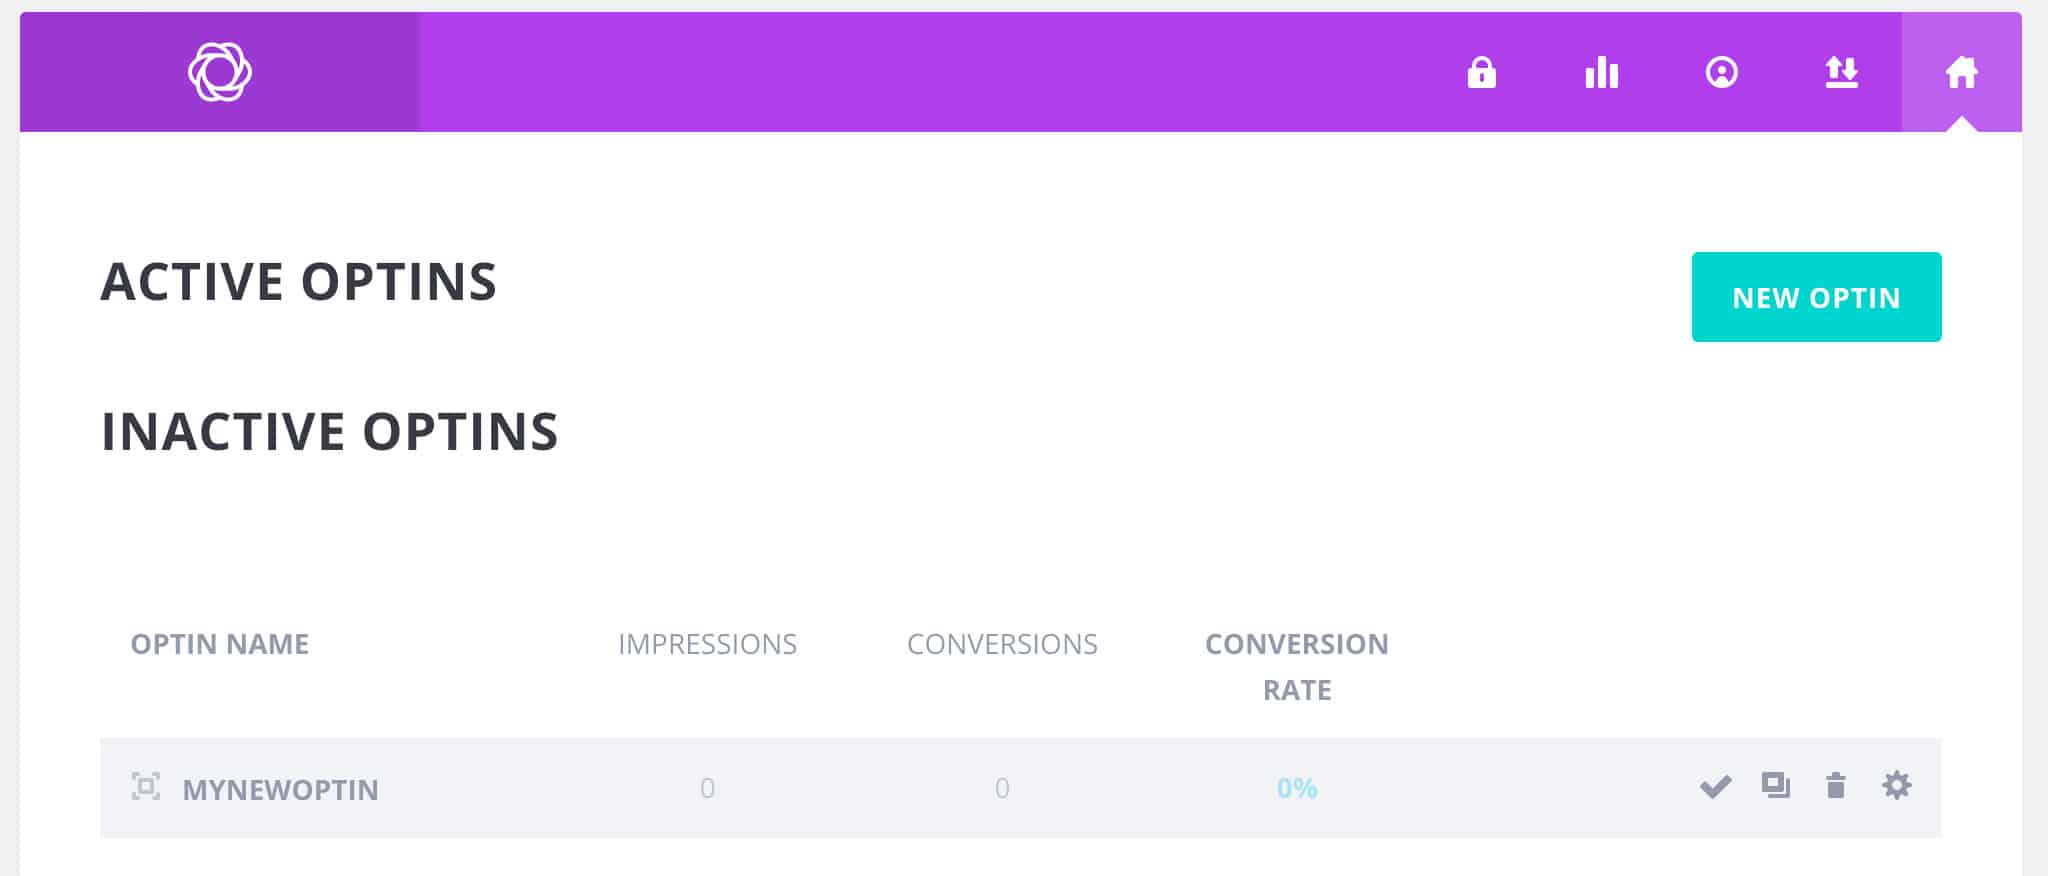
Once you hit Save & Exit, you will be redirected to a list of the active and inactive opt-ins. From this page, you can view the opt-in’s impressions, conversions, and conversion rate. You can also enable/disable, duplicate, delete and edit the opt-in.
Generating a shortcode
You can also generate a shortcode to place anywhere on your page/post using inline or blocked content opt-in type. To do that, go to the Success Action step and click Generate Shortcode as shown in the image below.
Your shortcode will look something similar to this:
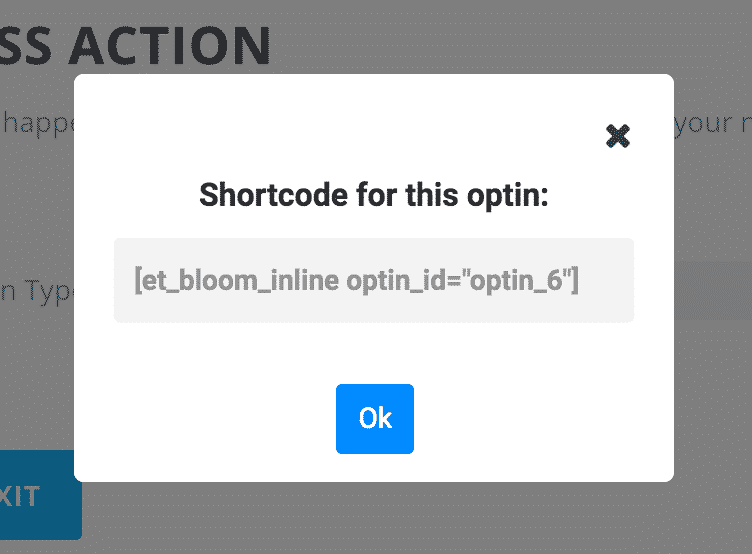
Simply copy the shortcode and place it anywhere on your page/post to display an opt-in form.
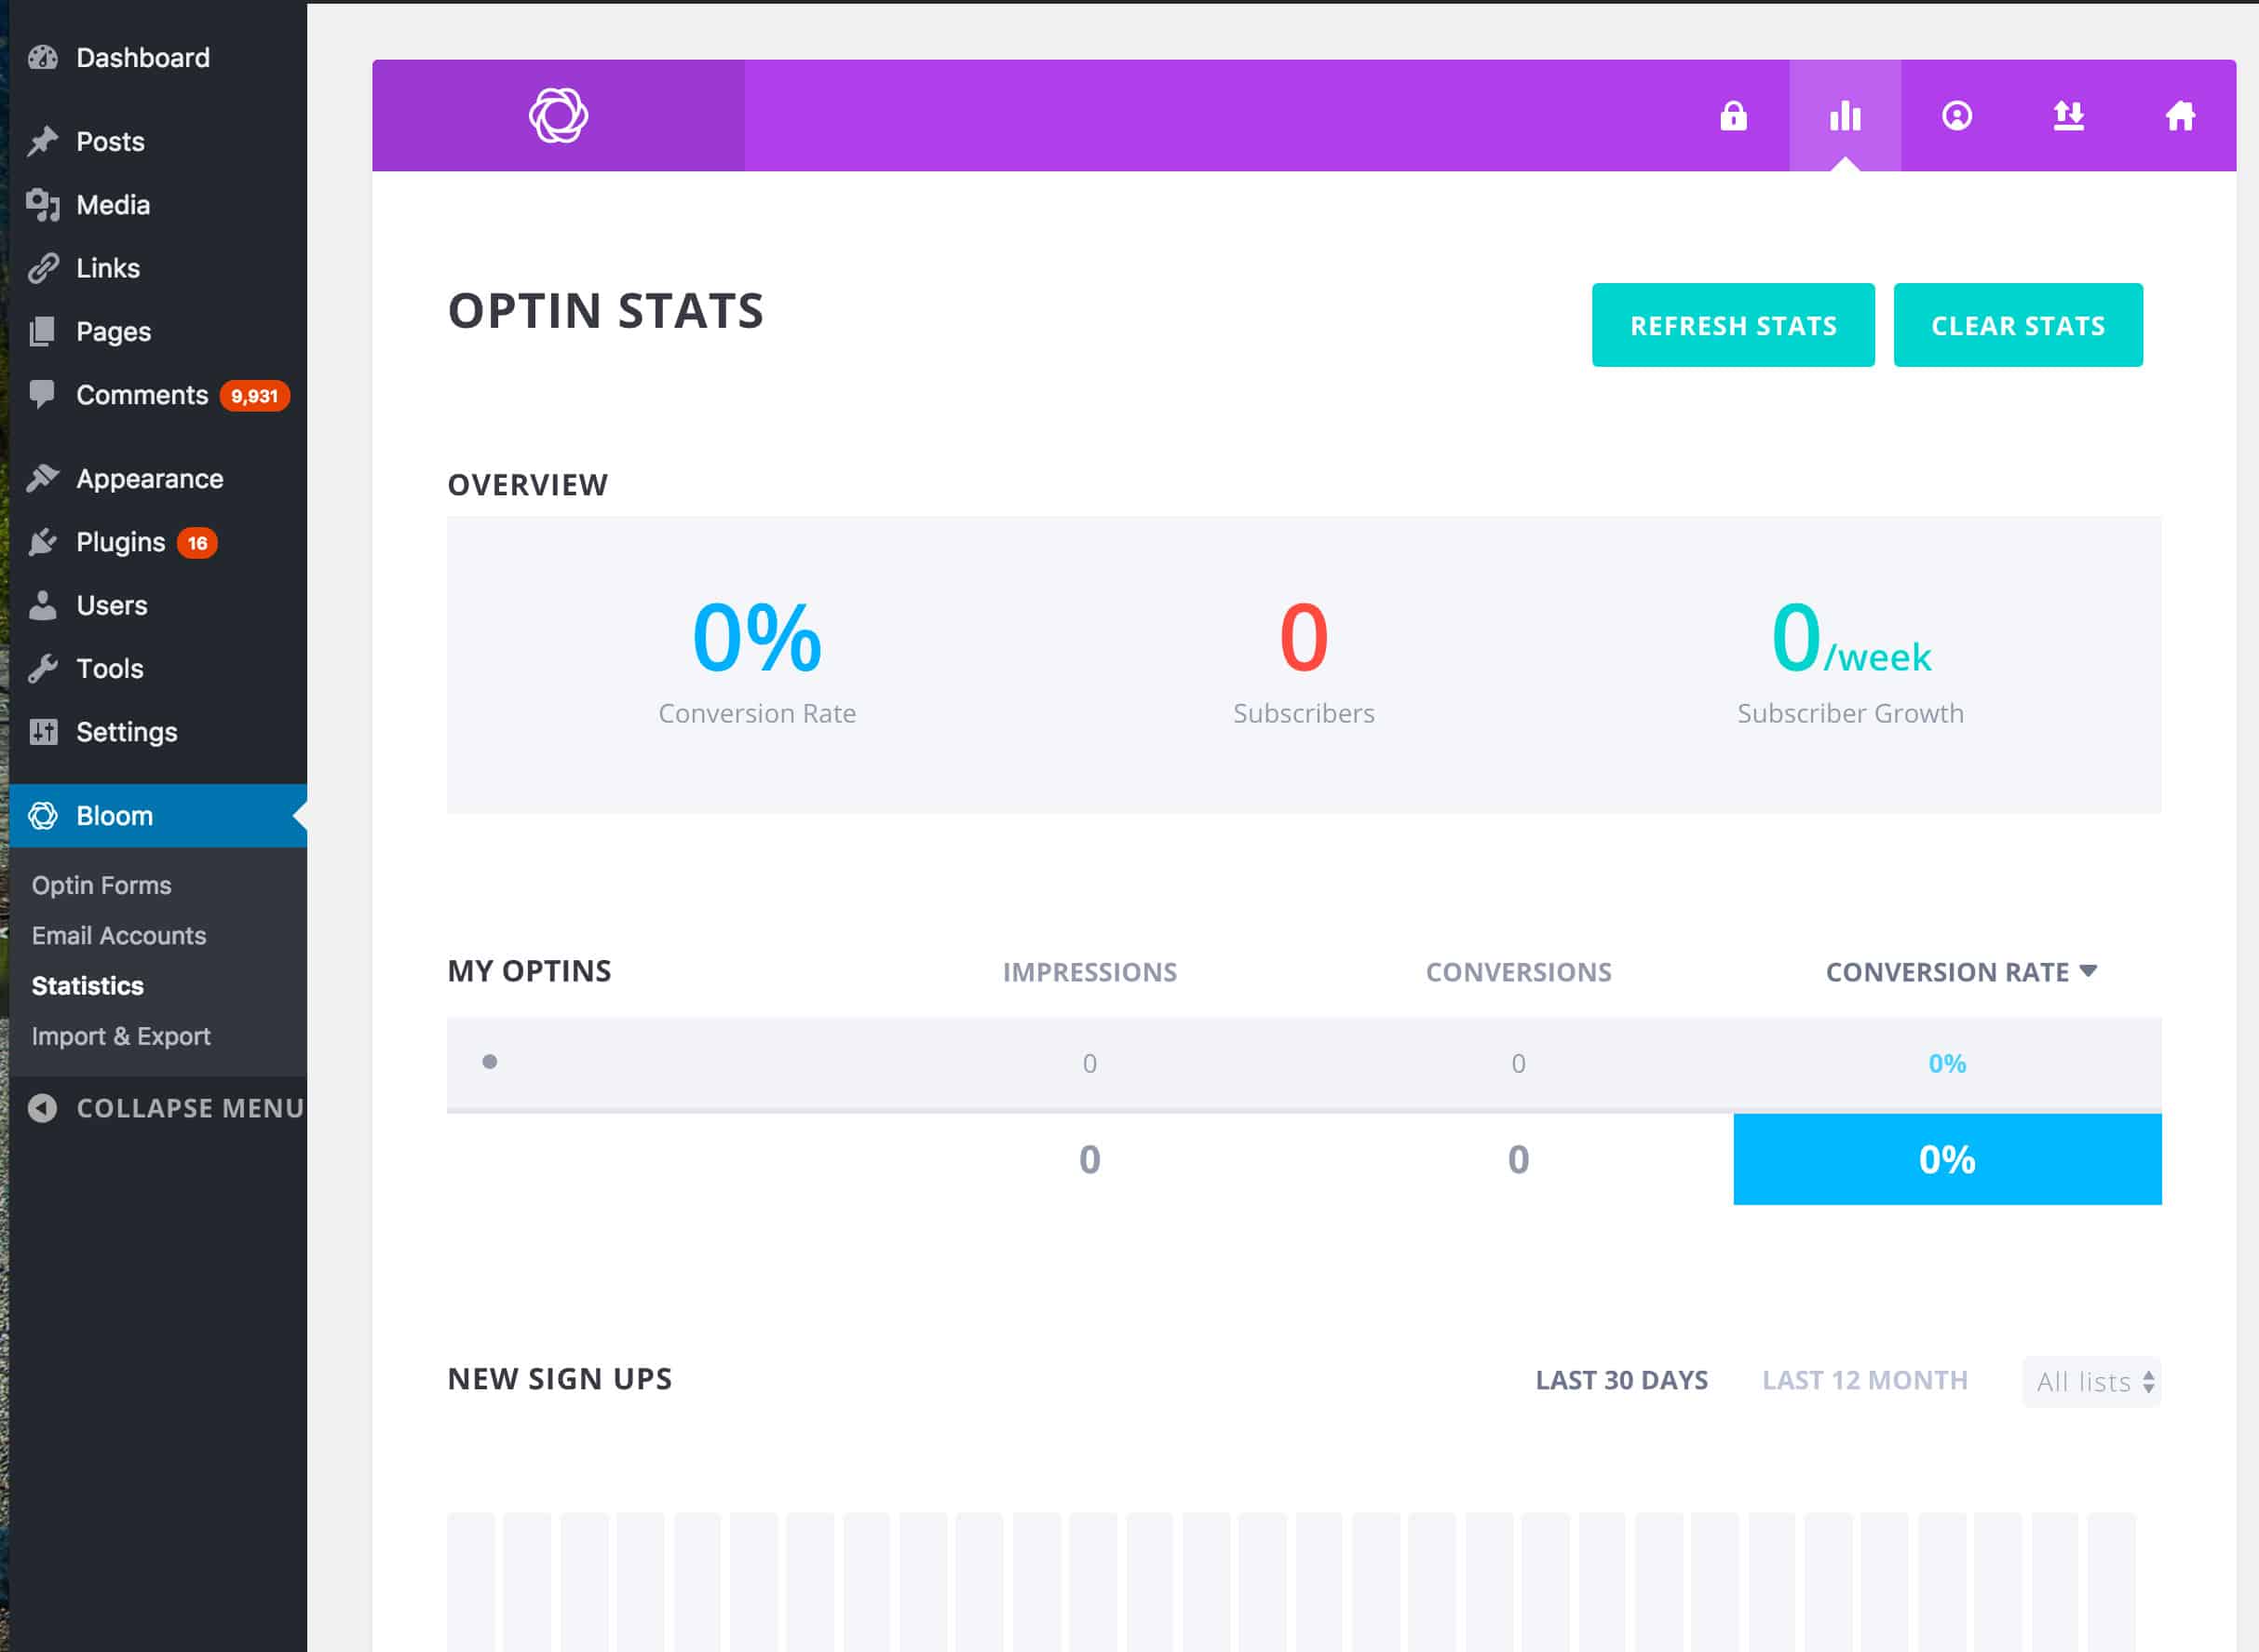
Congratulations! You have successfully set up your first opt-in. You can now begin gathering new subscribers and making the most of your email marketing. Once some visitors have used the opt-in, you will be able to view statistics in Bloom’s statistics section.
We hope you enjoyed reading Our Ultimate Guide To Bloom! Subscribe to the blog or follow us on social media for more useful articles and tips.

