WordPress is one of the most powerful content management systems ever made! Not only is it used to power large websites and blogs, it can be used as an eCommerce solution.
One of the best eCommerce plugins currently available for WordPress is Easy Digital Downloads (EDD). It is a powerful plugin designed to make selling digital products on your website simple. It supports a wide variety of digital products including software, photos, ebooks, documents, songs, graphics, and other digital media files.
Easy Digital Downloads is a fantastic plugin for content creators, designers, software companies, musicians, photographers and other creative people. It can quickly transform a humble blog into a profitable business venture! This Ultimate Guide to Easy Digital Downloads will walk you through the process of installing and configuring this fantastic plugin.
Table of Contents
- The Key Features of Easy Digital Downloads
- Installing Easy Digital Downloads
- Getting started with Easy Digital Downloads
- Additional Configuration Changes
- Extensions for Easy Digital Downloads
The Key Features of Easy Digital Downloads
Easy Digital Downloads is an extremely powerful plugin! Its key features include:
- A shopping cart system for purchasing multiple products
- The ability to handle many digital file formats including mp3, mp4, jpeg, and pdf.
- A variety of payment gateways can be used including PayPal Standard, Stripe, Amazon Payments, PayPal Express, Braintree, Authorize.net, Bitpay and Payza.
- Powerful extensions which expand on the functionality of the plugin. Some of the available extensions add recurring payments, software licensing, commissions, free download management, reviews and content restrictions.
- Payment history and customer management tools
Installing Easy Digital Downloads
Installing Easy Digital Downloads is a very simple process.
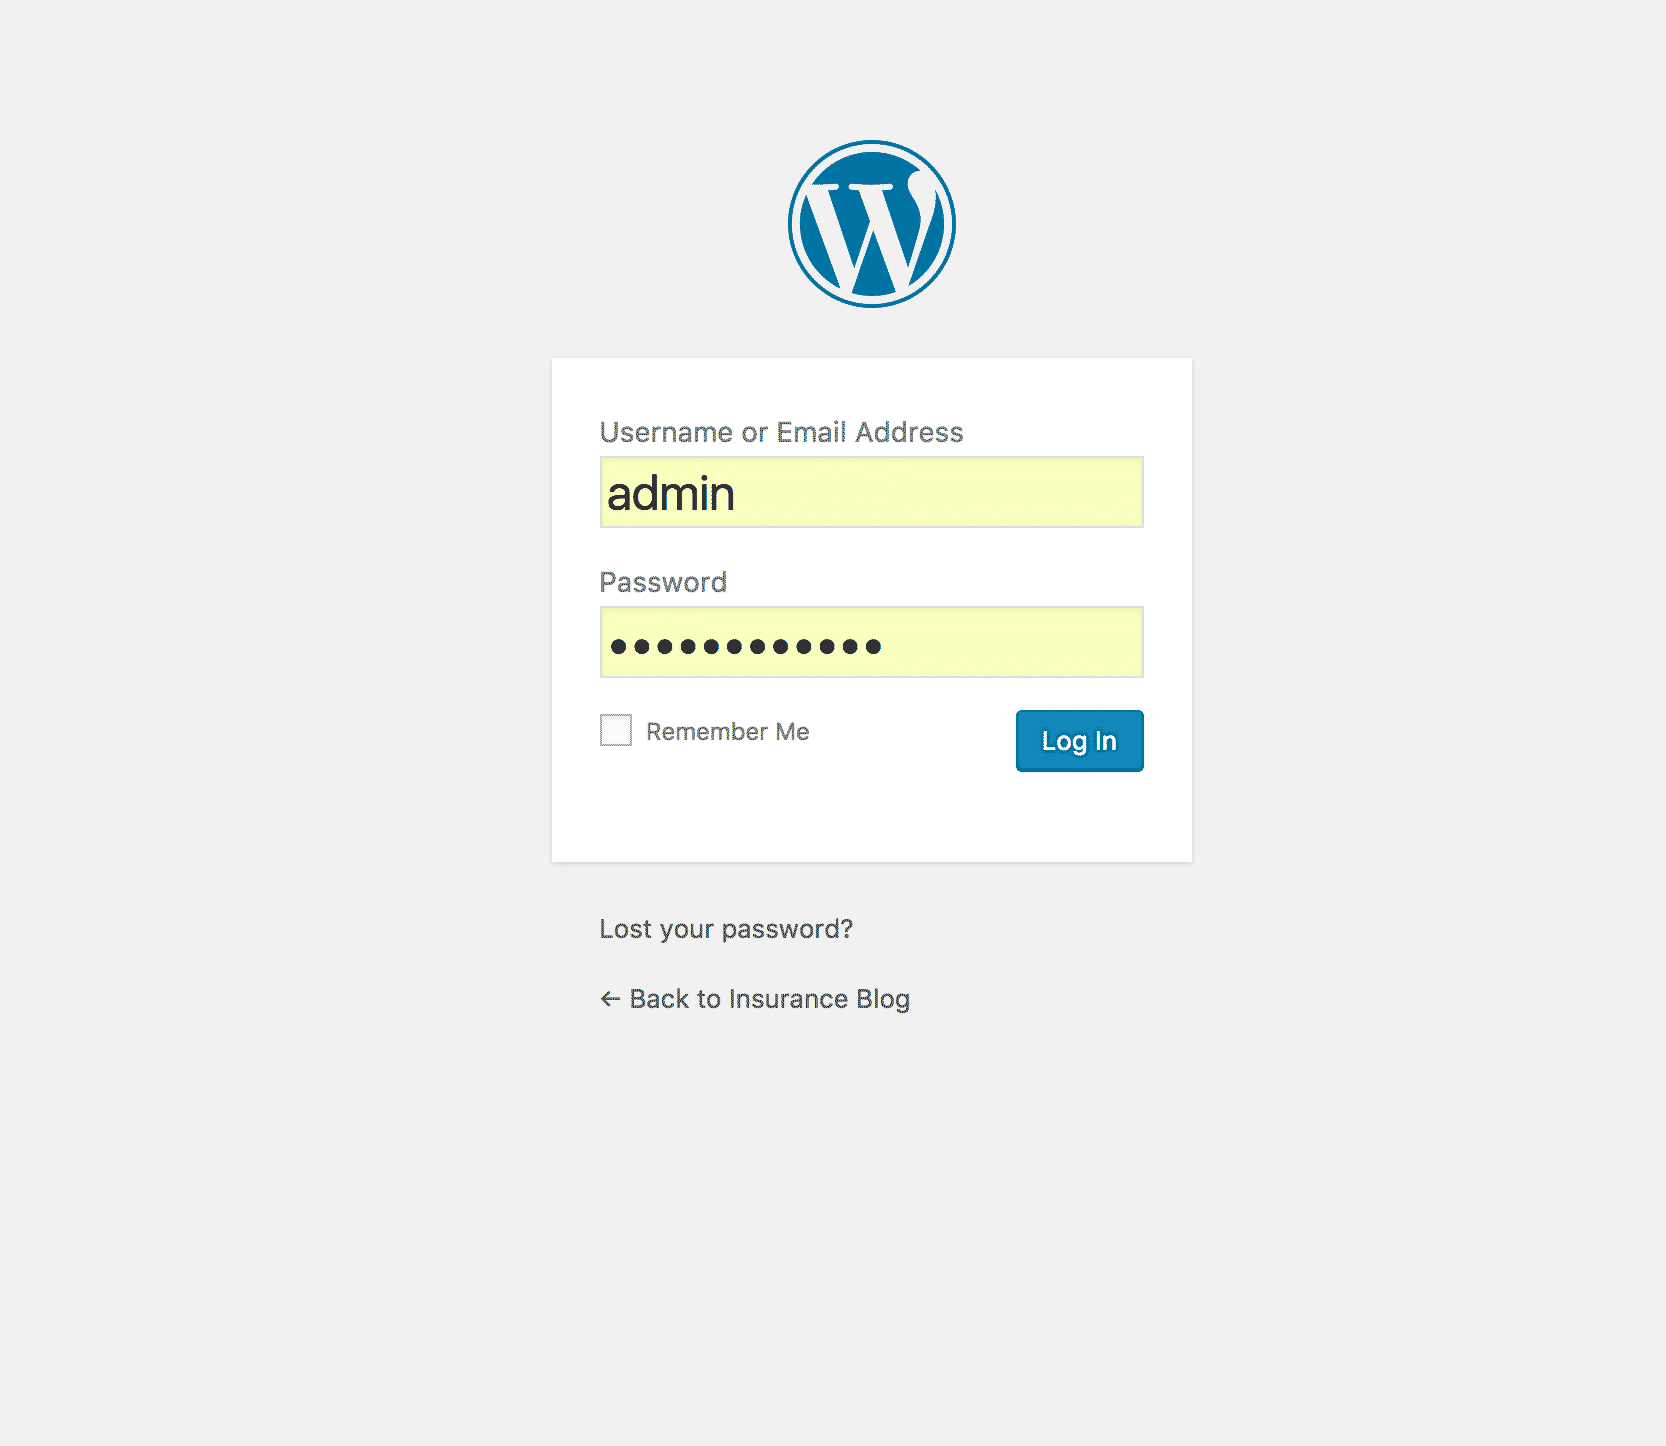
1. Log into your WordPress installation
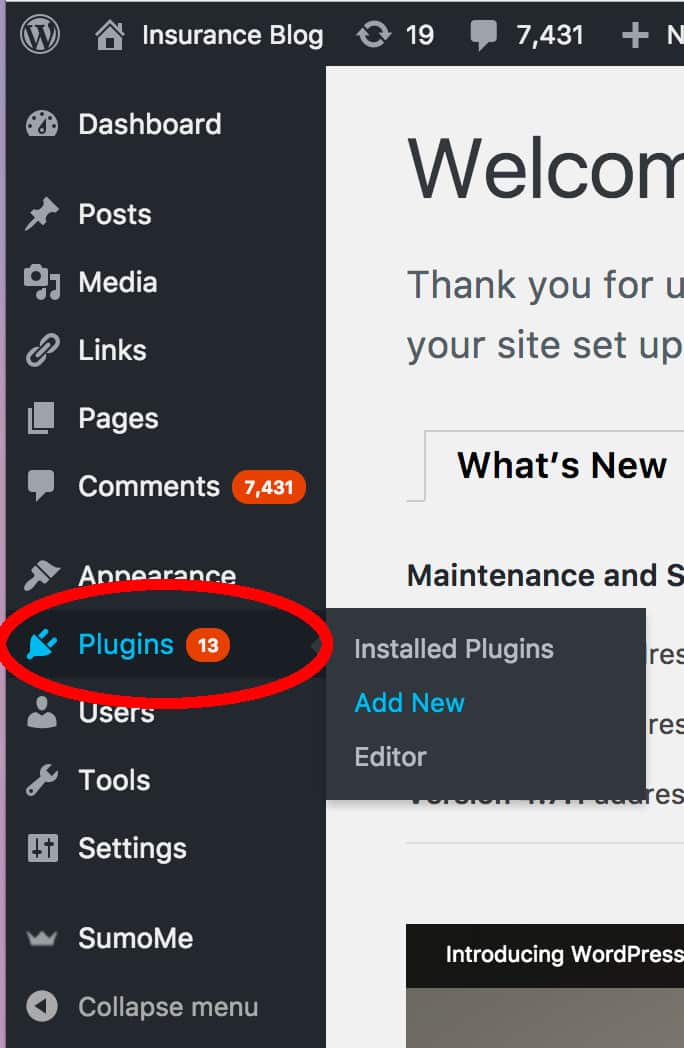
2. Hover over the “Plugins” menu item on the left-hand menu and click “Add new”
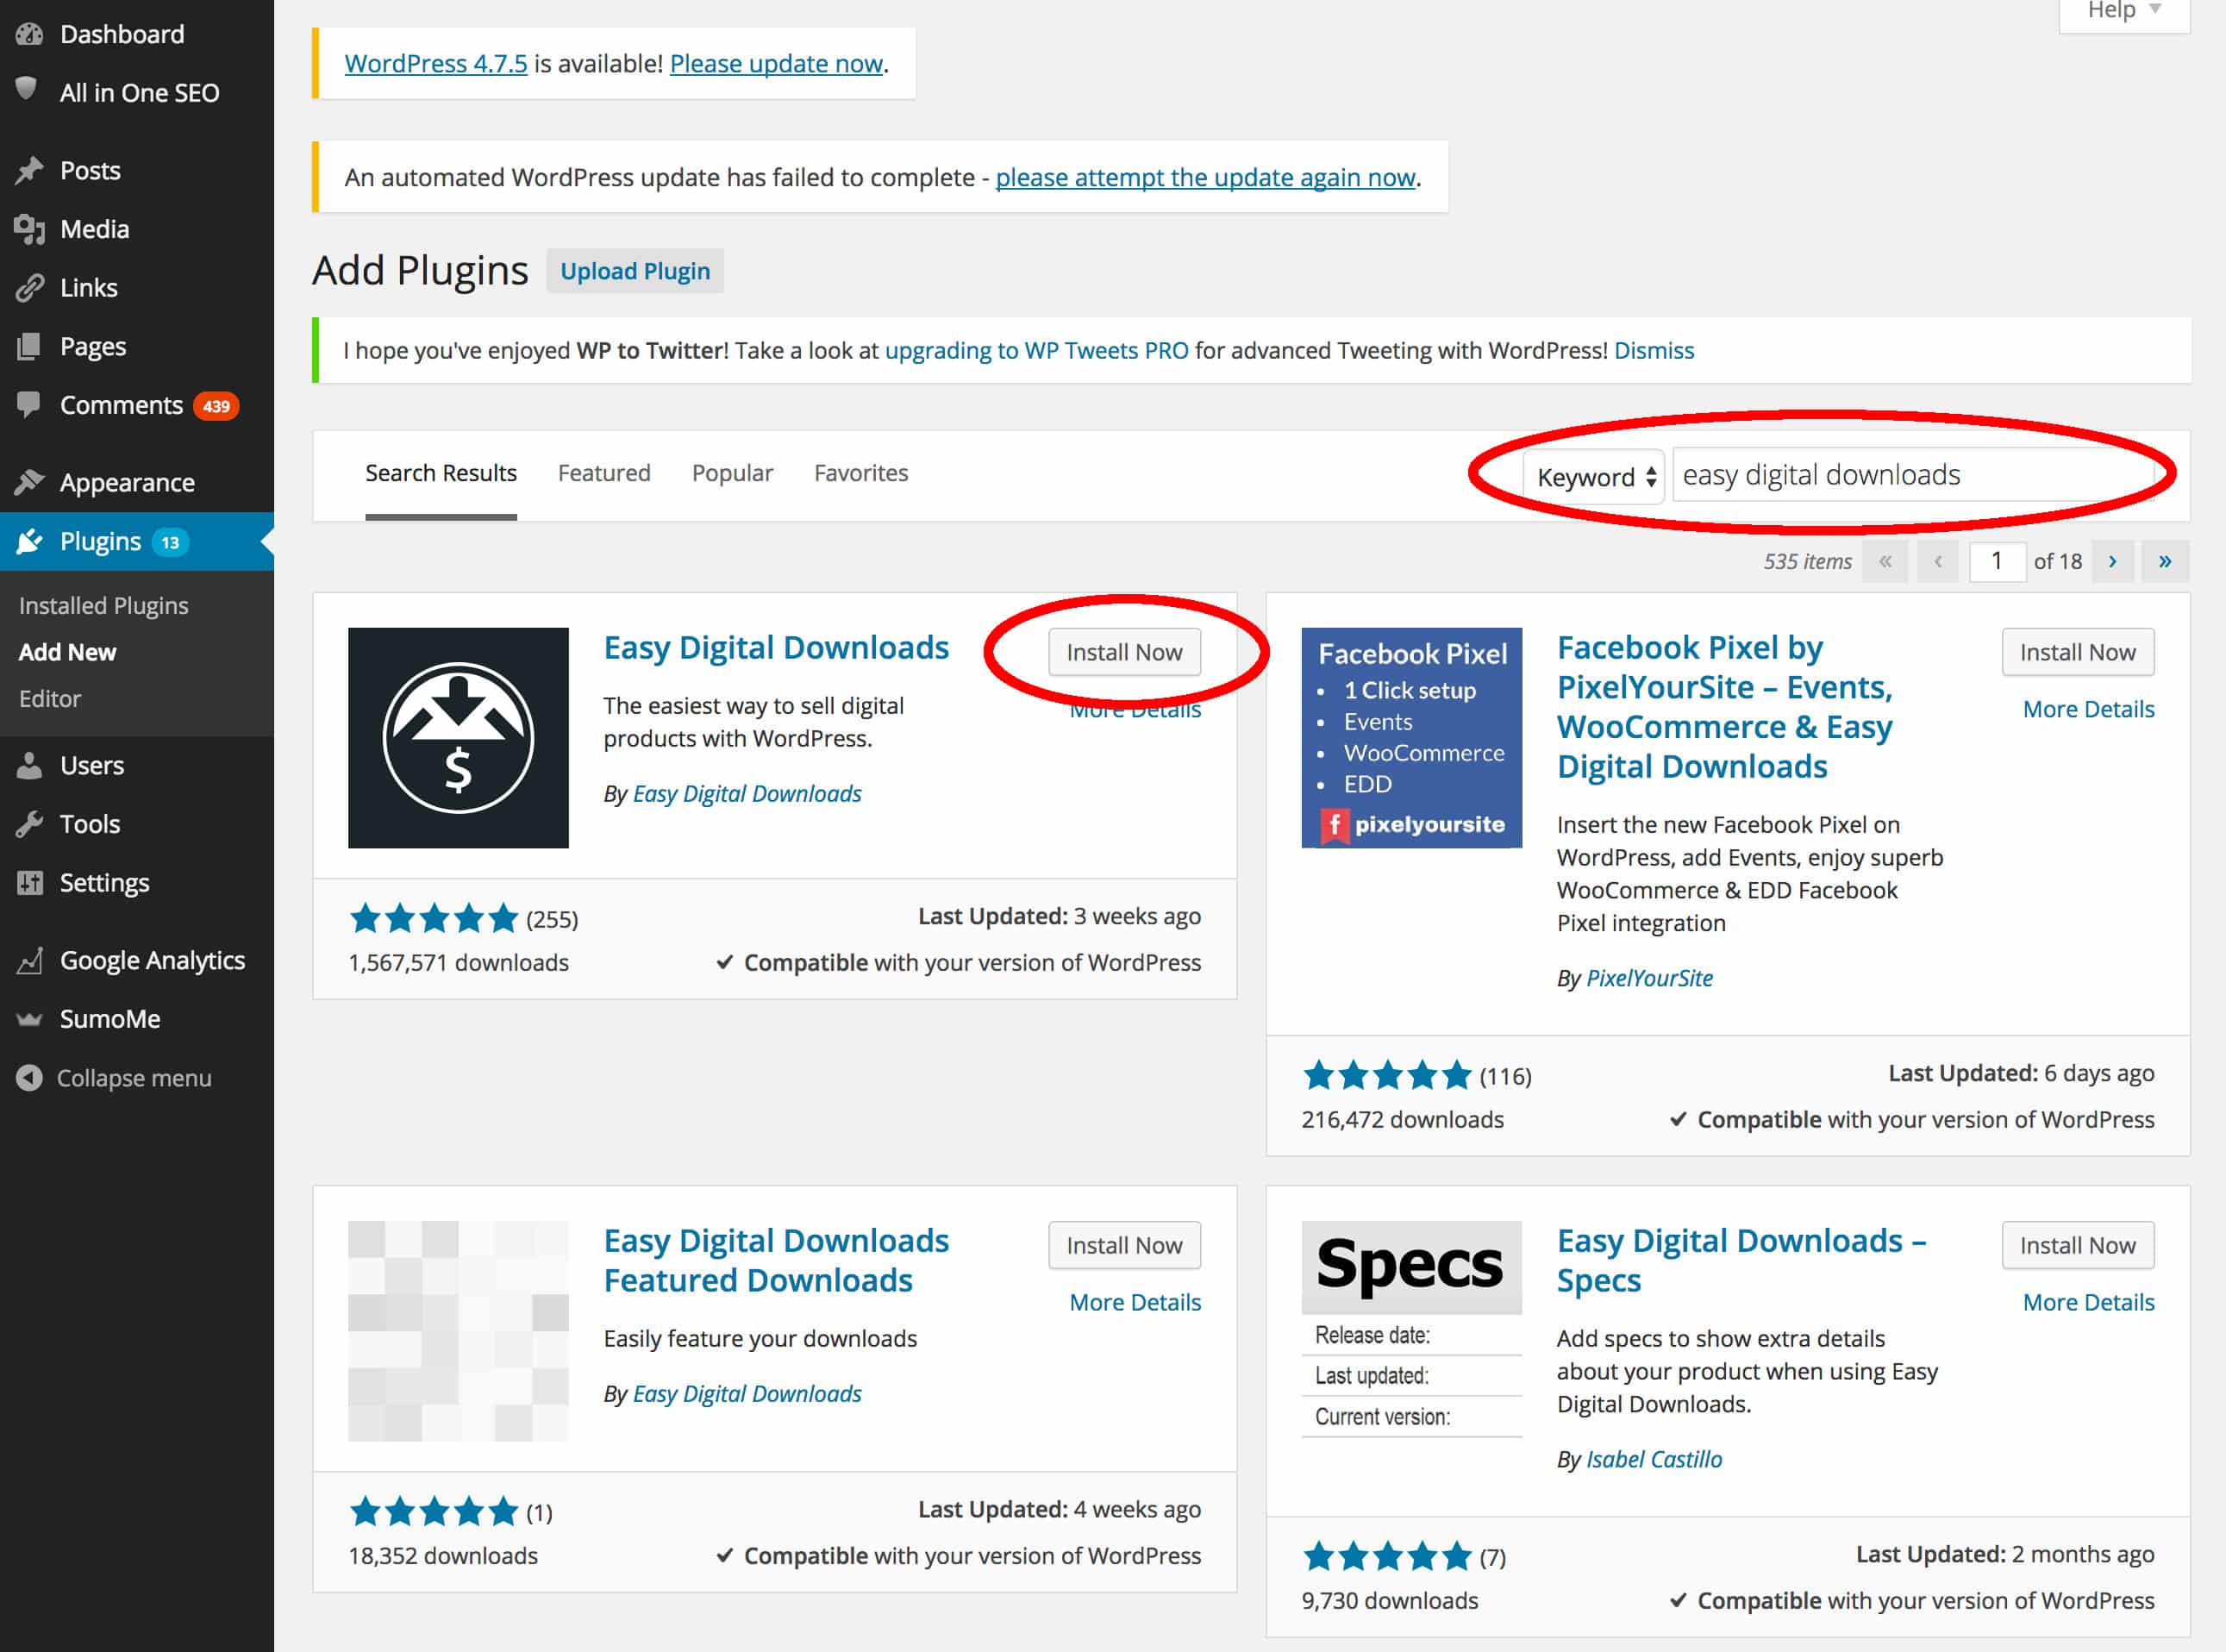
3. Search for the Easy Digital Downloads plugin by typing “Easy Digital Downloads” in the right-hand search box. In a couple of seconds, the search results will appear. When they do, click the “Install Now” button as indicated below.
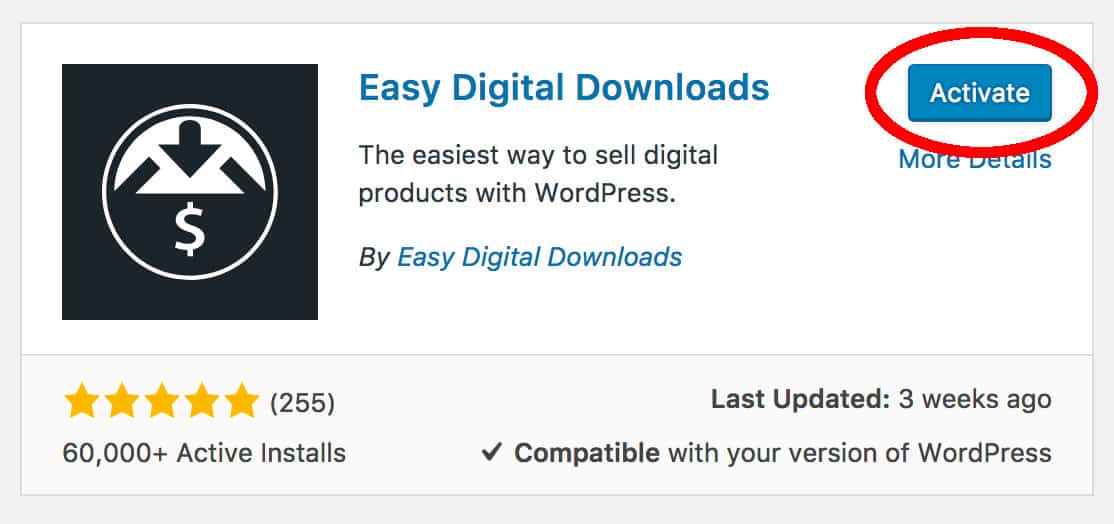
4. Once it is installed, click on the activate button on the Easy Digital Downloads box.
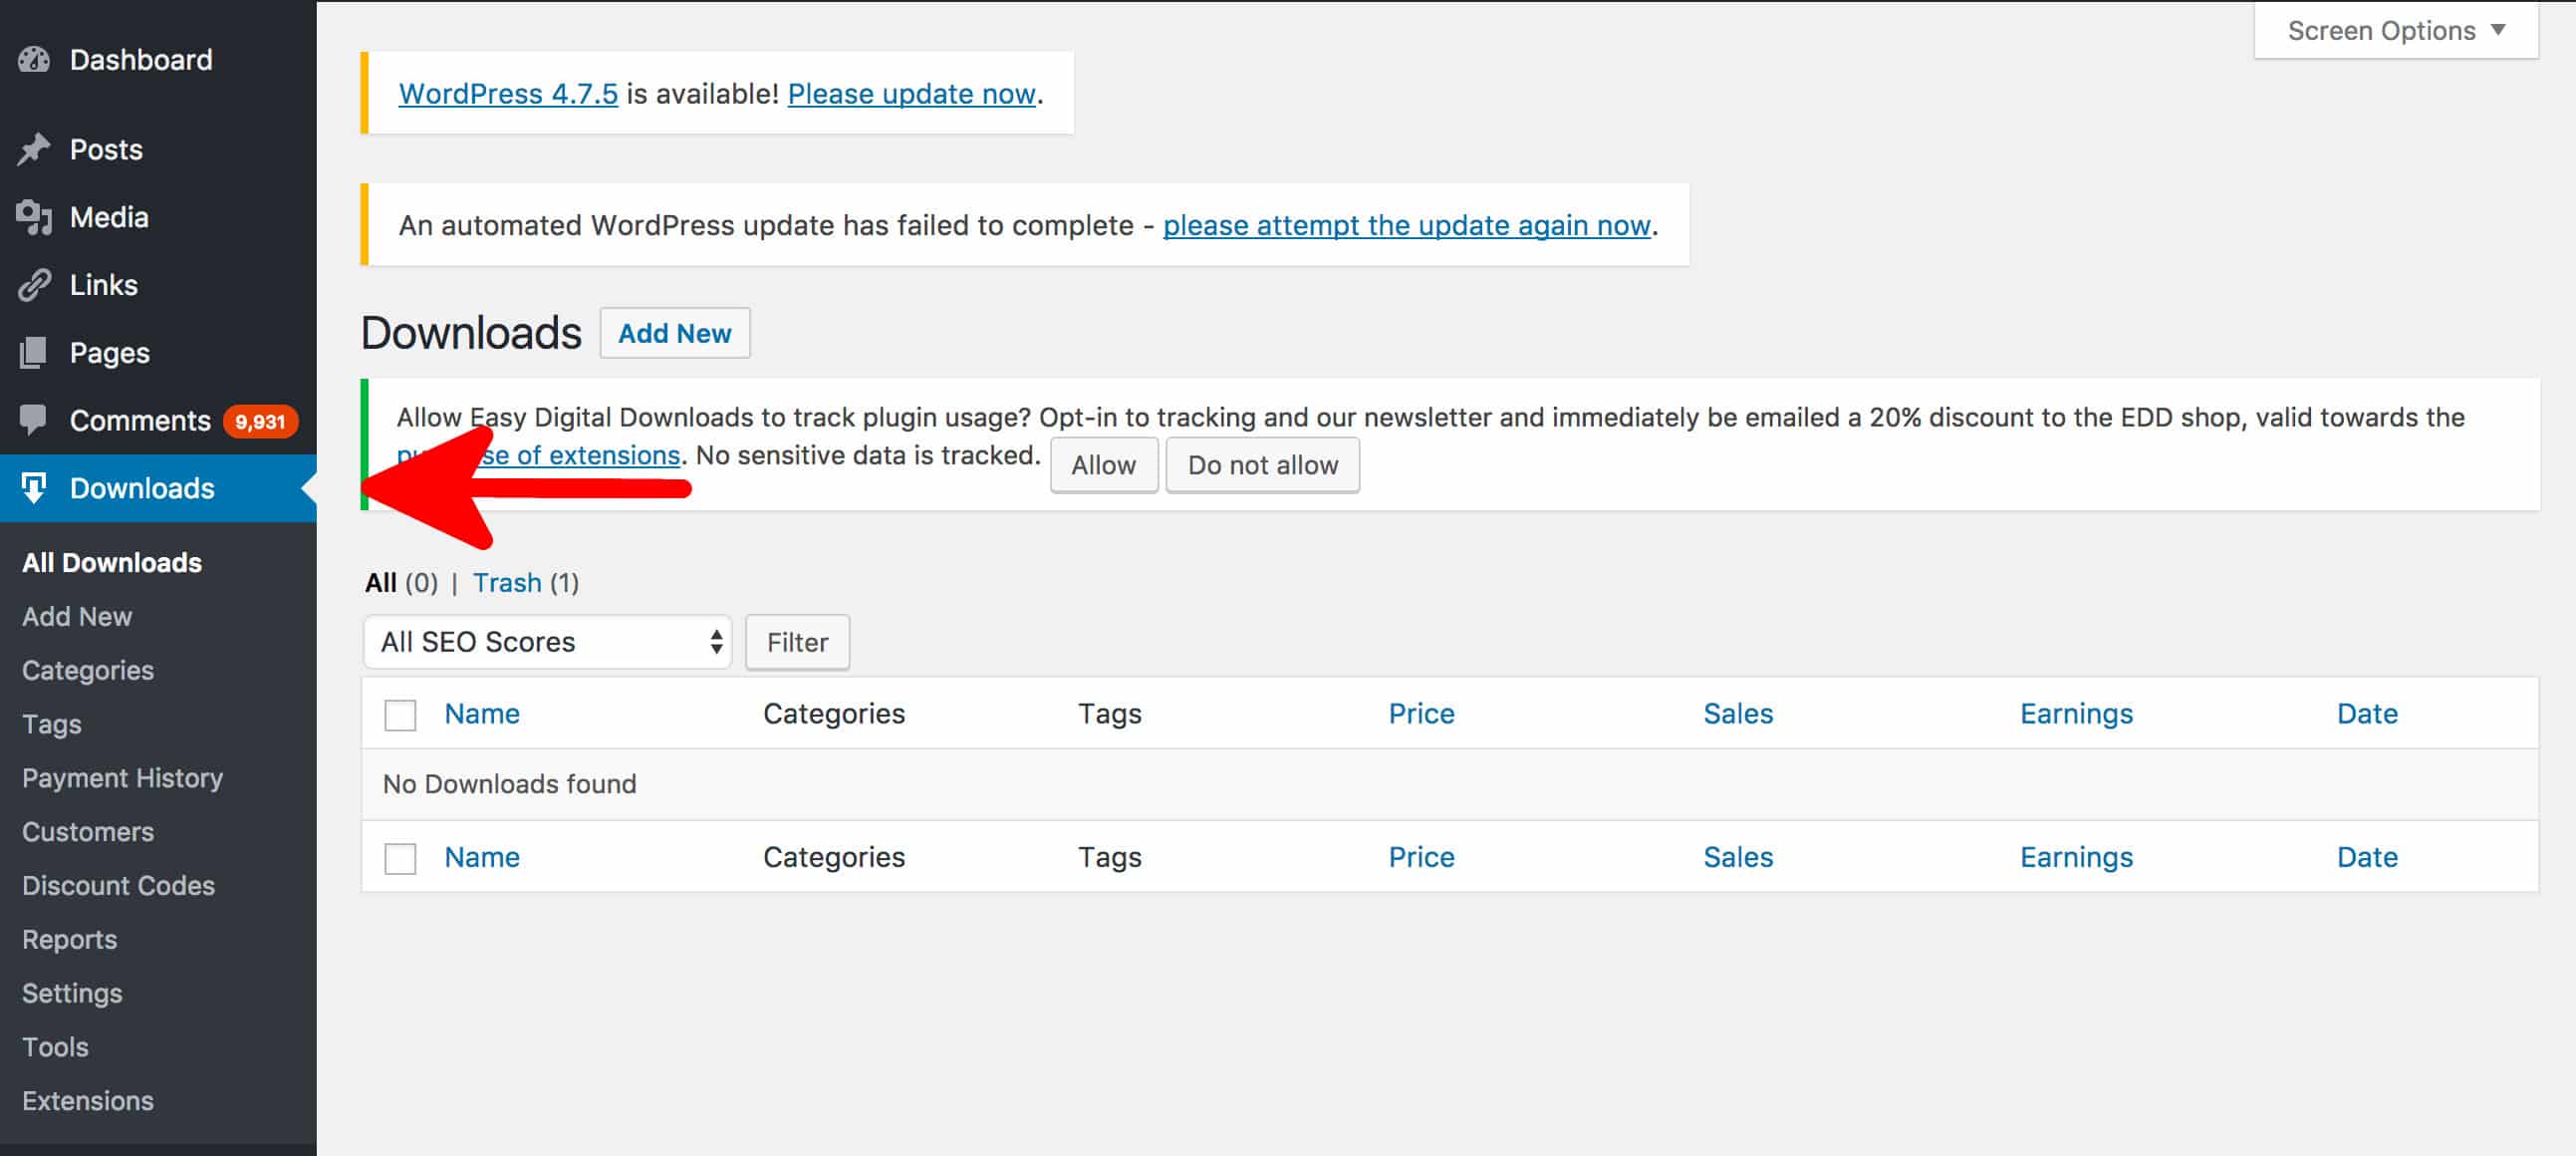
5. Once the plugin is activated, you will notice a new menu item called “Downloads” on the left-hand side. Click on it to see the menu items.
Getting started with Easy Digital Downloads
Although Easy Digital Download is a powerful plugin, it is quite easy to use. If you are familiar with the process of adding posts to WordPress, you will quickly pick this plugin up. Here is a quick summary of the available menu items:
- All Downloads: This is where you view the digital downloads that you have added.
- Add New: Add a new digital download.
- Categories: You can add categories for different digital downloads in the same way that you add categories for WordPress posts. You can add and remove categories on this page.
- Tags: You can tag your digital downloads in the same way that you tag WordPress posts.
- Payment History: Details of the payments you have received, including the customer’s name, the payment amount and the product sold.
- Customers: A list of the customers who have made a purchase.
- Discount Codes: You can add temporary or permanent discount codes on your products here.
- Reports: You can view and export reports showing your total sales.
- Settings: This is where you can configure how the checkout process works, which payment gateways are being used, what emails are sent after a purchase, which taxes are applied and much more. We will go into more detail about this section later in the article.
- Tools: In this section, you can add banned emails to prevent certain people making purchases, add API keys to integrate your store into other applications or devices, import/export, and obtain system information.
- Extensions: Easy Digital Downloads has an extremely powerful extensions system which allows you to improve the functionality of your store.
Adding a new digital product
We’ll start by adding some digital products to our store. This process will be familiar to anyone who has ever created a WordPress blog post or page. Click on the “Add New” button on the left-hand menu.
You will be confronted with a page that looks fairly similar to the “Add New Post” page.
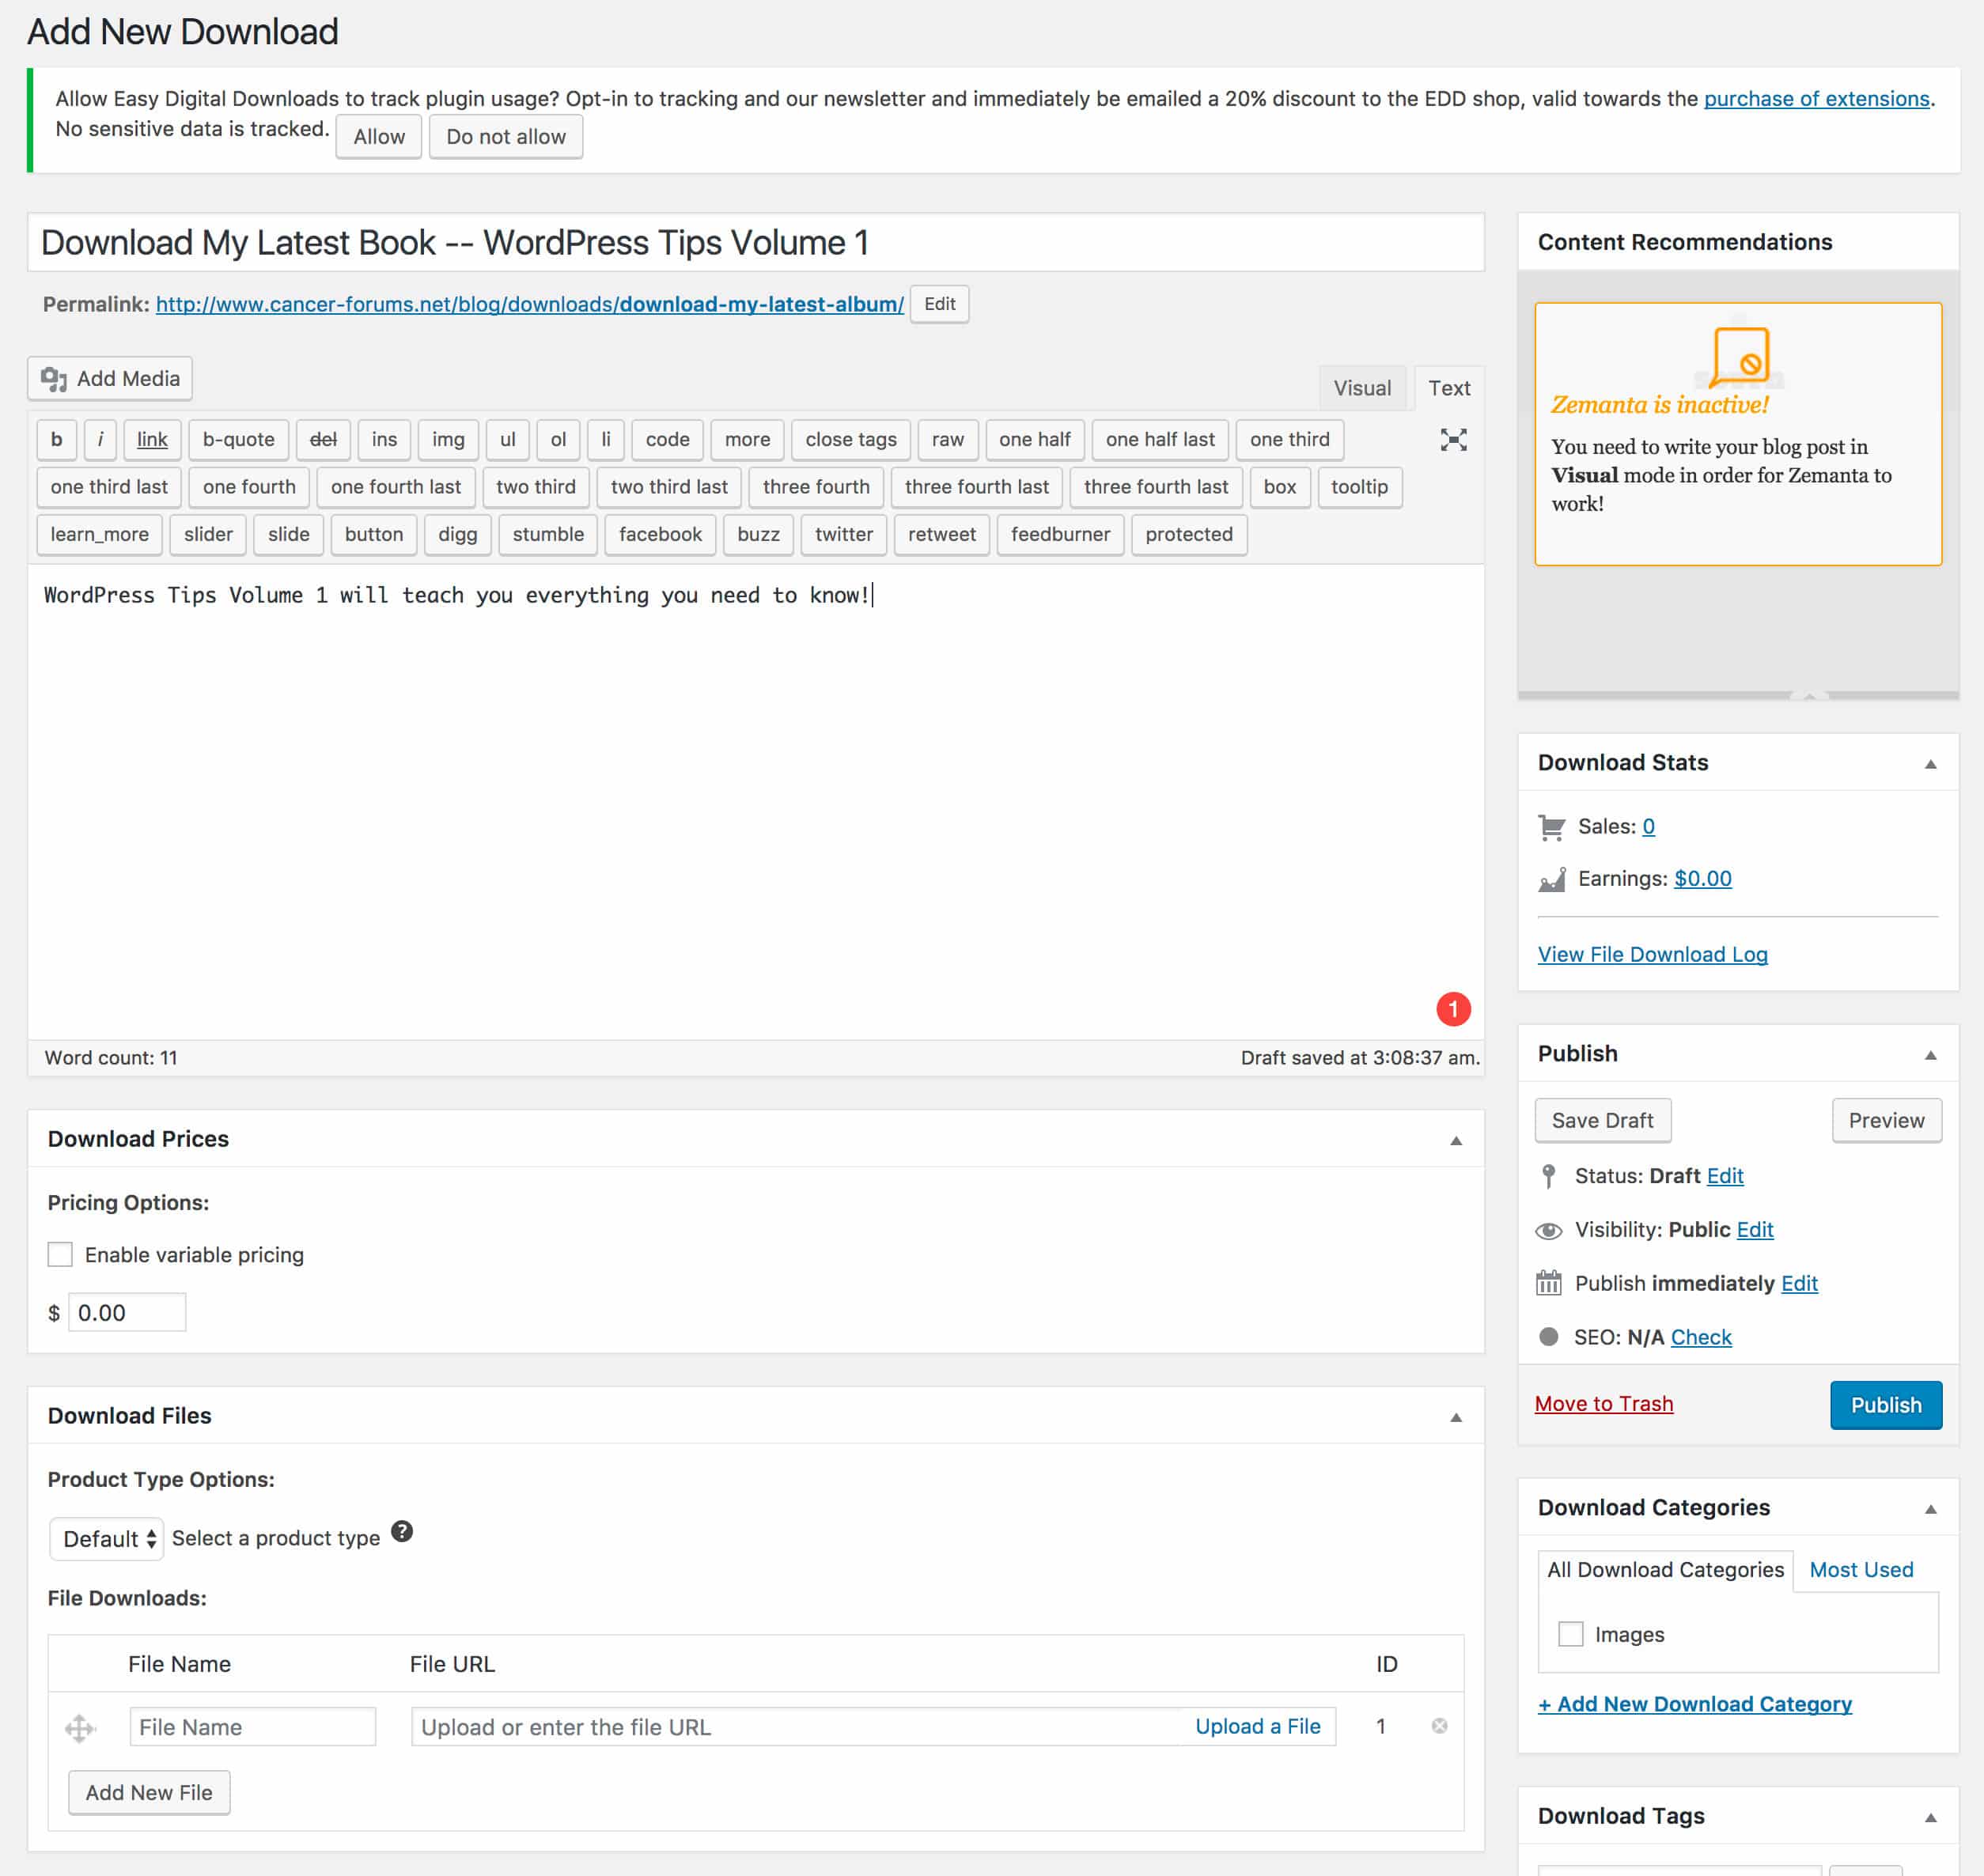
Let’s pretend we are selling our new book — WordPress Tips Volume 1. Readers will be able to purchase the entire book or buy individual chapters. Add the title and give it a short description (as shown above). You can add images to your description as you would with any WordPress post.
1. Setting a price for our product
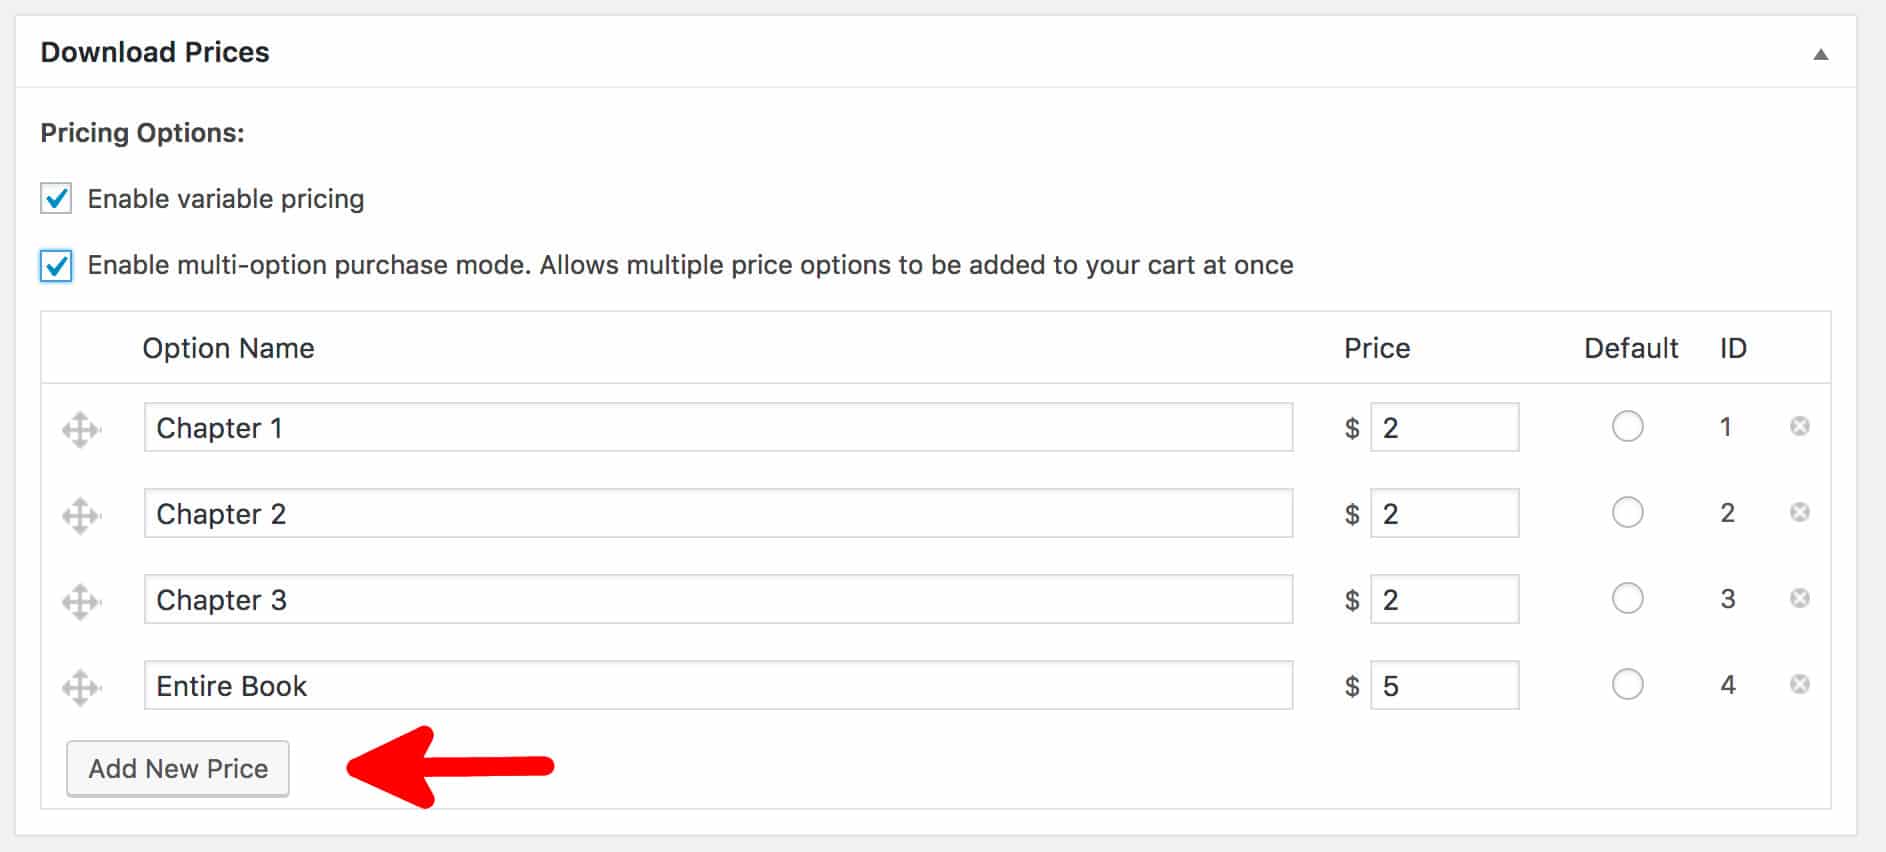
Because we want to sell individual chapters or the book as a whole, we will enable individual pricing in the Download Prices Section. Check the box enable variable pricing.

That will open up a list of options. Because we want to sell individual chapters or the entire book, we will create four items as shown below. We will also enable multi-option purchase mode, so customers can buy two or more chapters at once. The price for each chapter is $2 or customers can buy the entire book for $5.
2. Uploading our digital files
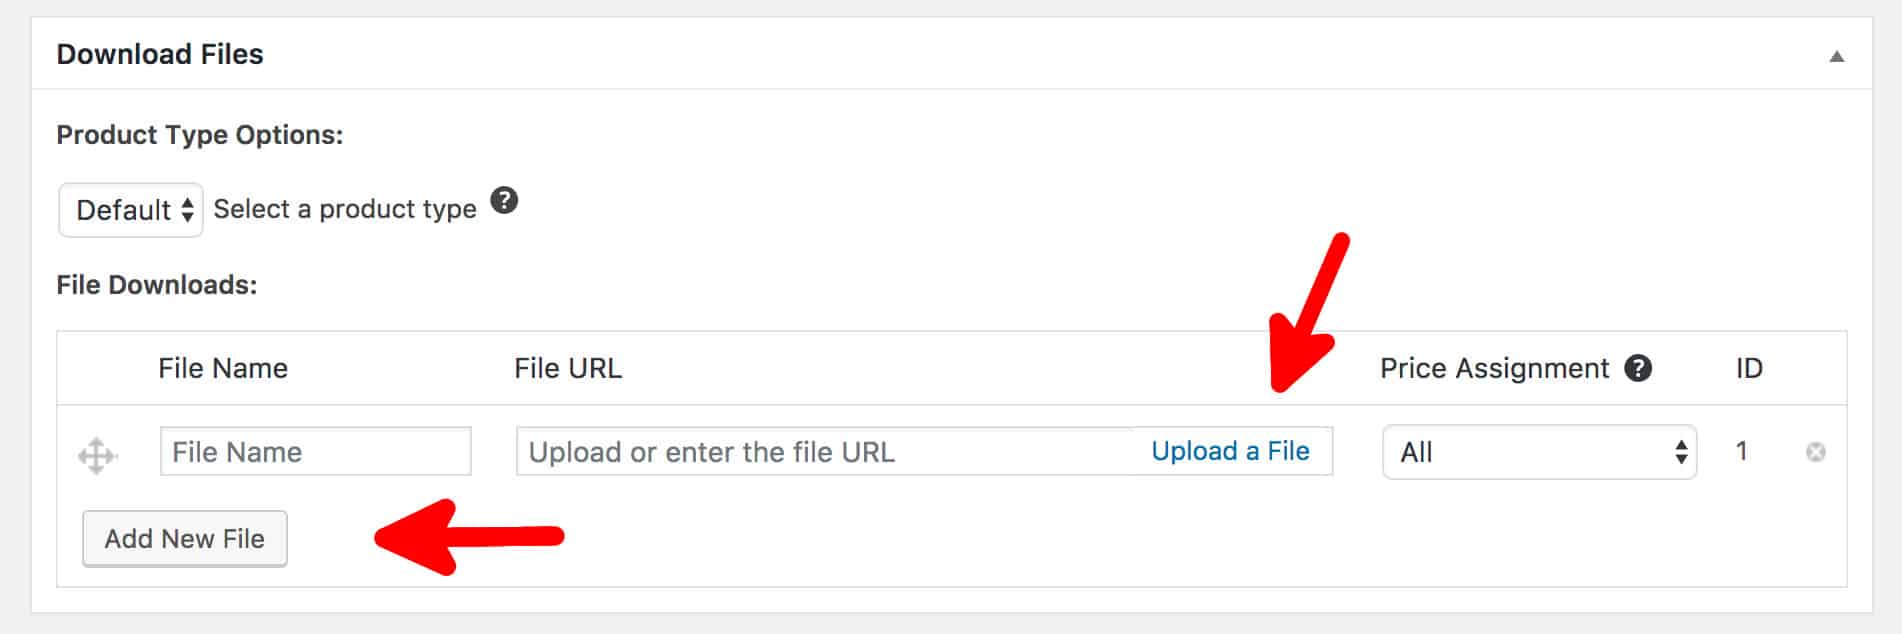
Scroll down to the Download Files section. We will have to upload 4 files here — one for each chapter and one file that is the entire book. Click on the Upload a File button to upload each file and the Add New File button to add more files.
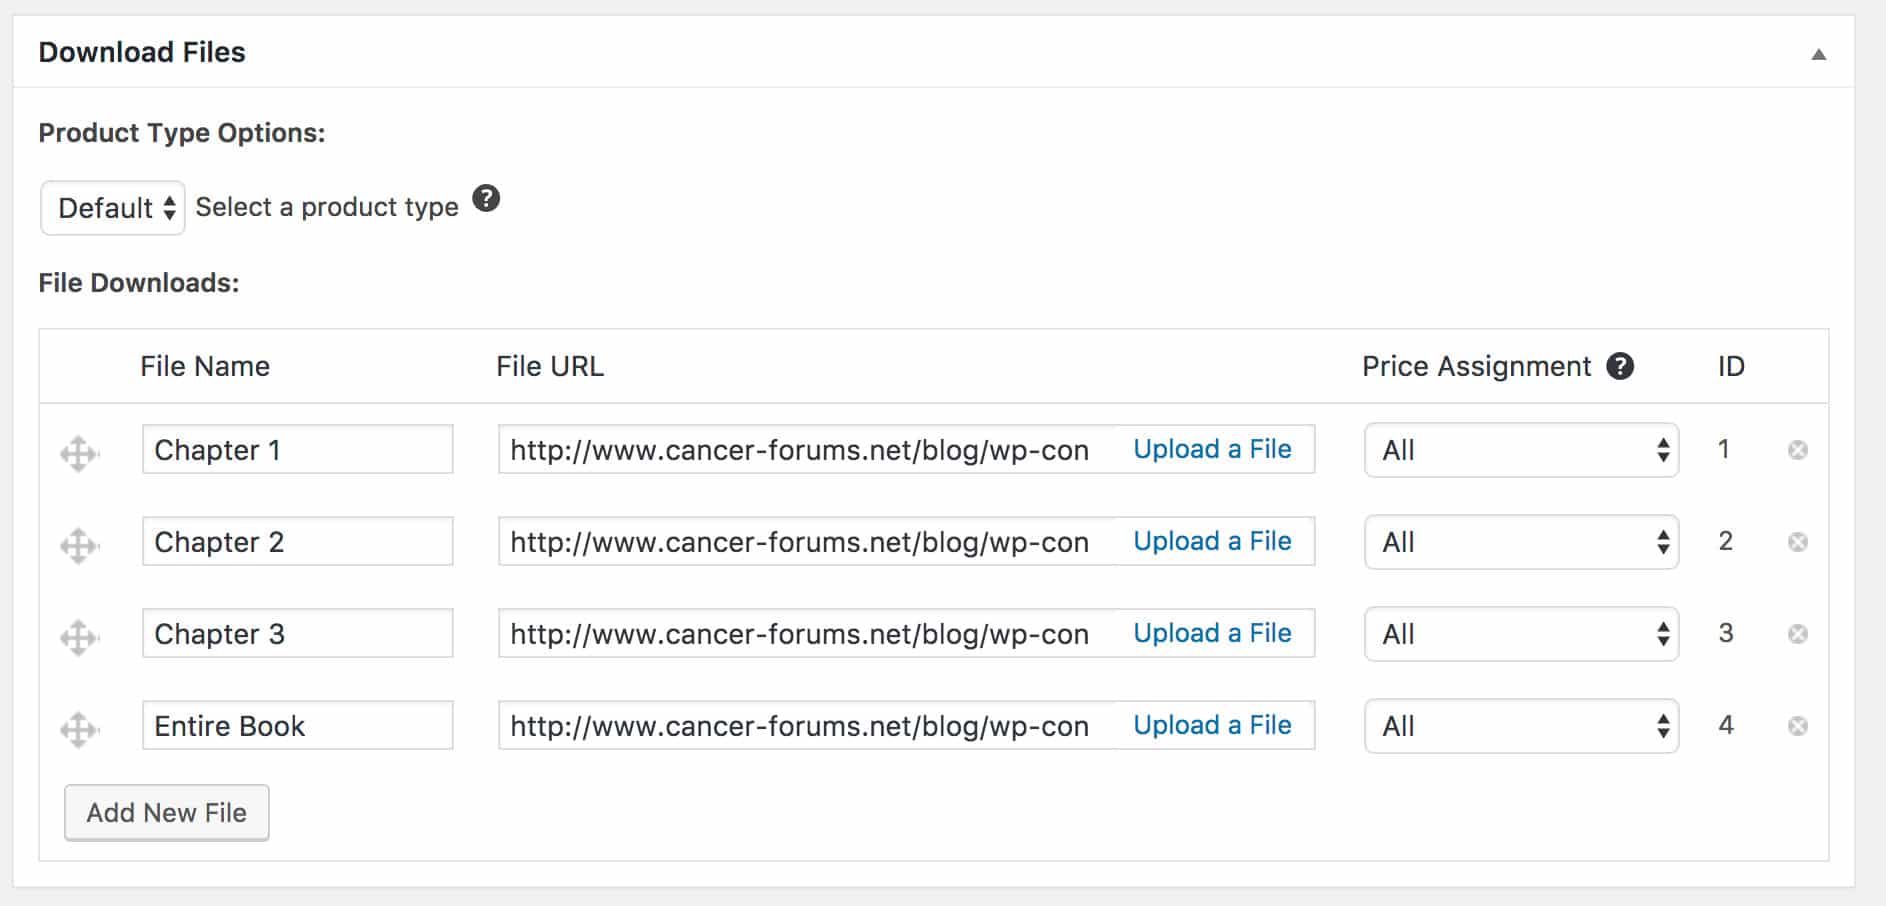
Once you have uploaded all 4 files, it should look something like the image below.
The next step is matching the prices we set to the individual downloads. Change the drop-down boxes under Price Assignment so they look like this:
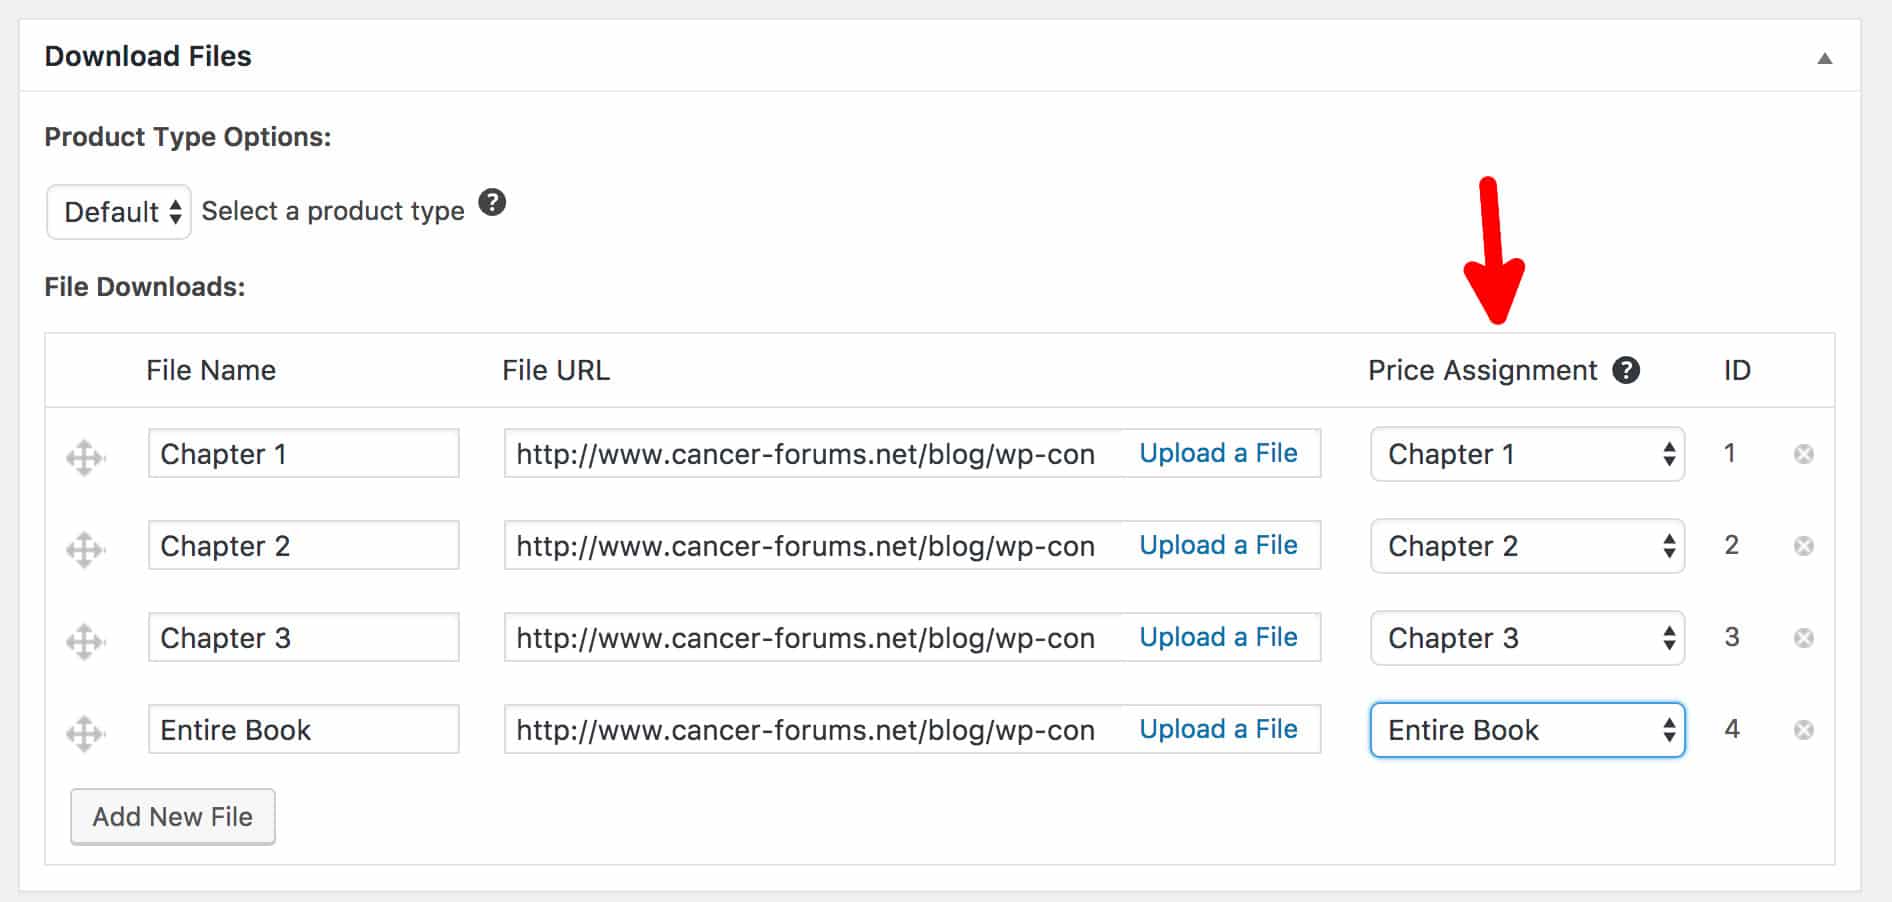
That shows you how simple it is to add digital products and assign a price to each one.
3. Add download notes
If you have any special instructions for your product, add them in the Download Notes section. These notes will be added to the purchase receipt that the customer receives.

4. Add a download category and some download tags
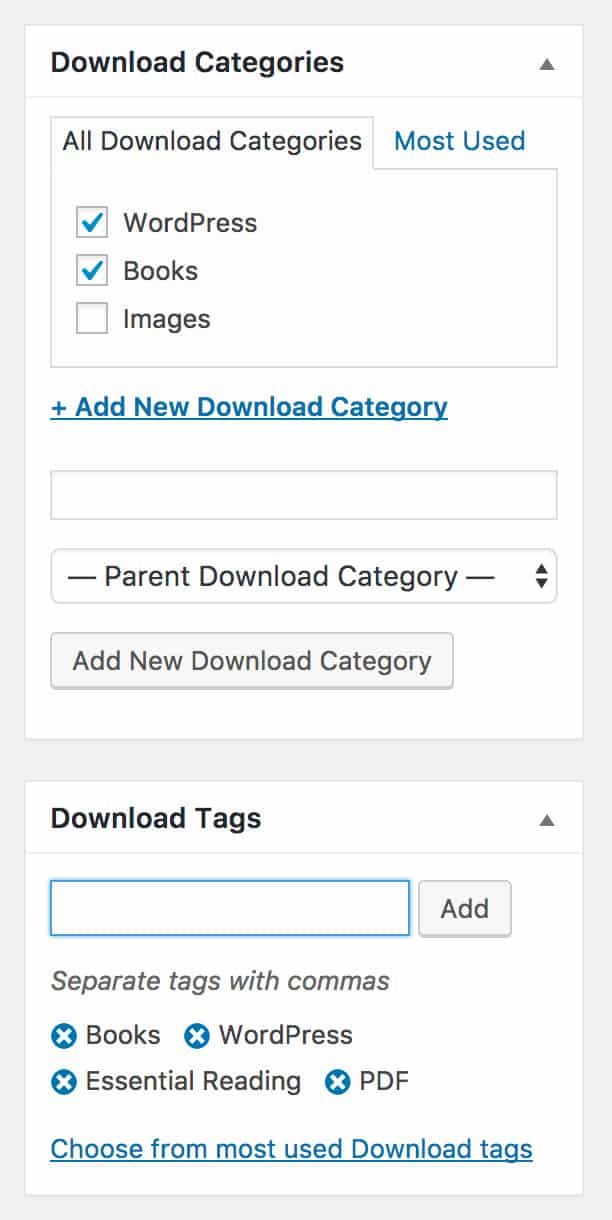
The next step is to add a category and some tags to our product. Scroll up and look for the Download Categories and Download Tags boxes on the right-hand side of the screen. Fill these with same kinds of details that you would when creating a WordPress post.
5. Create download settings
The final step is to update the product’s download settings. You will have the following options:
- File Download Limit: How many times the user can download the file after their purchase.
- Button Options: By default, the plugin will add a purchase button underneath the product. You can disable this here if you decide to place the button elsewhere. You can also choose the type of purchase process here if you have enabled a “Cart” style checkout instead of a single click checkout.
- Purchase Shortcode: This is a shortcode that you can add to pages where you want a product secretion and “buy now” button. The link has a few options, which allow you to change the style of the button, the text and its colour. The shortcode generated should look something like this [purchase_link id=”658″ text=”Purchase” style=”button” color=“blue”]
Click the publish button to save your product. Well done! You have just added your first digital product to your store. If you click on All Downloads link on the left-hand menu, you will see the product has been added.

You will also have a link to the product page. Send links from your other pages to this product page or add the product page to one of your theme’s menus.
You can also add a direct, custom link that will add a product to the cart automatically. For example, if you’re designing a specific product landing page with a custom button, you may want to avoid sending users from the landing page to the product page and only then to the cart. To do that, simply use the following link trigger:
<a href="http://example.com/?edd_action=add_to_cart&download_id=ID_OF_THE_DOWNLOAD">Purchase This</a>
Make sure to input your website domain instead of the example.com and your EDD product ID where it says ID_OF_THE_DOWNLOAD.
6. Configure payment options
Because we want people to pay for our book, we also need to configure the payment gateway. Easy Digital Downloads makes this task simple. Click on Downloads > Settings on the left-hand menu, then click the Payment Gateways tab.
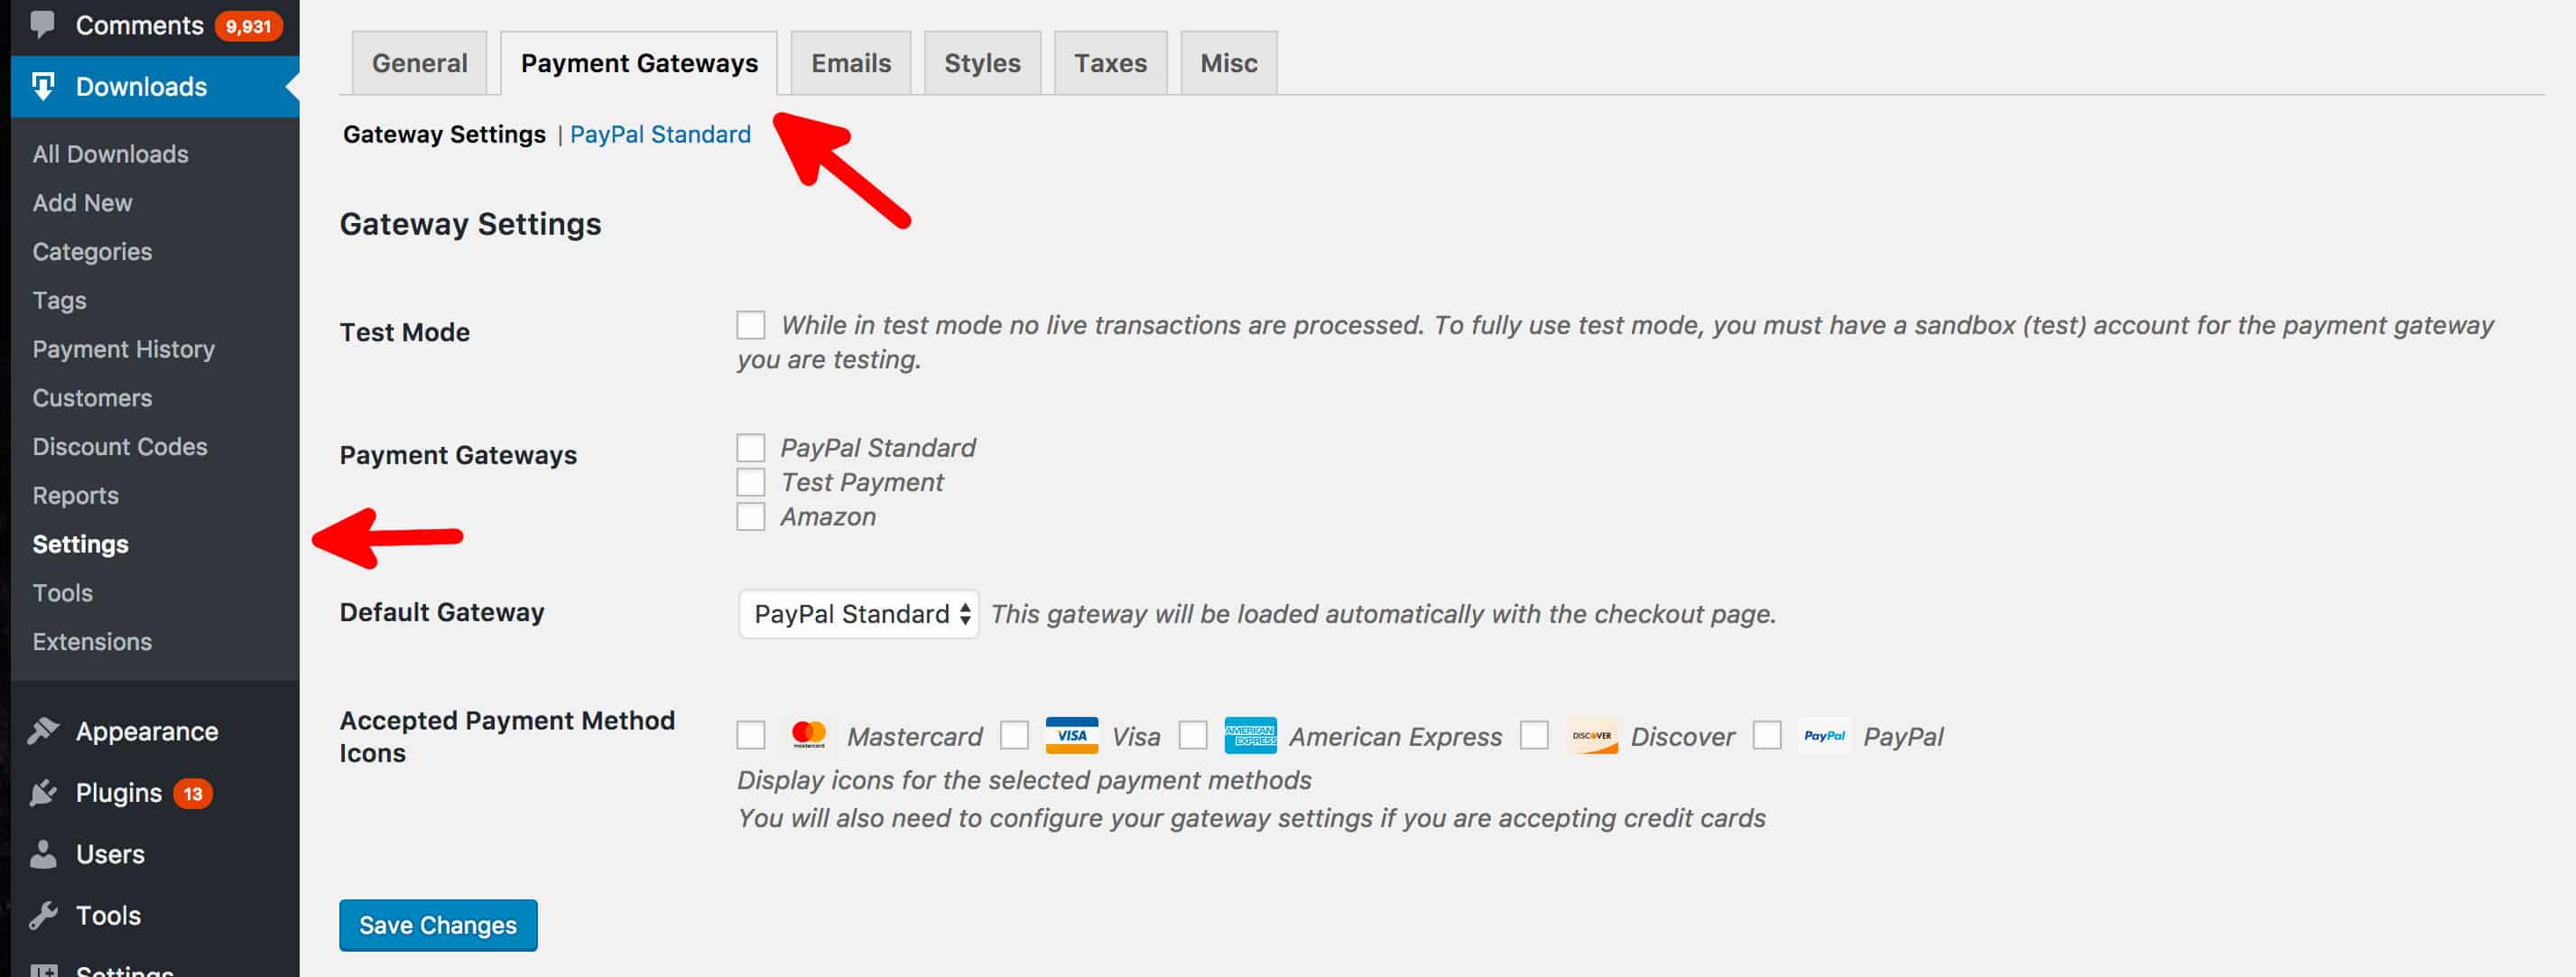
The free version of Easy Digital Downloads comes with two payment methods — PayPal standard and Amazon. The Test Payment option of for testing your checkout process works. We will use PayPal, so check the PayPal Standard checkbox and the PayPal accepted method icon. You can check the Test Mode box if you wish to test the checkout process (usually a good idea!).
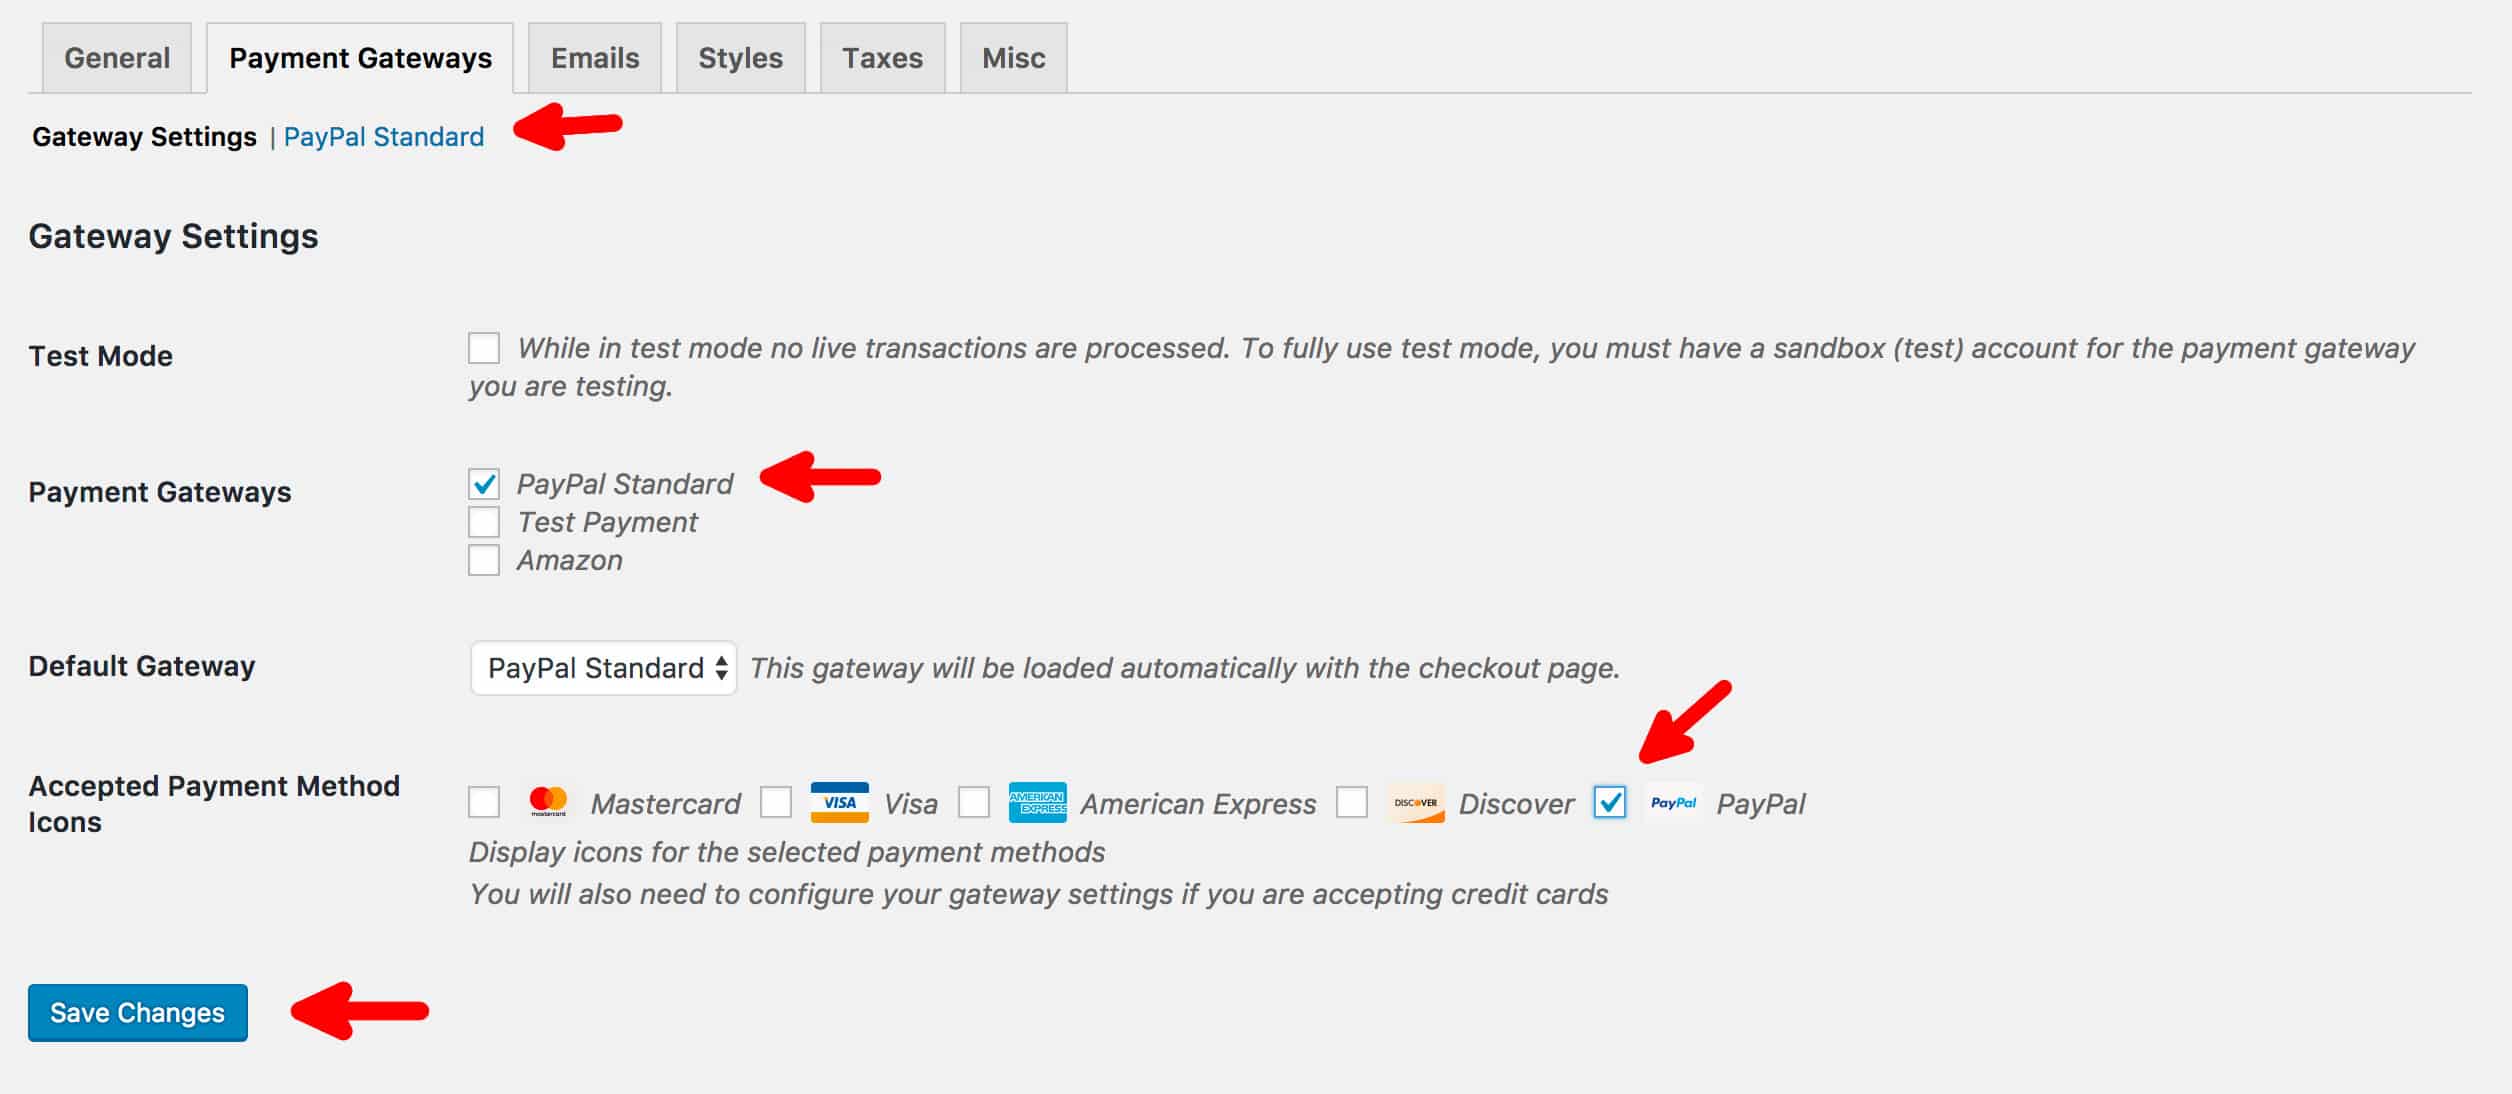
After you have saved those changes, click on the PayPal Standard text at the top of the screen. It will bring up some configuration details for your PayPal account. You can grab this information from your PayPal account.
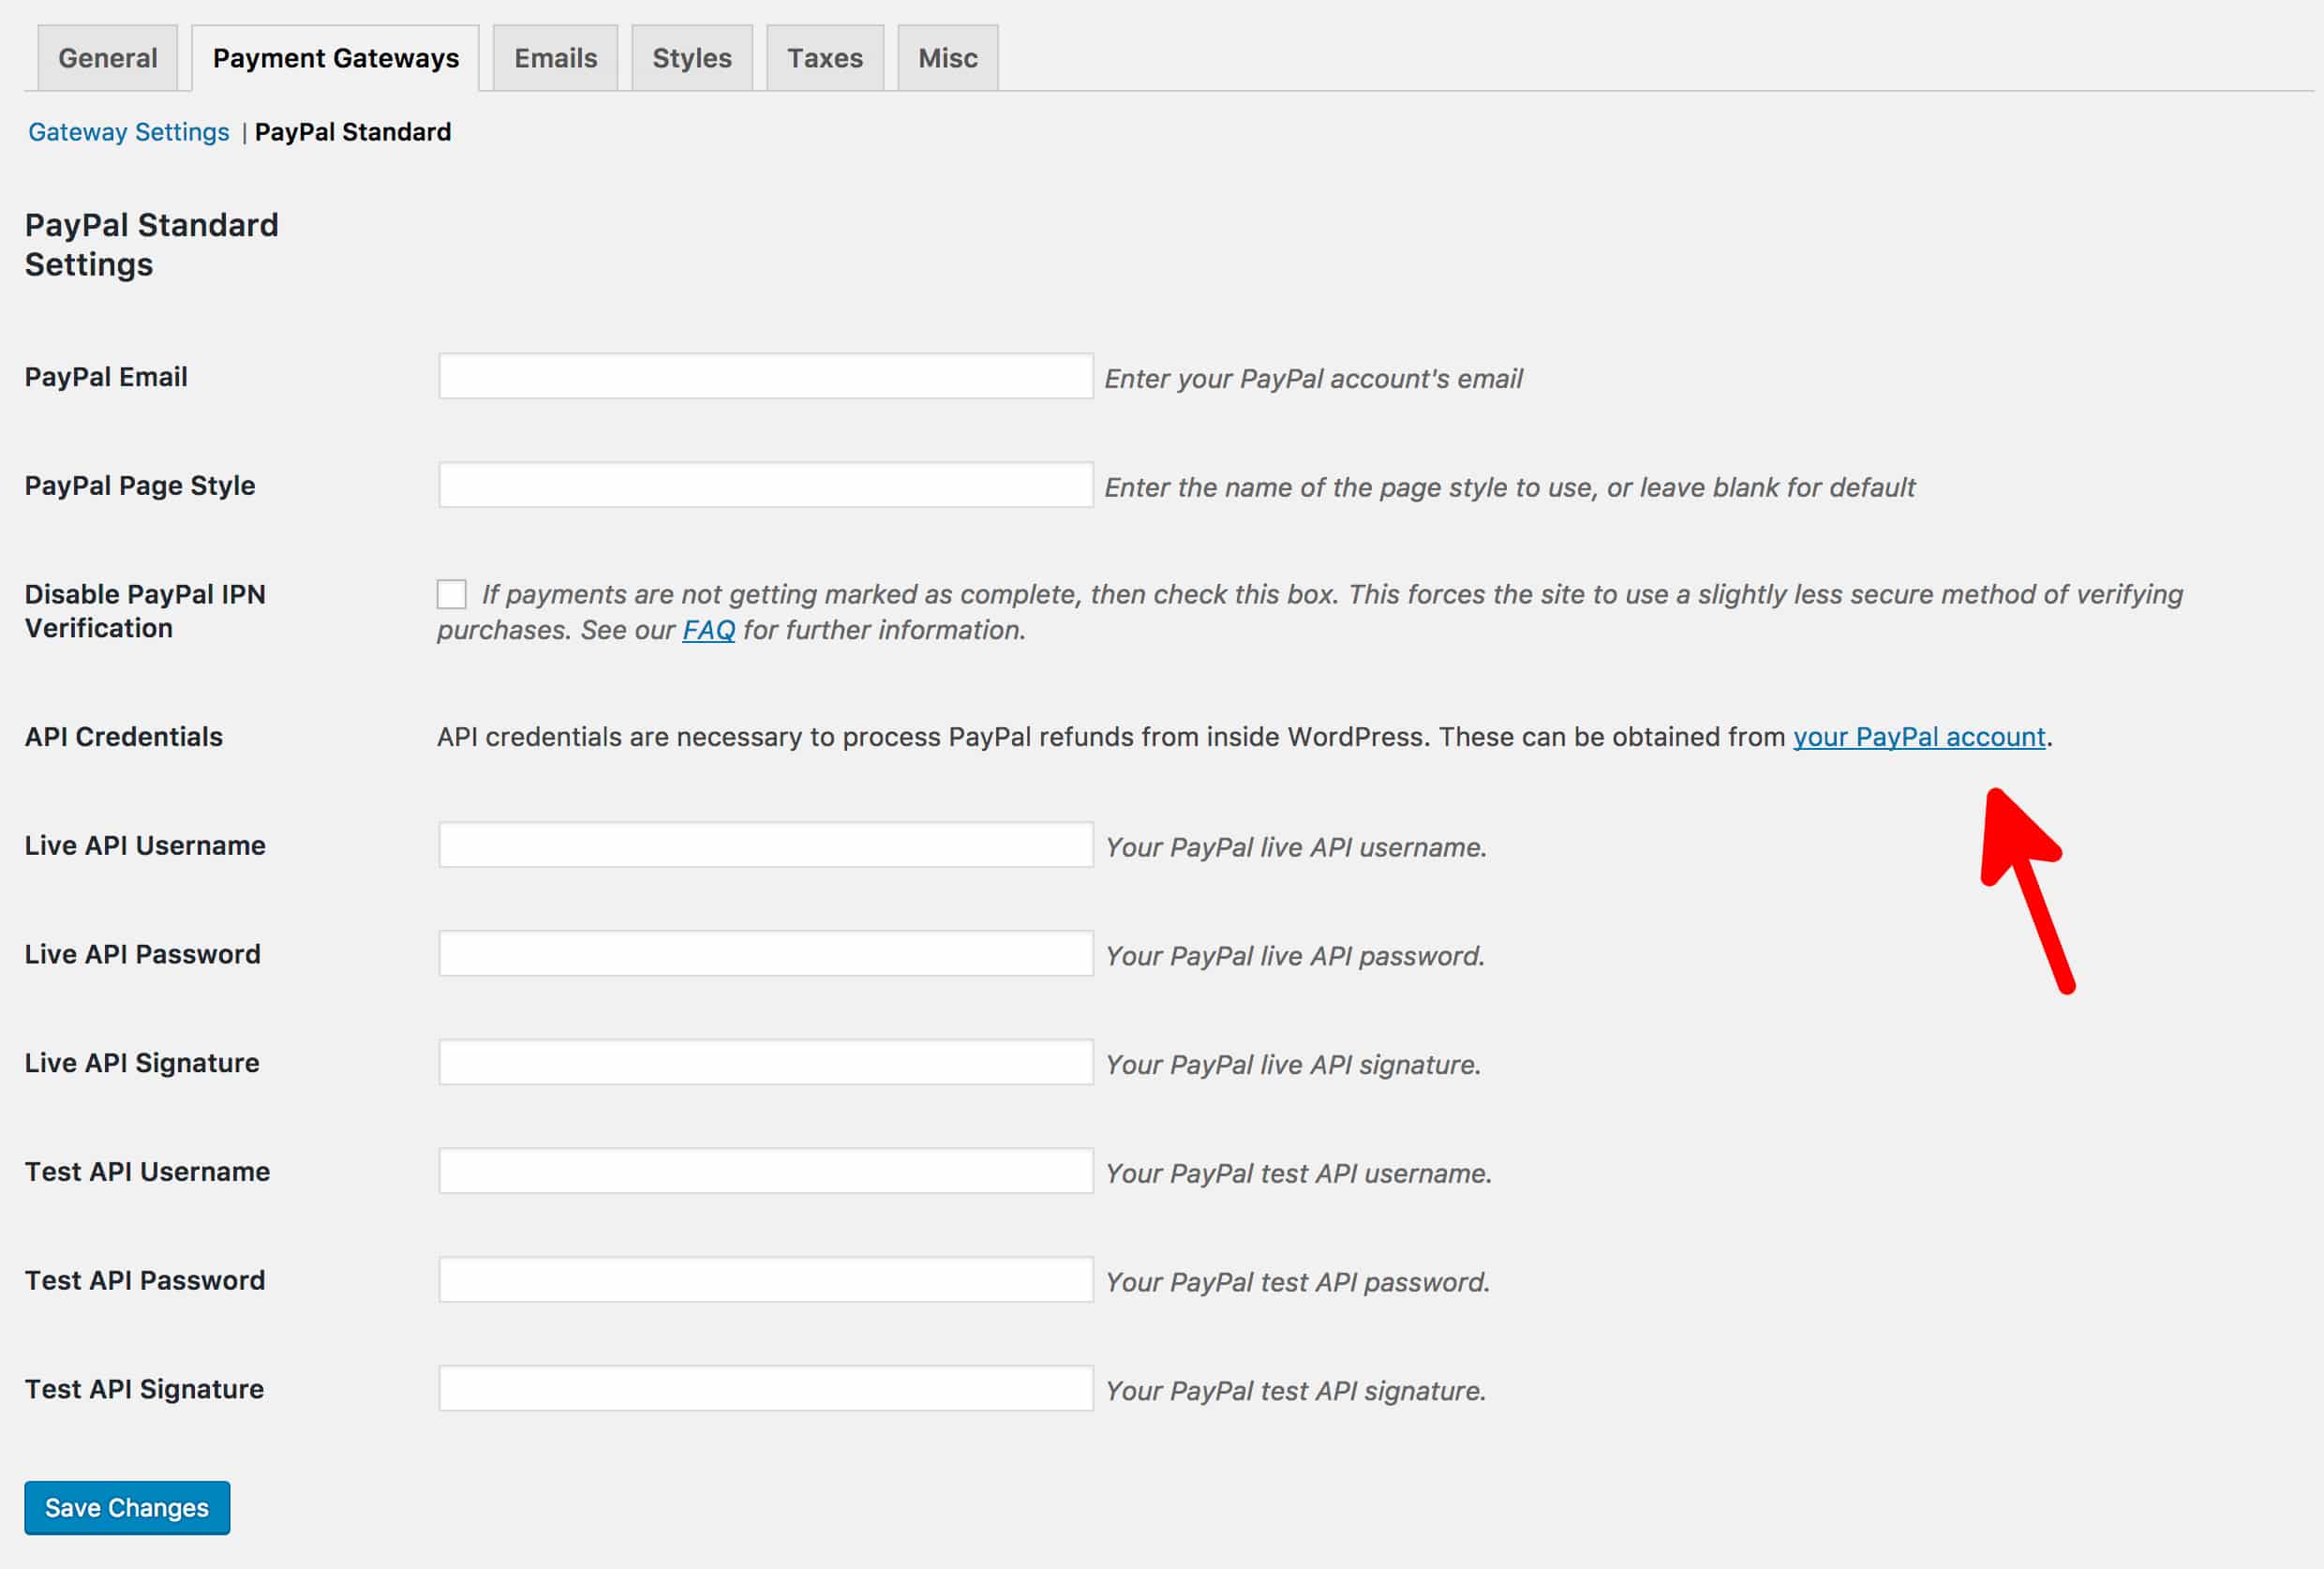
After adding your PayPal details, hit Save Changes once more. You can now test the checkout buttons on your product page. Don’t forget to turn off the test mode when you are ready to launch!
Additional Configuration Changes
While you could start selling your product at this point, there are a few more configuration changes which you may wish to make.
Settings — General
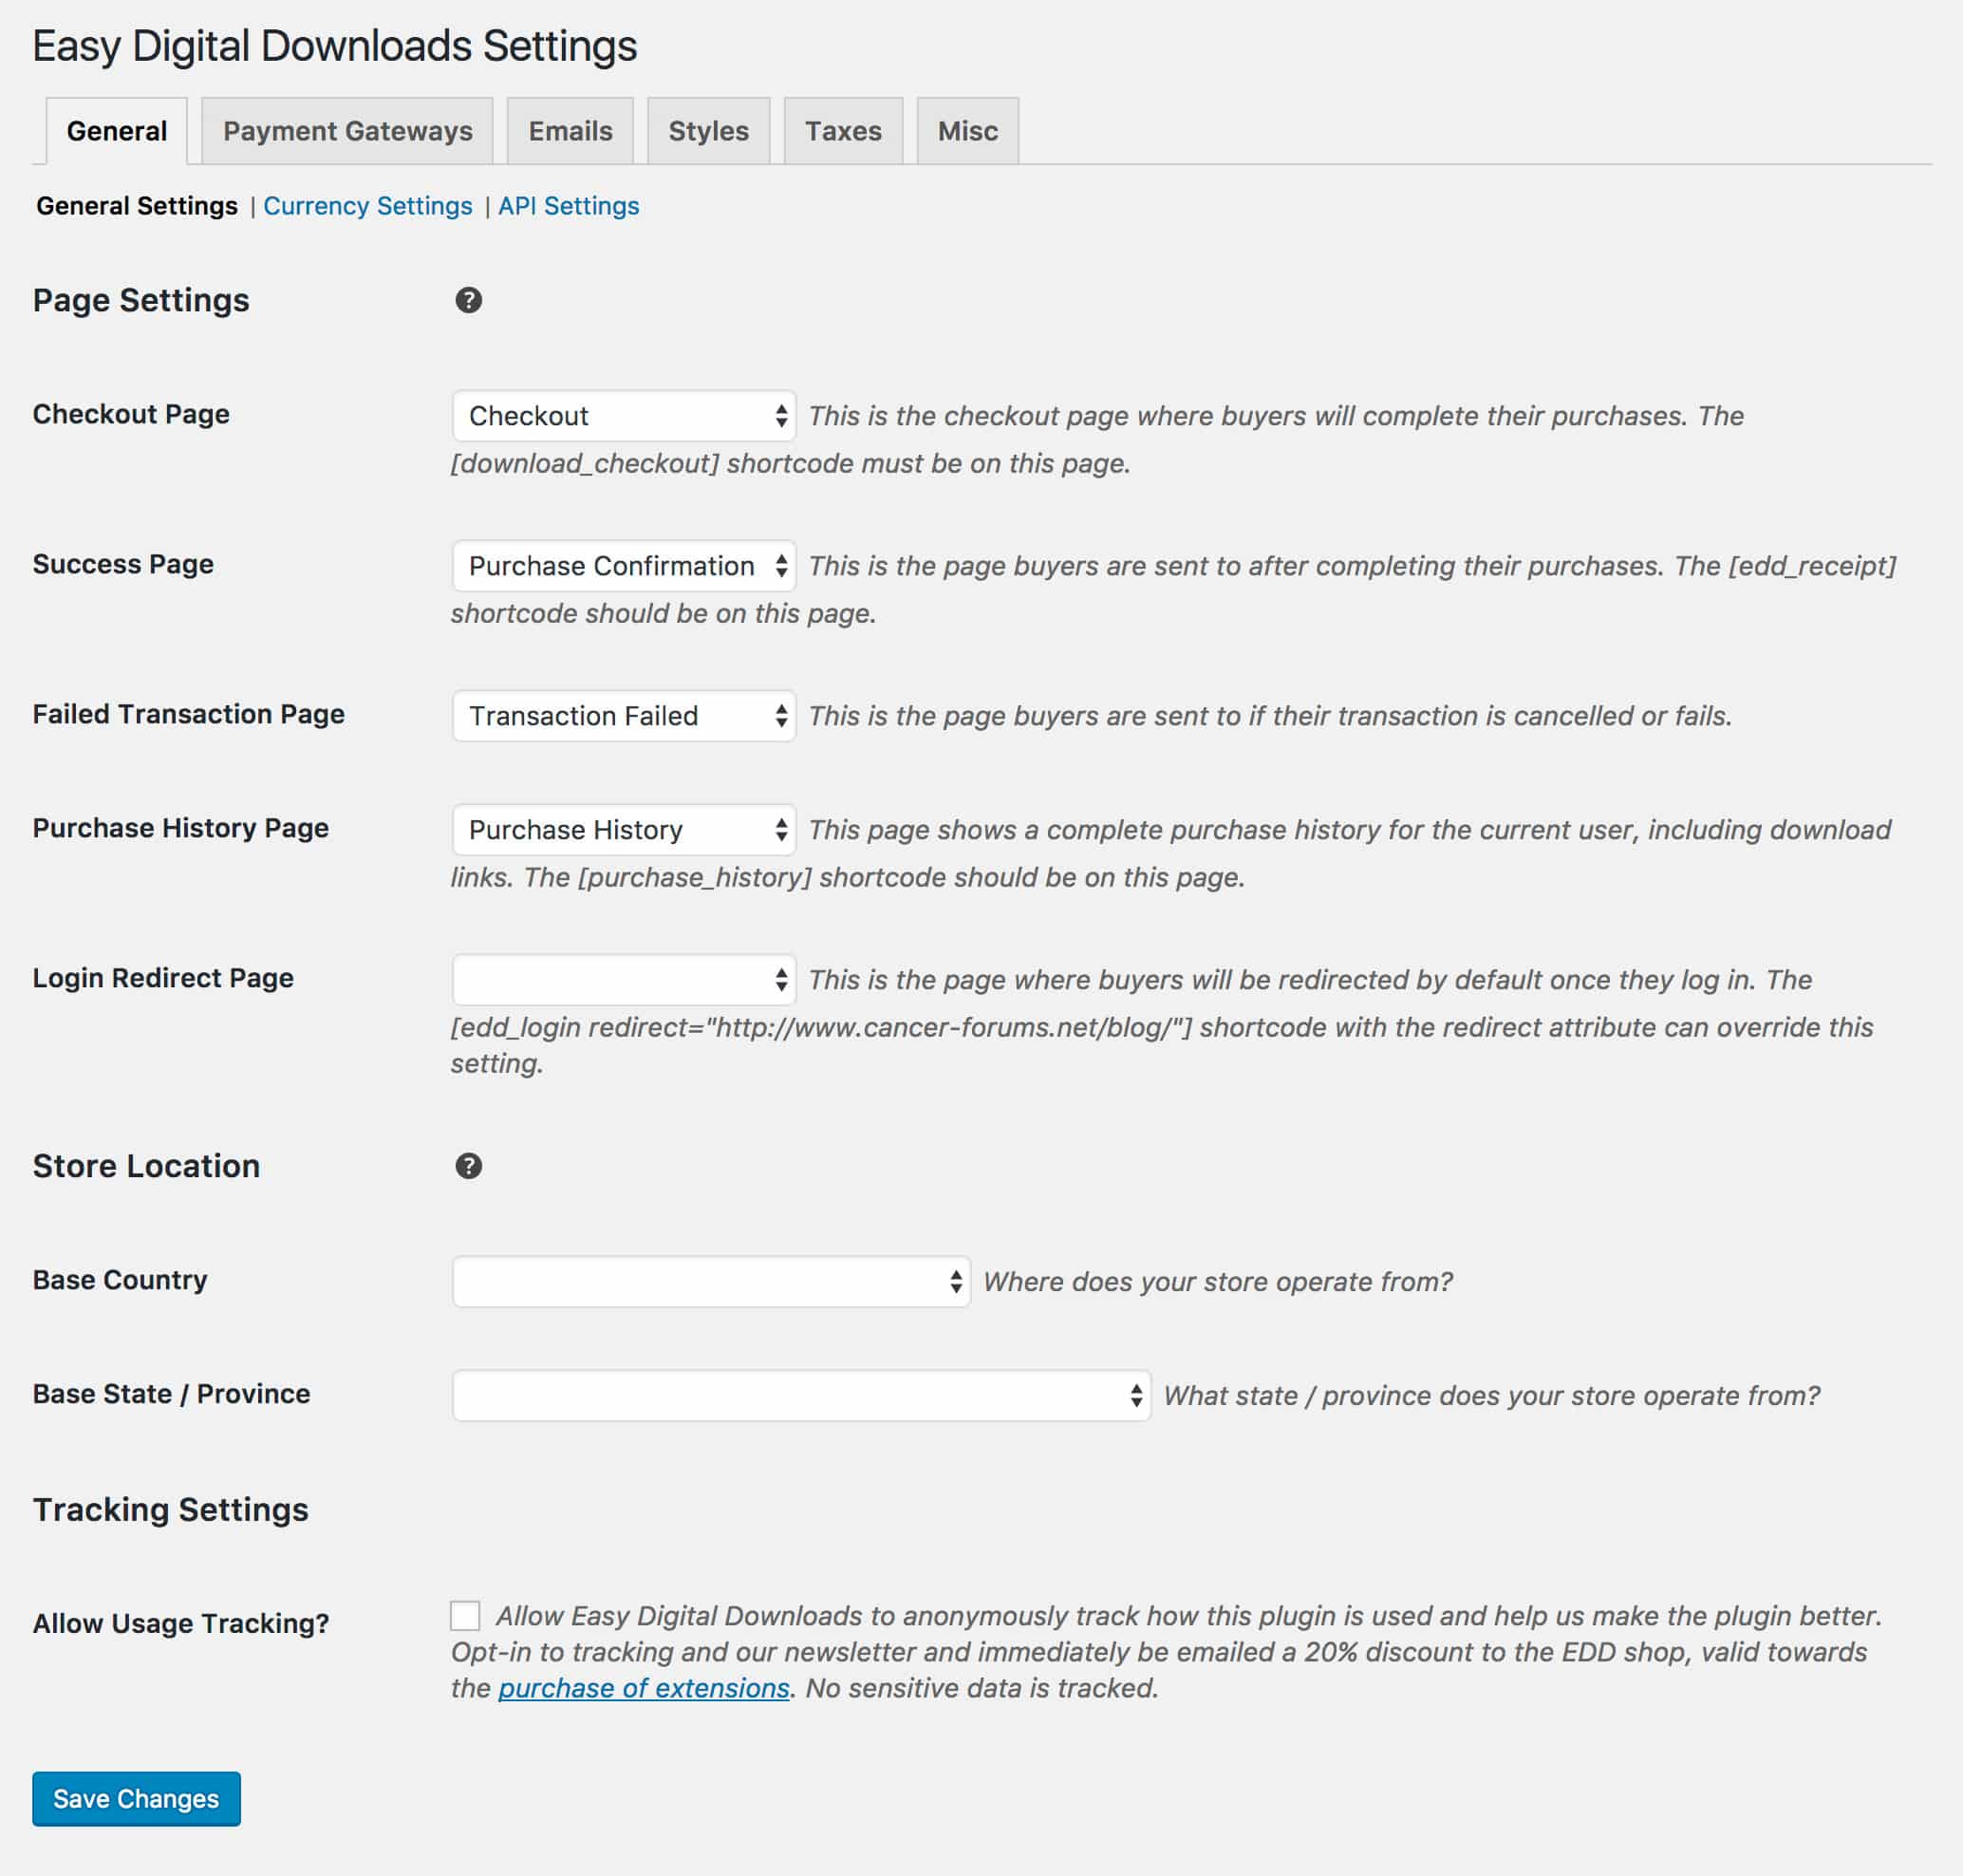
The settings on the General tab include:
- Page settings: These options let you alter the flow of the checkout process. You can change the page that clients checkout from and the page where they are redirected after a successful or failed transaction. You can also alter the page where they view their purchase history and the post-login page for customers.
- Store location: Set the store location settings here. This information helps customers know more about your company.
- Usage tracking: You have the option of sharing usage data with the developers of the plugin.
- Currency settings: If you look at the top of the page you will notice a link called Currency Settings. This section allows you to set a default currency, alter the currency position and change decimal point separators.
- API settings: You can give approved users API keys that allow them to manage the shop’s settings remotely.
Settings — Emails
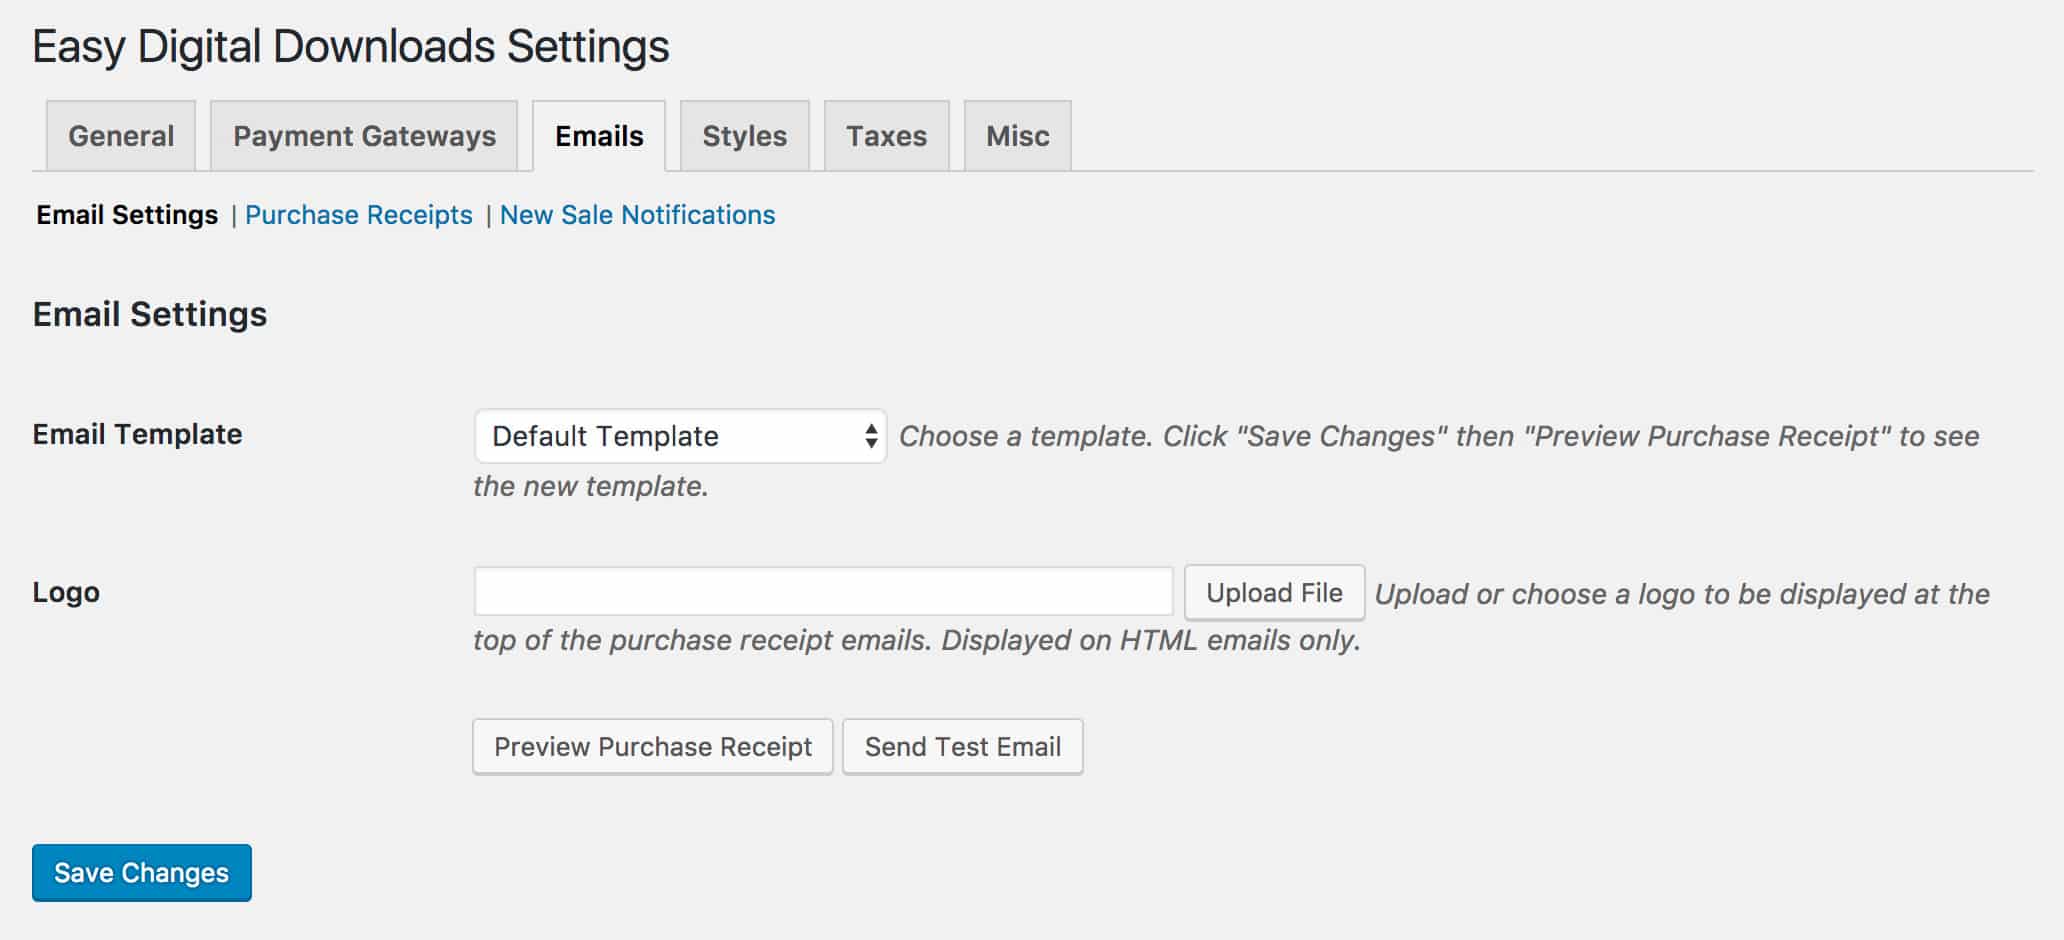
The email section allows you to customise the appearance and contents of emails sent to customers. It has the following sections:
- Email Settings: This allows you to choose a template for your emails, add a logo and send test emails.
- Purchase receipts: Use this section to further customise the appearance of receipts that your customers receive. You can use template tags to create highly customised emails.
- New Sale Notifications: You can customise the sales notification emails that you receive after a customer makes a purchase.
Settings — Styles
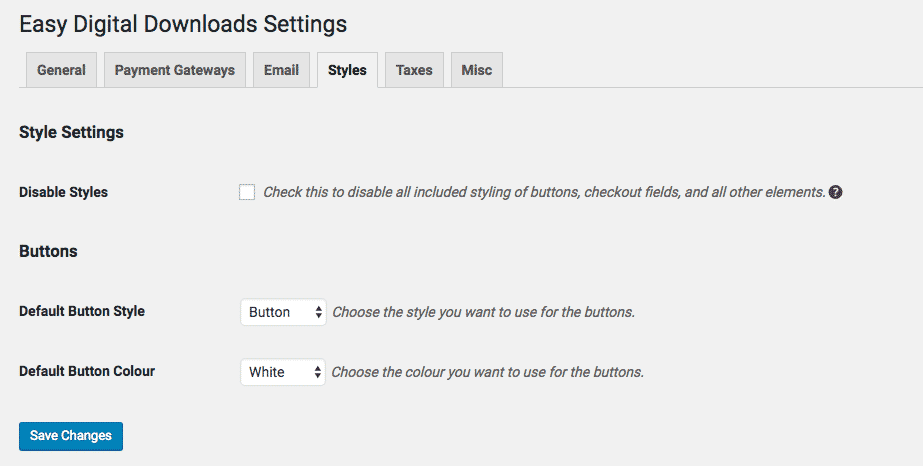
This section allows you to change the style of your checkout and purchase buttons. If your blog has a distinctive style, you may like to tweak these settings.
Settings — Taxes
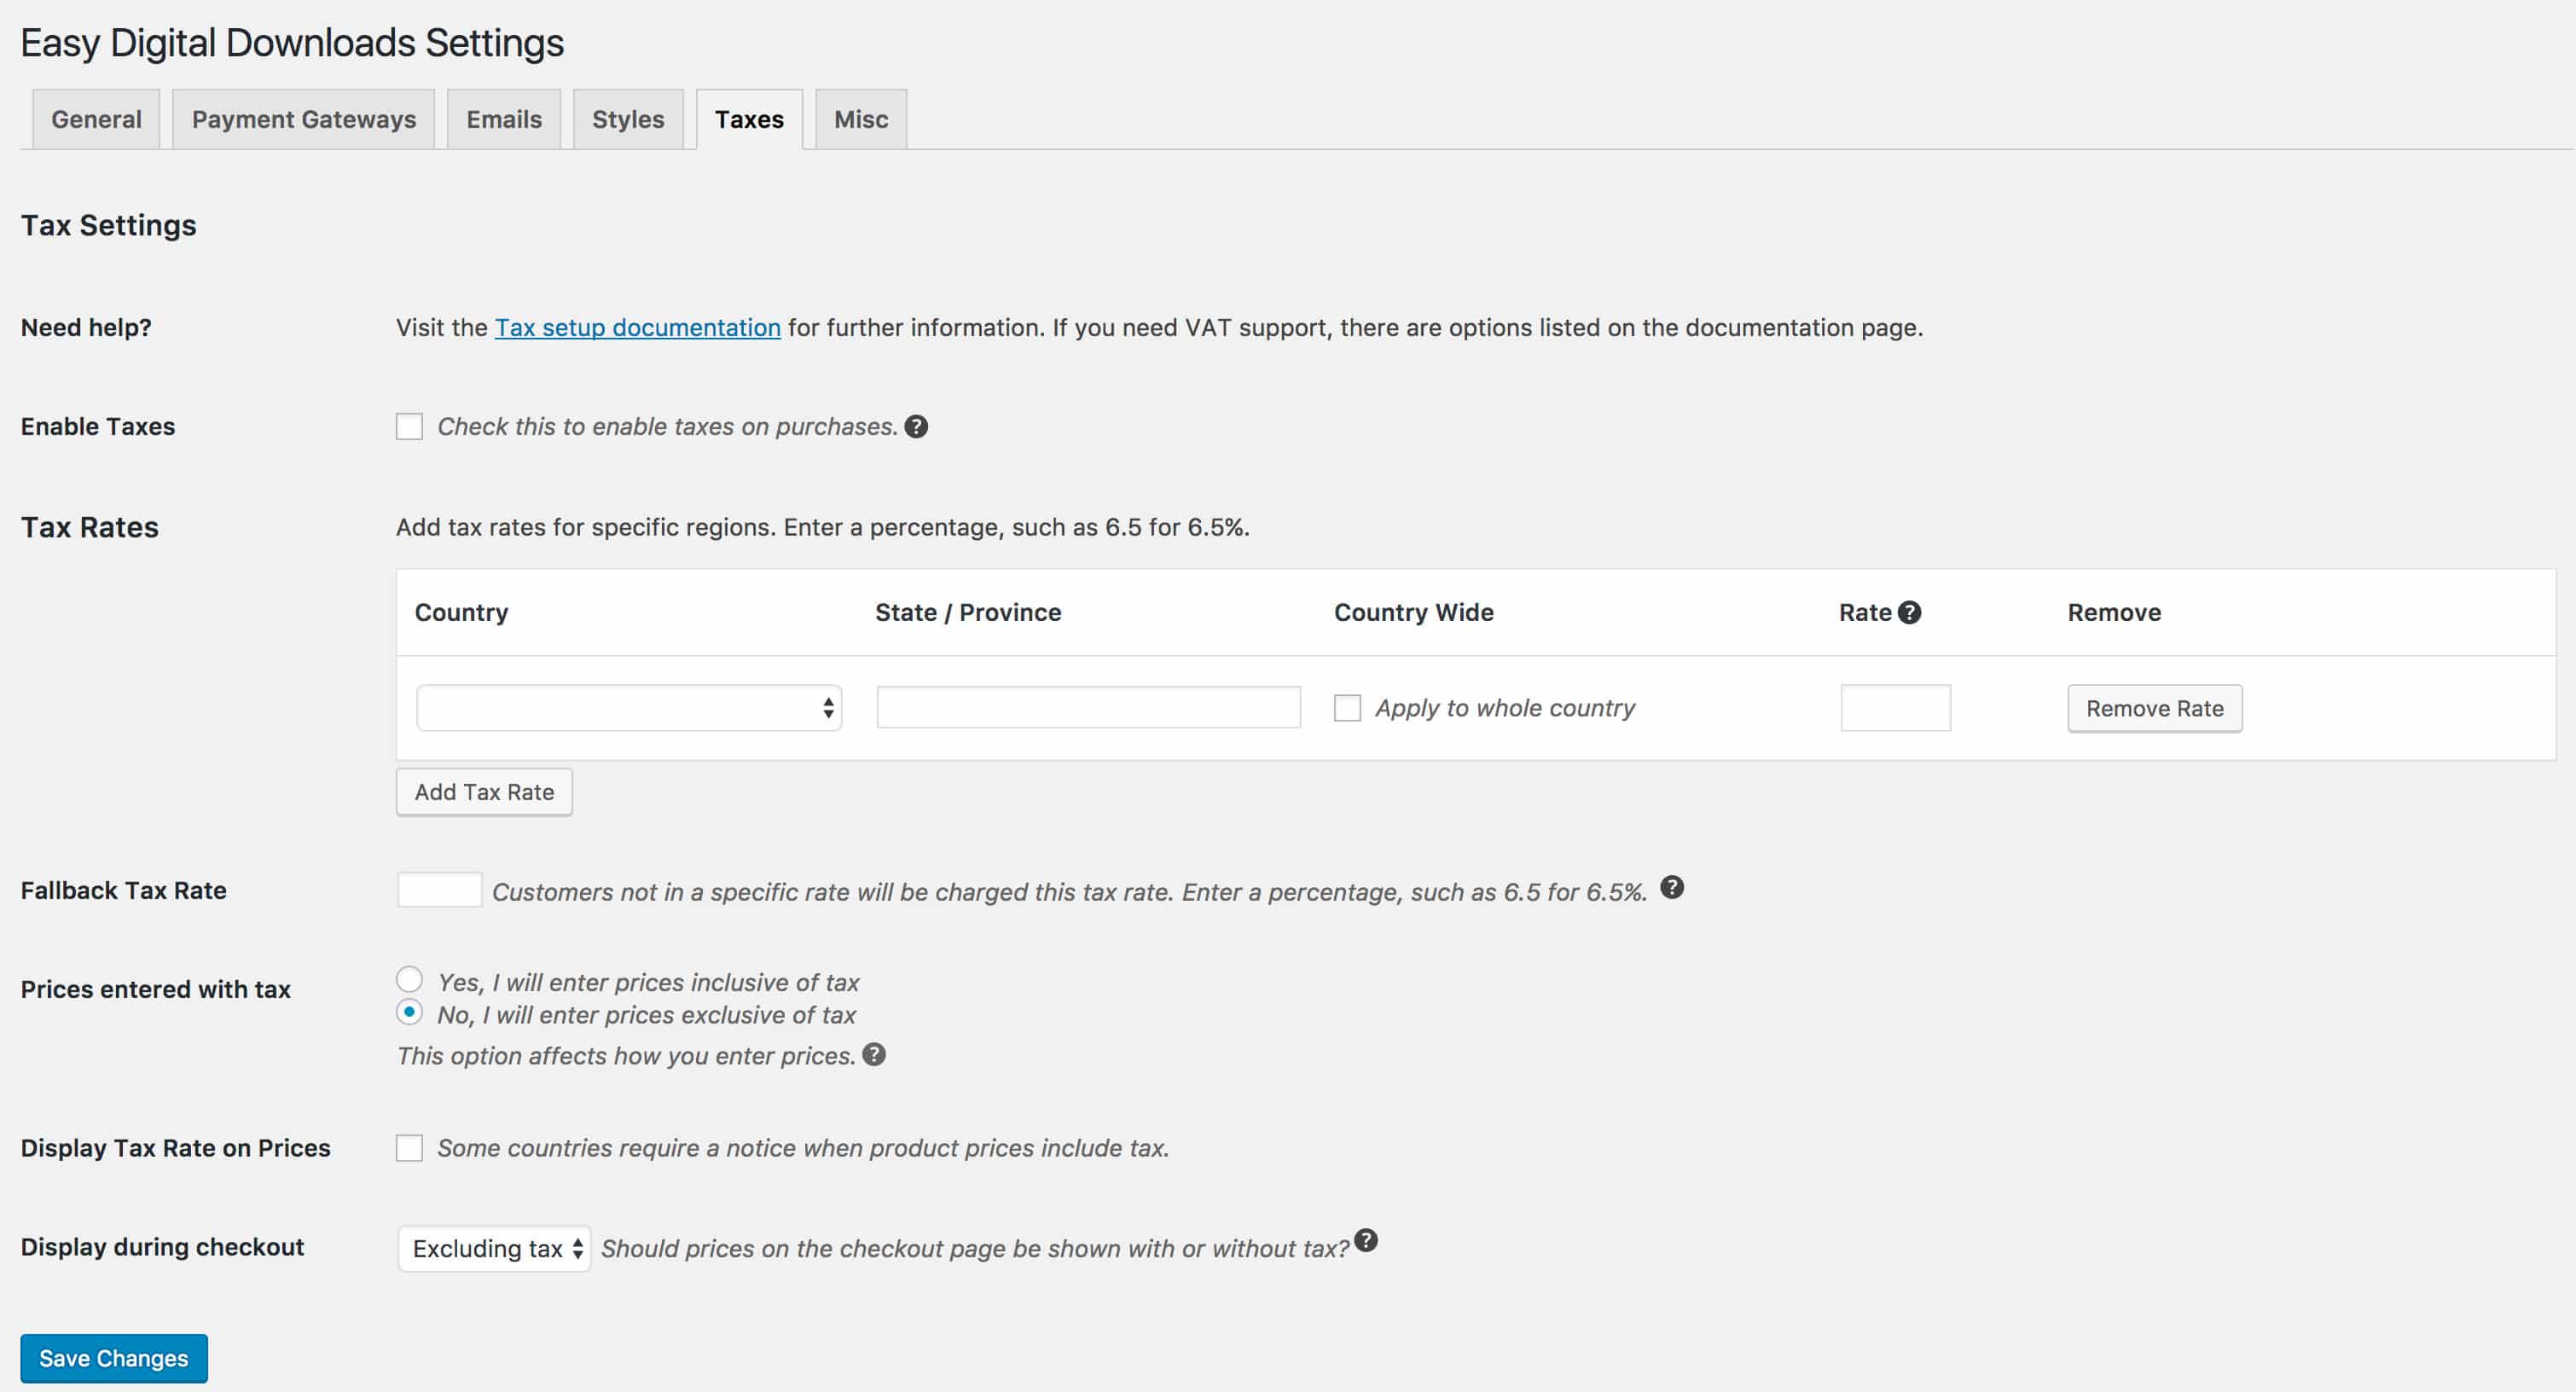
Depending on where you conduct business, you may have to pay state or federal taxes on your sales. This section helps you manage the taxes that must be added to the sale of your digital products.
Settings — Miscellaneous

The final Settings section contains a couple of options which allow you to change the behaviour of the shopping cart. You can also check an option to ensure all data is deleted if you decide to remove the plugin.
Extensions For Easy Digital Downloads
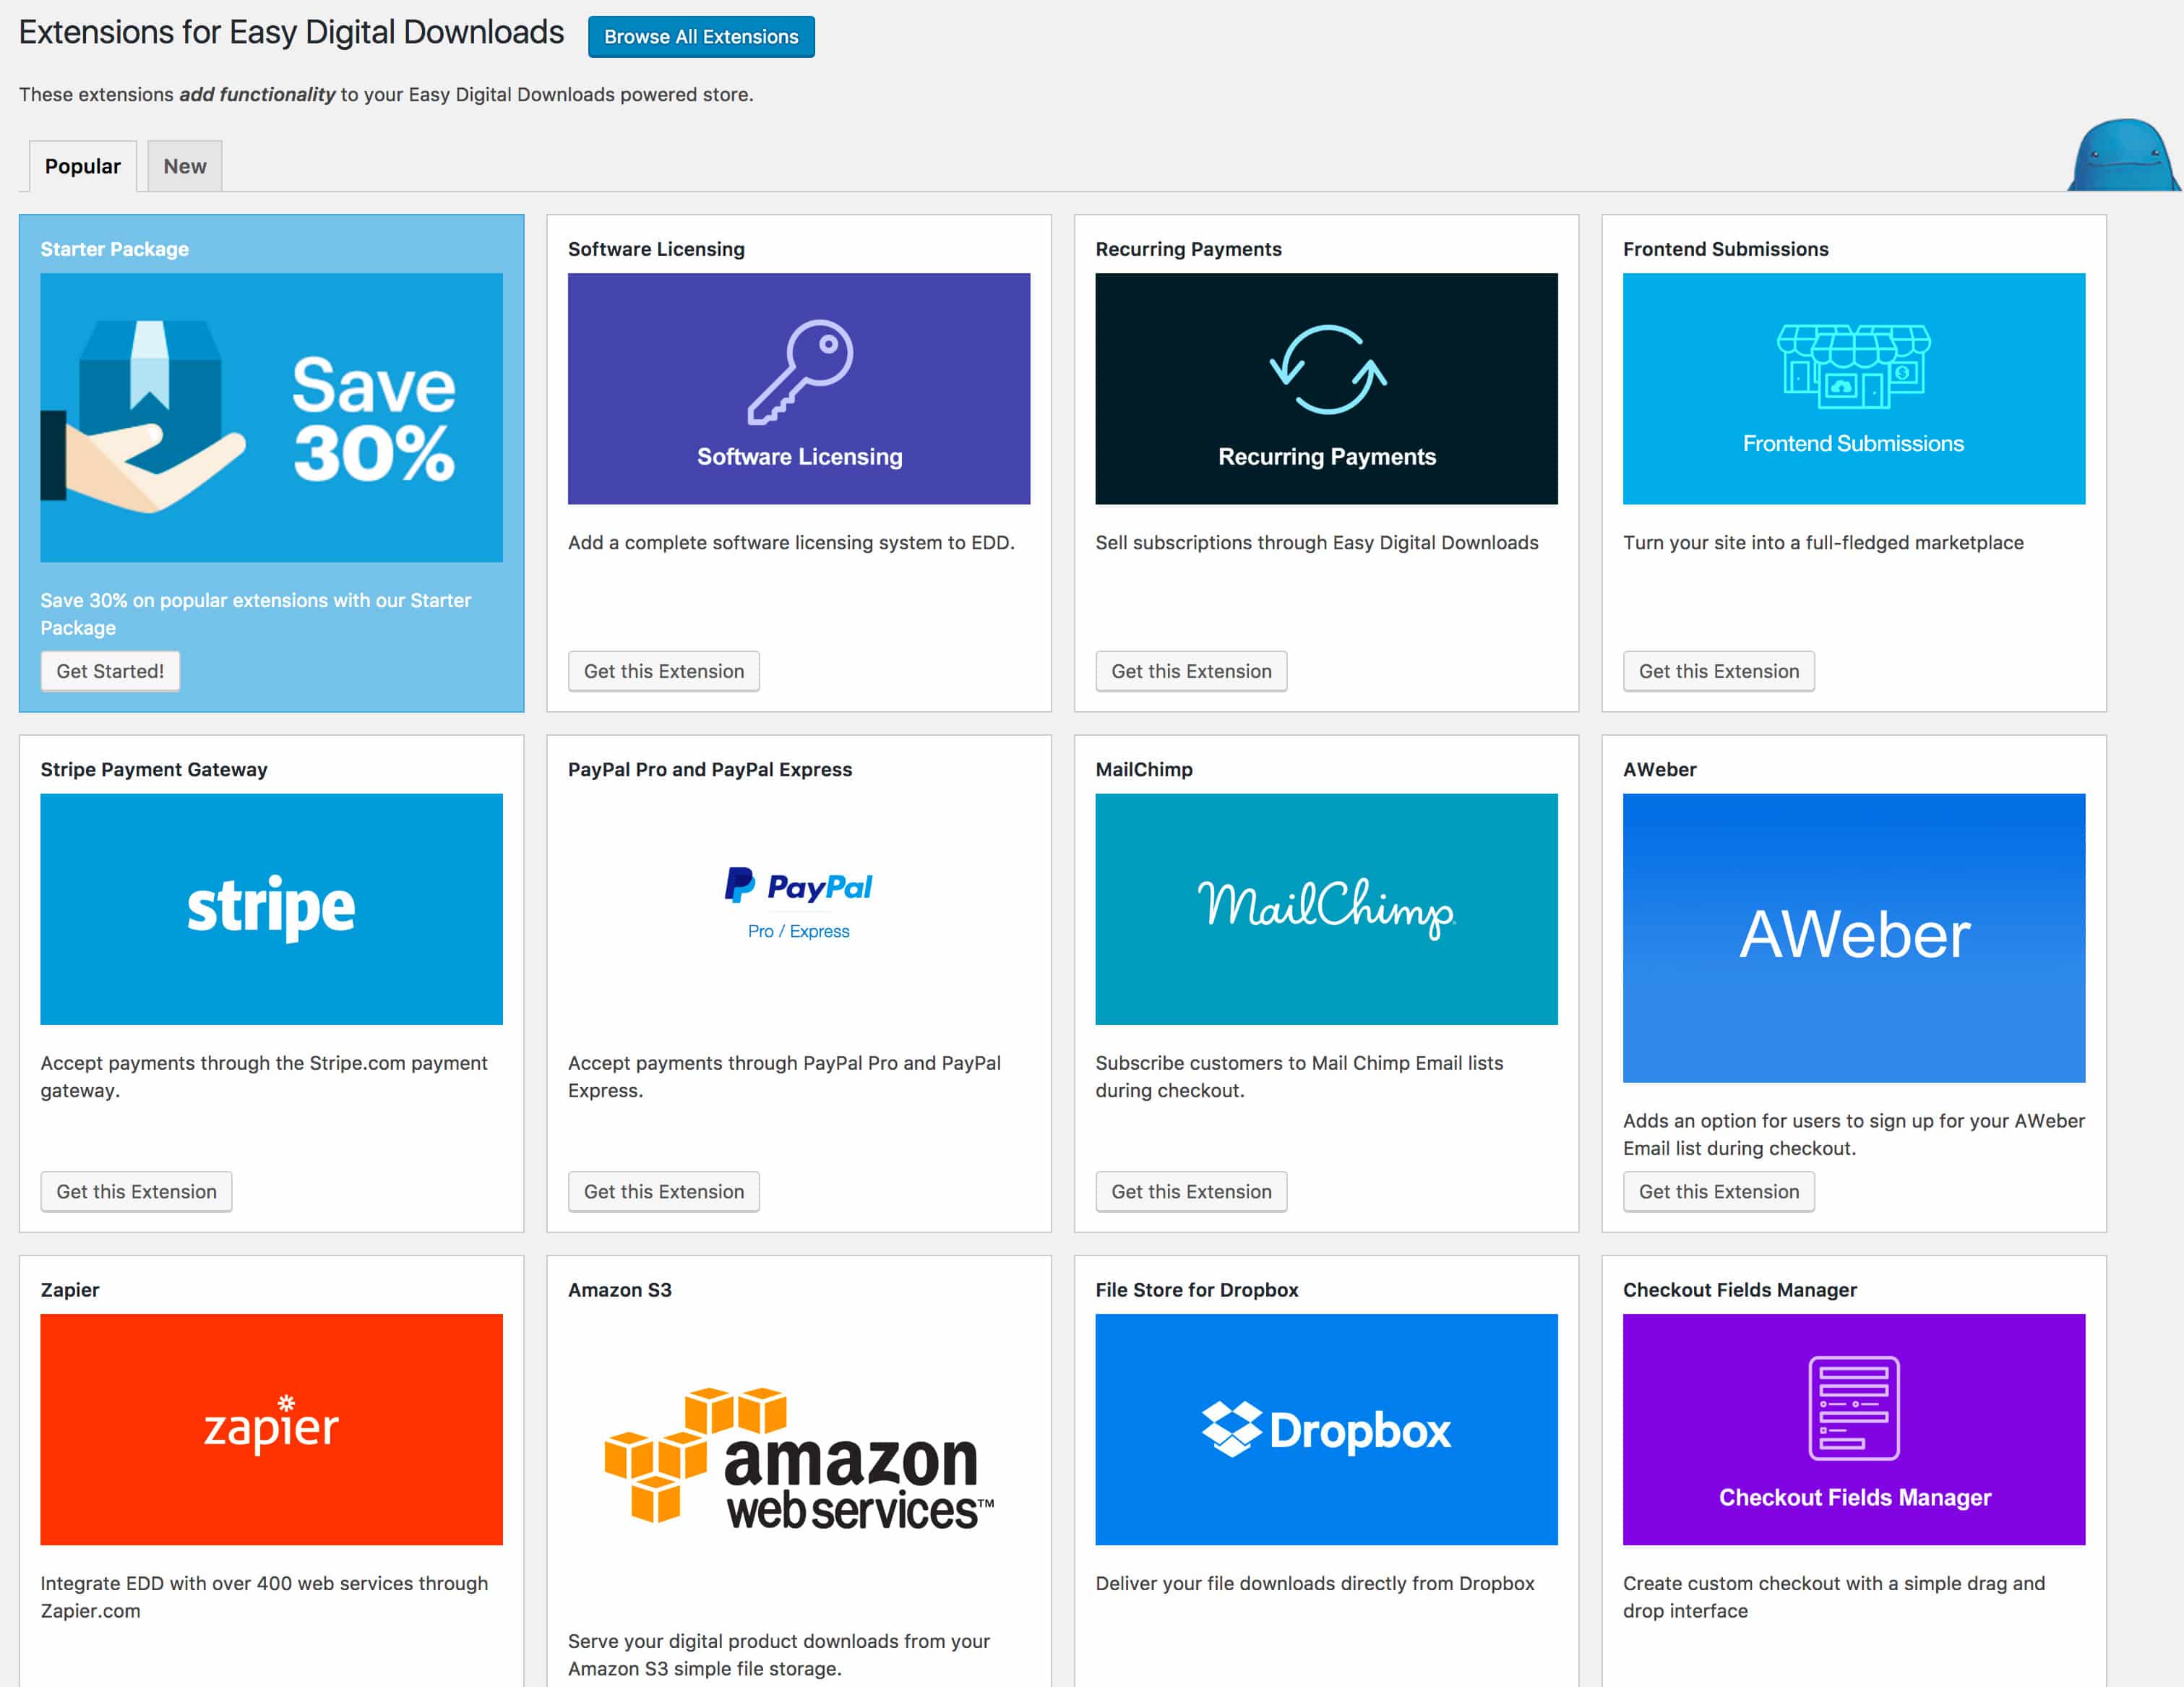
There are many extensions available for Easy Digital Downloads. Most extensions are commercial and must be purchased, however, there are a few free extensions also. Some of the best include:
- All Access: This extension allows you to create temporary passes allowing customers to download all of the digital content from your website.
- Software Licensing: You can create software license keys using this extension. Very useful for software developers!
- Stripe Payment Gateway: Stripe is a very popular payment gateway with lower fees than PayPal.
- Recurring Payments: You can take regular weekly, monthly, or annual payments from customers in return for access to certain digital products.
- Dropbox: This extension allows you to store the digital products you sell on Dropbox, giving customers access to high-speed downloads.
- Freshbooks: You can make accounting arrangements simpler with the FreshBooks plugin. It connects your sales and customer data with the FreshBooks cloud accounting platform.
- MailChimp: This extension allows you to incorporate a MailChimp mailing list subscription form into your checkout process.
- Git download updater: This allows customers to download digital files directly from services like GitHub and BitBucket.
We hope you enjoyed reading The Ultimate Guide to Easy Digital Downloads. Stay tuned to the blog for more WordPress tutorials, tricks and tips! You can also follow us on our social media channels.
