As you make changes to your website, you may find yourself in a situation where you need to permanently redirect visitors from one page to another. This can be accomplished with a 301 redirect. It is a simple method for telling web browsers and search engine spiders that a URL has permanently moved to a new location.
A 301 redirect comes in handy for human users who have bookmarked an old page, because it allows you to seamlessly redirect them to the new page (without messing up the user experience). It can also be useful if you have incoming links that are pointed to an incorrect or old URL. 301 redirects can even be used to improve your website’s search engine rankings and domain authority (if done correctly).
This guide will explain the scenarios where a 301 redirect would be useful. Then, we’ll show you two methods for adding 301 redirects. One will use a plugin and the other will involve a manual change to your .htaccess file. Let’s get started!
Table of Contents
- Why would you want to create a 301 redirect in WordPress?
- Using a WordPress plugin for 301 redirects
- Manually adding 301 redirects
Why would you want to create a 301 redirect in WordPress?
A 301 redirect is a powerful tool for redirecting visitors to different locations. It is an HTTP response status code that is sent from your web server to a user’s web browser or a search engine spider. It indicates that the content found at a URL has been permanently moved to a new location.
Here is a quick example of how 301 redirection works. Say you have a webpage that sells Ford car doors. The URL for that page is: http://www.acme.com/car-doors/
You might decide to change the URL to http://www.acme.com/ford-car-doors/ because that is a more descriptive URL and better for search engine optimisation. But if you change the URL, it may negatively impact your search engine rankings because incoming links will still be pointing to the original URL. It may also impact users who have bookmarked the original URL.
You can set up a 301 redirect to seamlessly send those visitors to the new location. When a visitor types in or clicks the link http://www.acme.com/car-doors/, the server tells the browser “hey, this page has permanently moved” and immediately redirects the visitor to the new URL. The most common reasons to set up a 301 redirect include:
To improve domain authority: There may be many variations of the same URL on your website. For example, you may have http://www.acme.com, http://acme.com and https://acme.com all pointing to the same page. This can negatively impact the user experience and eventually your organic rankings, simply because Google and other search engines will get confused when it comes to identifying the actual URL. You can use a 301 redirect so all variations point to the same page. Search engines will see that all incoming links point to a single page — which helps that page rank well.
To rebrand your website: If you have decided to rebrand your website, you may need to change the URL of your website completely. Having a 301 redirect will allow you to direct visitors from the old site over to the new site. This lets you retain any search engine rankings that you had previously achieved.
To improve the search engine optimisation of URLs: In the previous example, we changed a URL to a more search engine optimised version. Using 301 redirects allows you to change URLs whenever you feel like it and retain any existing rankings and domain authority.
For cleaning up dynamic URLs: If you have a dynamic website with long URLs that contain a lot of data, you might wish to redirect them to shorter, search engine friendly versions. For example, if a URL looks like http://www.acme.com/cardoors.php?door=yellow&car=ford, you might like to redirect that to http://www.acme.com/yellow-ford-doors/. Your URL will be easier for users to understand and search engines tend to handle static URLs more easily.
Using a WordPress plugin for 301 redirects
The first method for adding 301 redirects to your website is to install the Redirection Plugin. This plugin makes adding 301 redirects easy! This rRedirector also has some other excellent features including:
- 404 error monitor to help you identify missing pages
- It logs how many times a redirect has been used
- Allows for any URL to be redirected, even for pages that still exist
- Works with Apache and Nginx servers
- Allows you to add temporary 302 and 307 redirects as well as permanent 301 redirects
- Regular expression support
Here is a short guide to installing and configuring this plugin.
1. Log into your WordPress blog
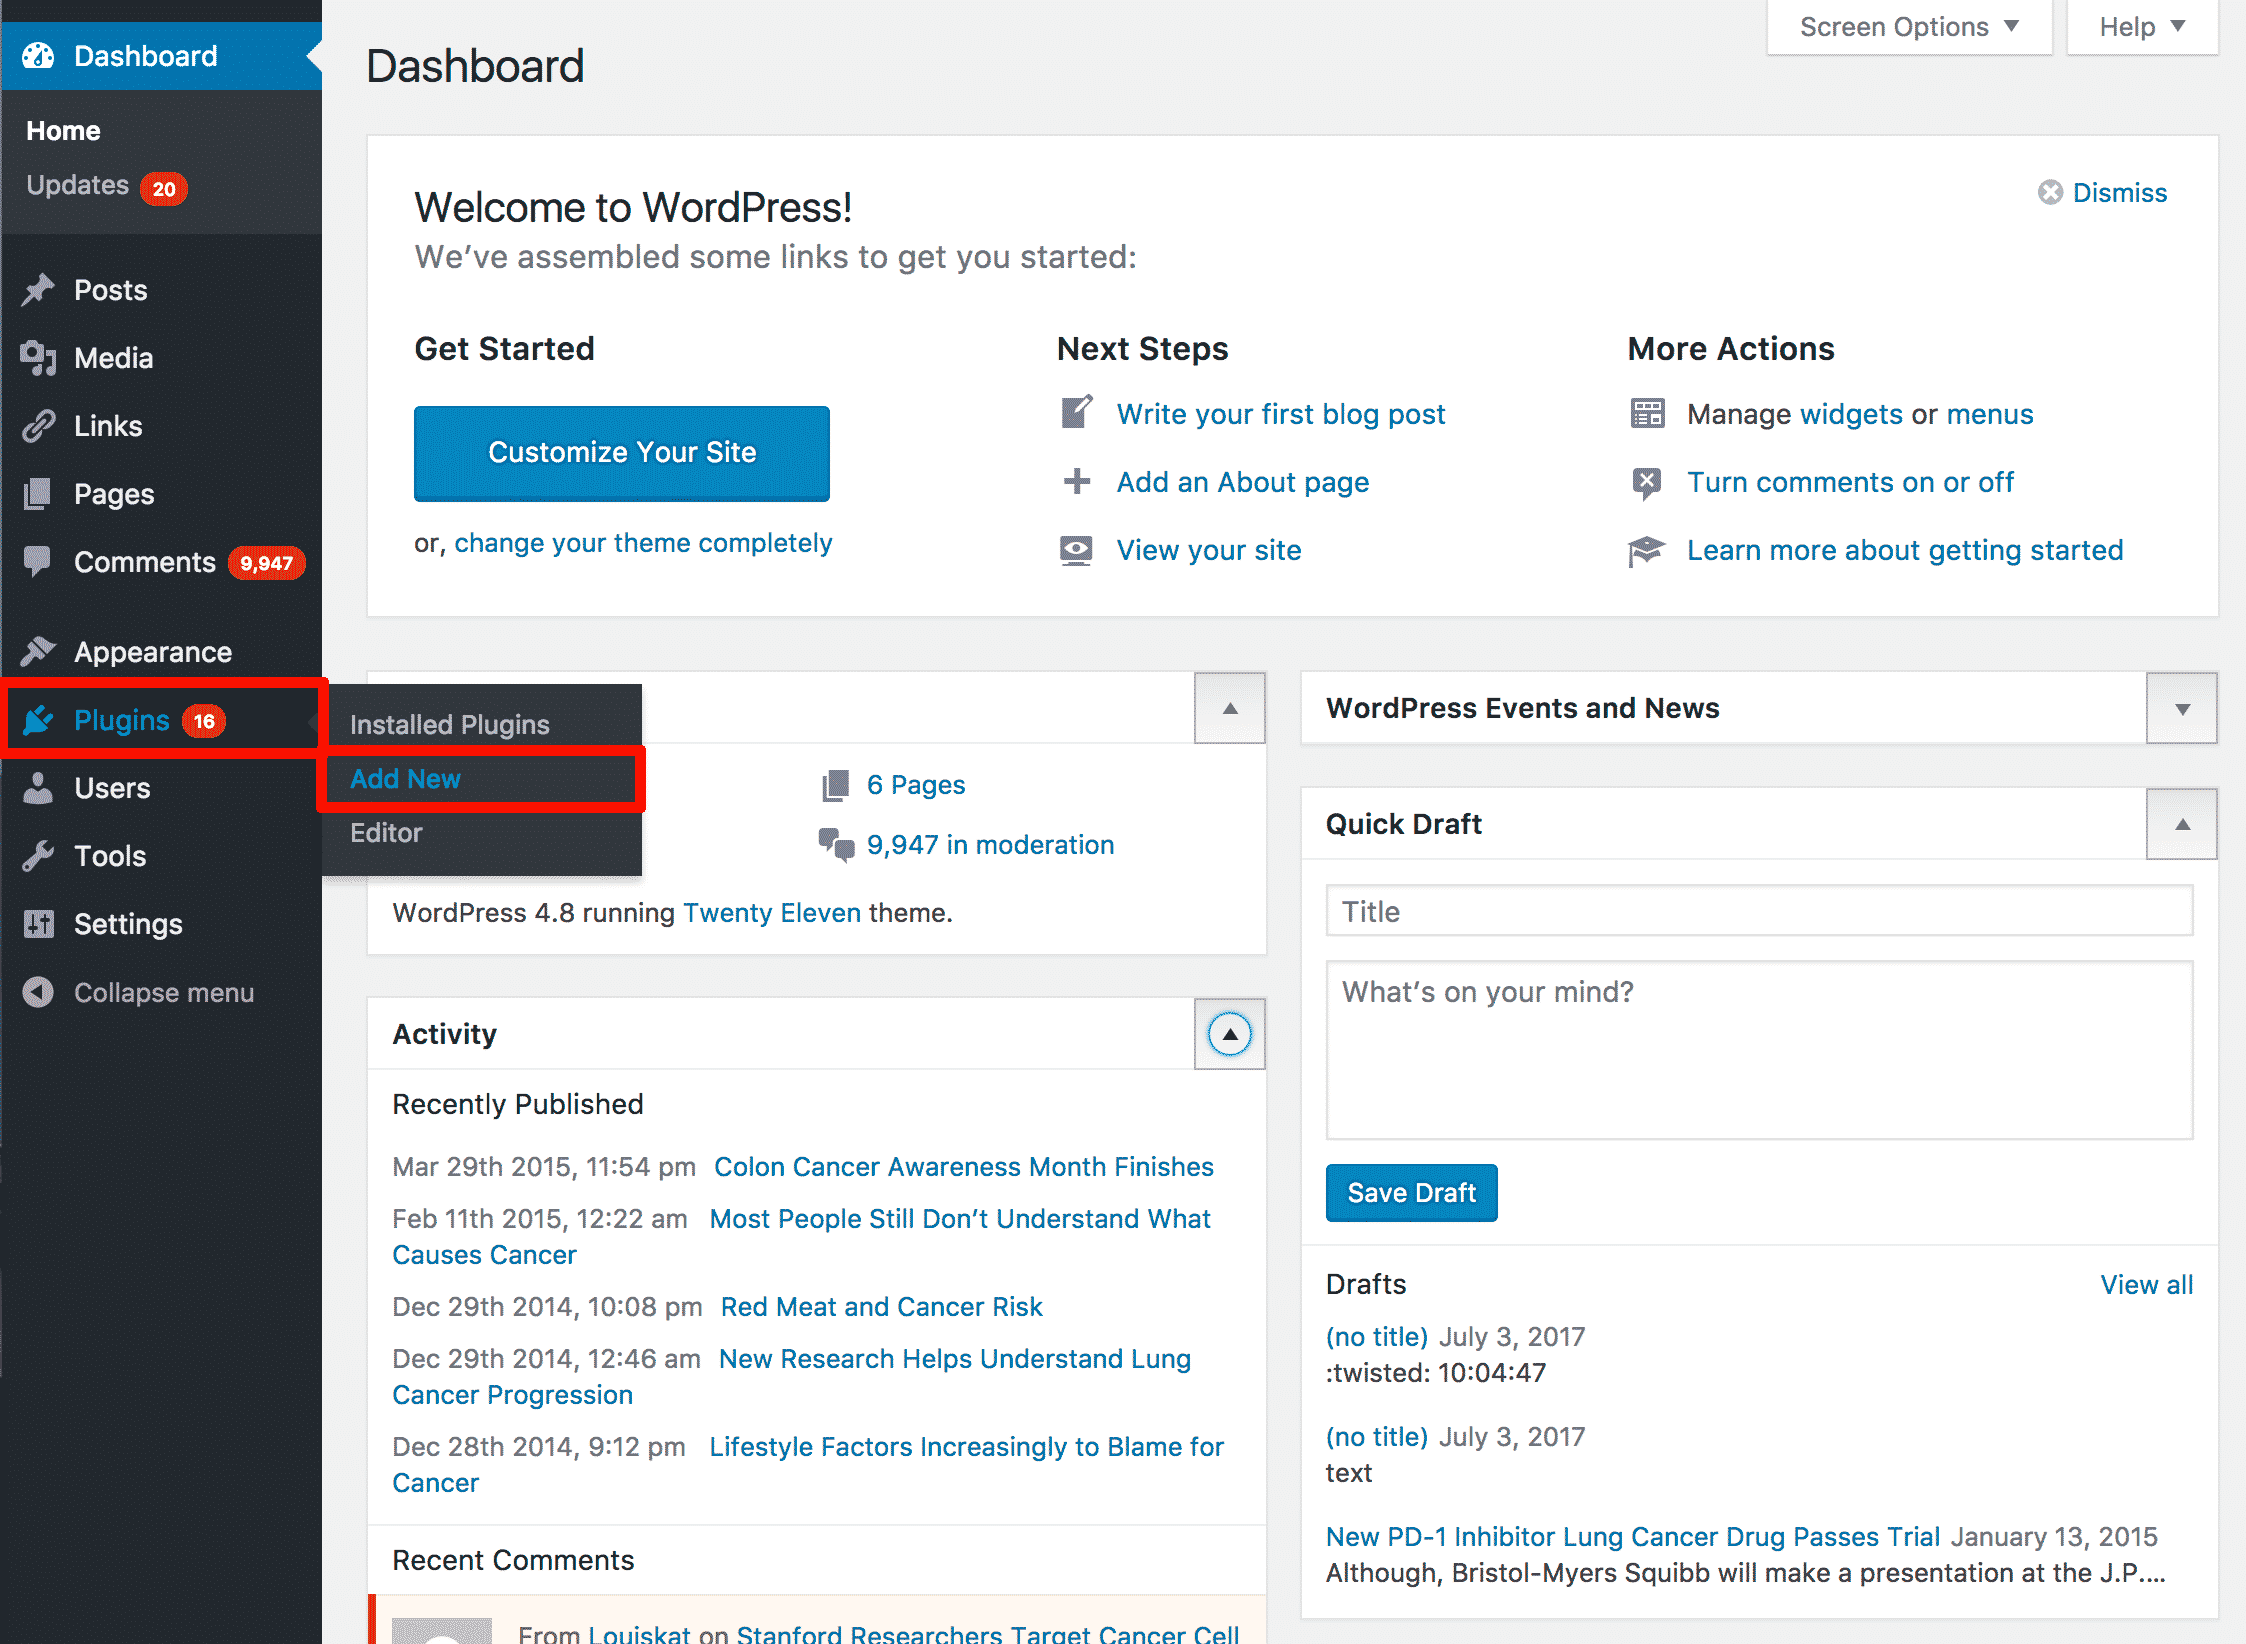
2. Use the left-hand navigation to select Plugins > Add New
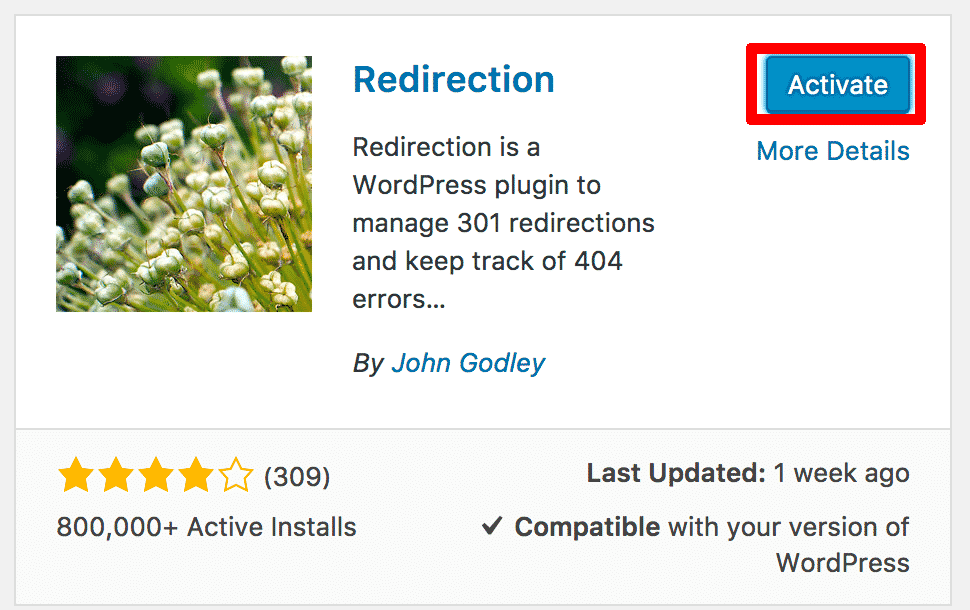
3. In the Search field on the upper right corner, type “Redirection”. The Redirection plugin will be the first result. Click on the Install Now button.

4. Click the Activate button to activate the plugin!
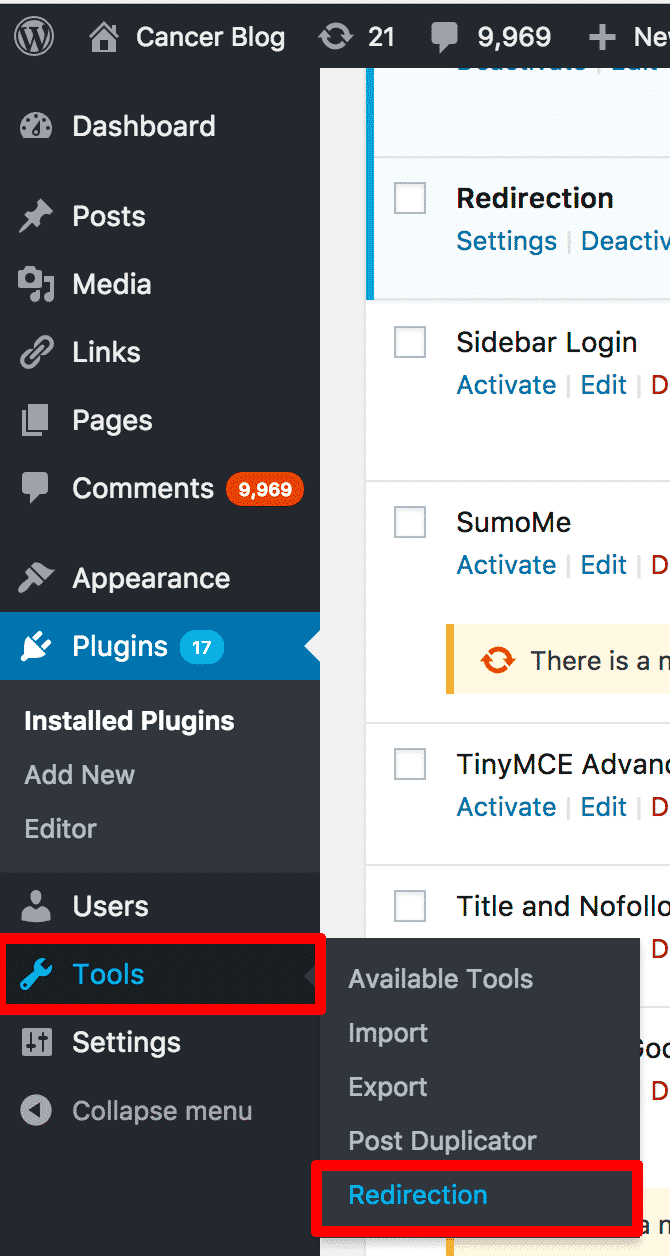
You will now have a new menu item available: Tools > Redirection. Click on this menu item.
You will be taken to the Redirections configuration page. The main 7 menu items are listed near the top of the screen.
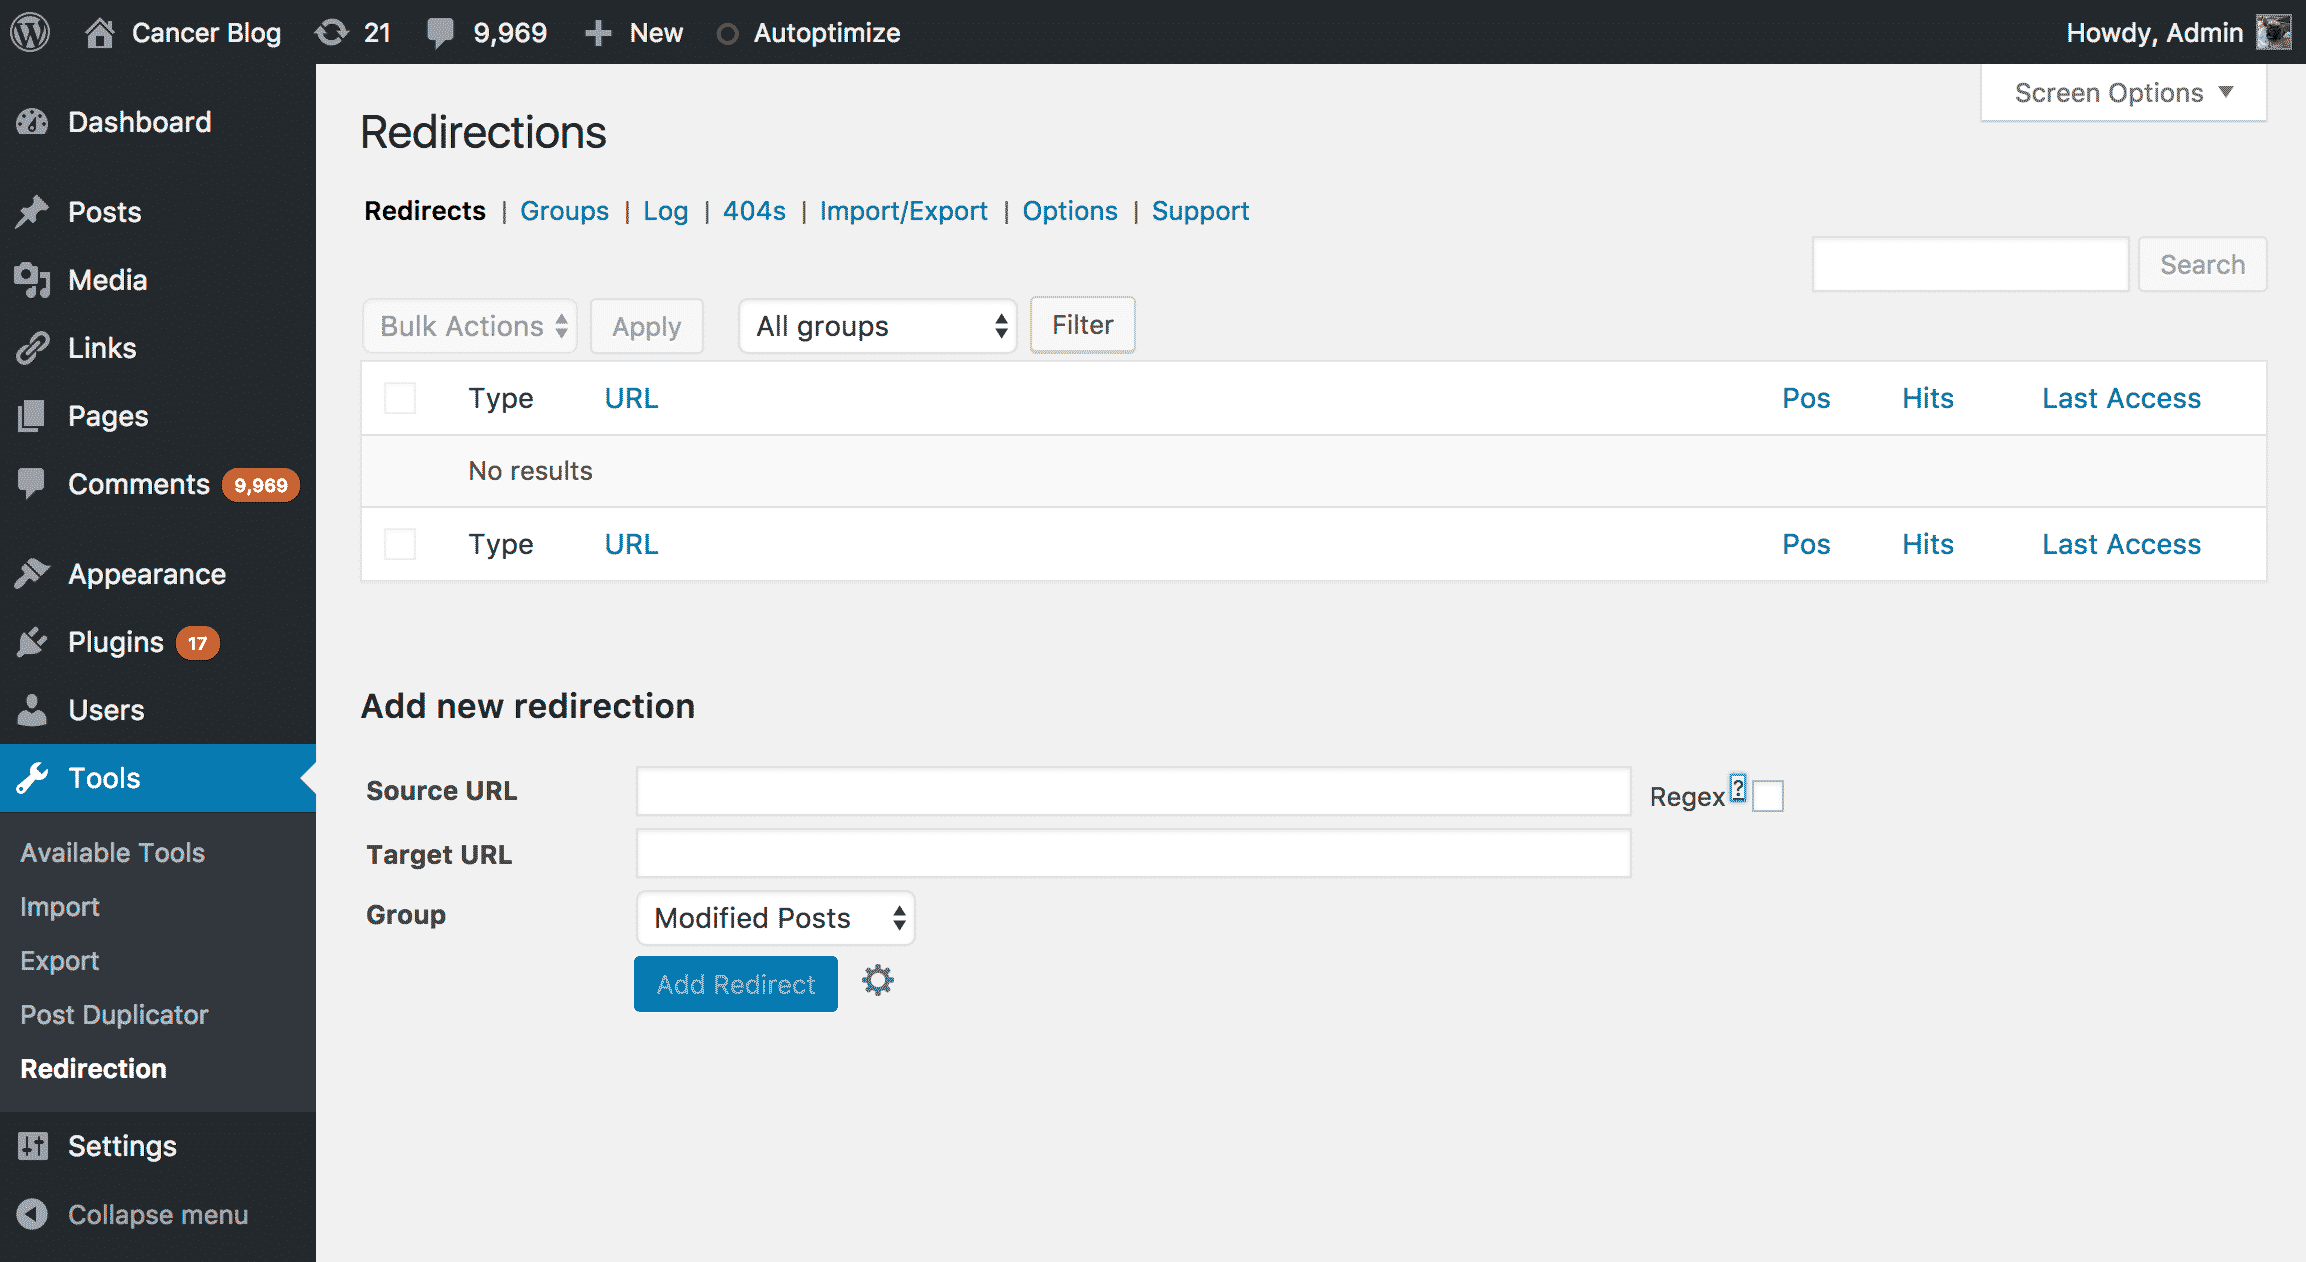
They include:
Redirects: Where you can create, delete, and edit your redirects. You can also view how many hits your redirect has had on this page.
Groups: If you use a lot of redirects or different types of redirects, you might like to place them into groups. The groups’ section allows you to create, delete, and edit those groups. By default, the plugin has two groups — Modified Posts and Redirections.
Log: You can view redirect logs here. Information includes the date the linked was clicked, source URL, referrer and IP address.
404s: A list of the 404 errors on your website
Import/Export: You can import or export your redirects as a CSV, JSON, .htaccess or Nginx rewrite rule file.
Options: There are a handful of options available, mostly relating to how much information is logged and which server module to use.
Support: If you have any questions, go here!
Let’s add a redirect. While on the Redirects page, click on the cog icon near the bottom of the page. This will show you all of the options available when creating a redirect.
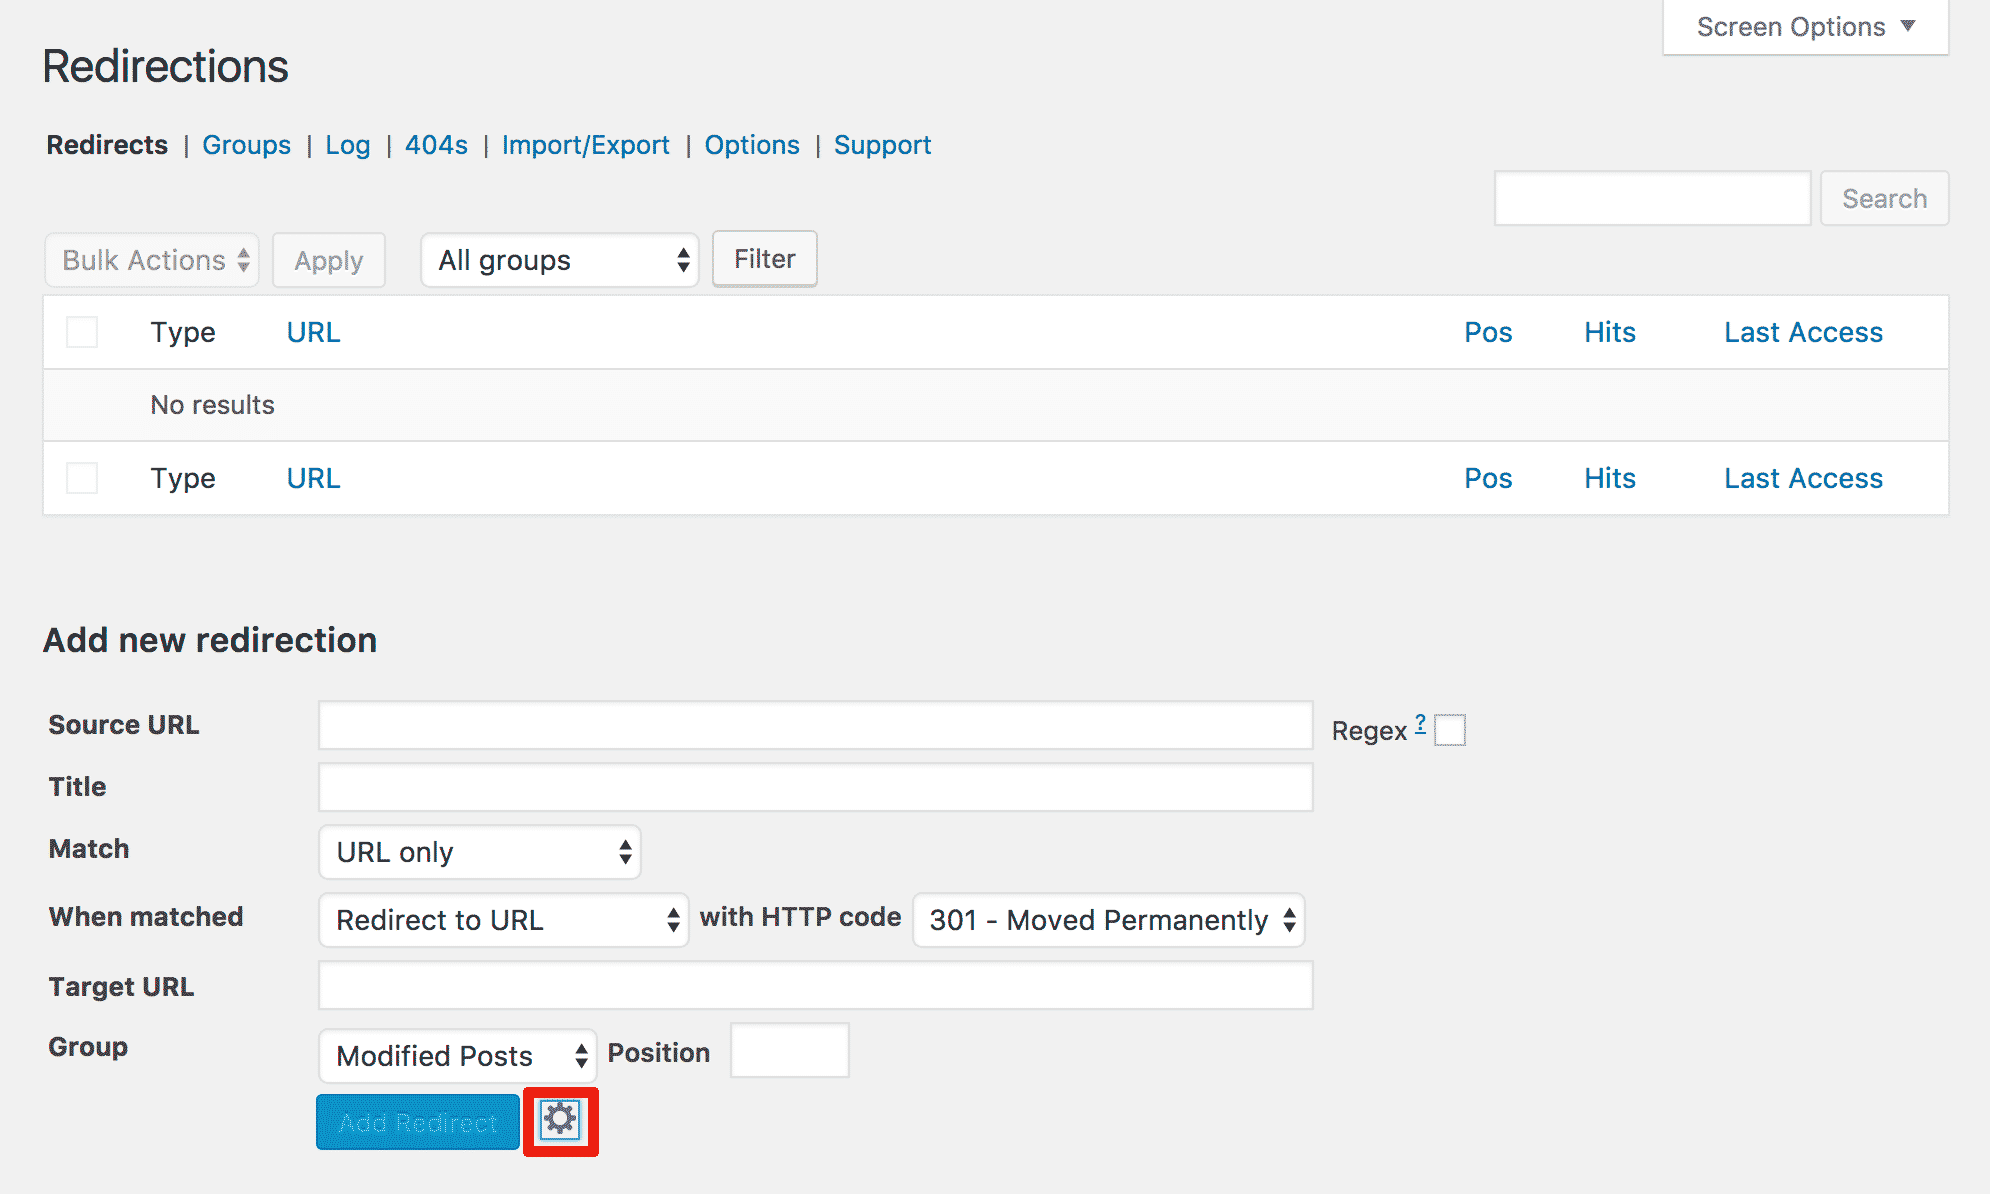
Here is a quick run down of what each field means.
Source URL: This is the old page that you want to direct users away from. Type the name of the page in this field.
Regex: Regex stands for Regular Expressions. A regular expression is a special text string that acts like a search string. You can create regular expressions that catch all incoming URLs with a specific word in them, which allows you to redirect many different URLs simultaneously. Learn more about Regex here.
Match: Redirection adds some very powerful matching tools to your redirects. You can tell the plugin to match visitors based on the URL only, URL and login stats, URL and referrer, or URL and user agent. That means you can redirect all logged in users from a specific page to another one. You could also redirect all users who come from a certain external page to a specific page — which comes in handy for advertising and marketing campaigns.
When matched: This is the section where you tell the plugin what to do with a visitor after they have gone to a certain URL. You can:
- Redirect them to another URL
- Redirect to a random post
- Pass-through to another page, file or website
- Throw a 404 error
- Do nothing and let them view the original page
When combined with the plugin’s powerful matching functions, you can treat different kinds of users in many different ways. For example, you can send users coming from a Google advertisement to a specific location.
You also have the ability to redirect with different HTTP codes including 301 Moved Permanently, 302 Found, 307 Temporary Redirect and 308 Permanent Redirect.
Target URL: If you are redirecting the user, add the target URL here.
Group: You can place this redirect into a specific group if you like and change its position.
As you can see, Redirection is a seriously powerful plugin! Once you have finished creating your redirect, simply click Add Redirect to add it.
Manually adding 301 redirects
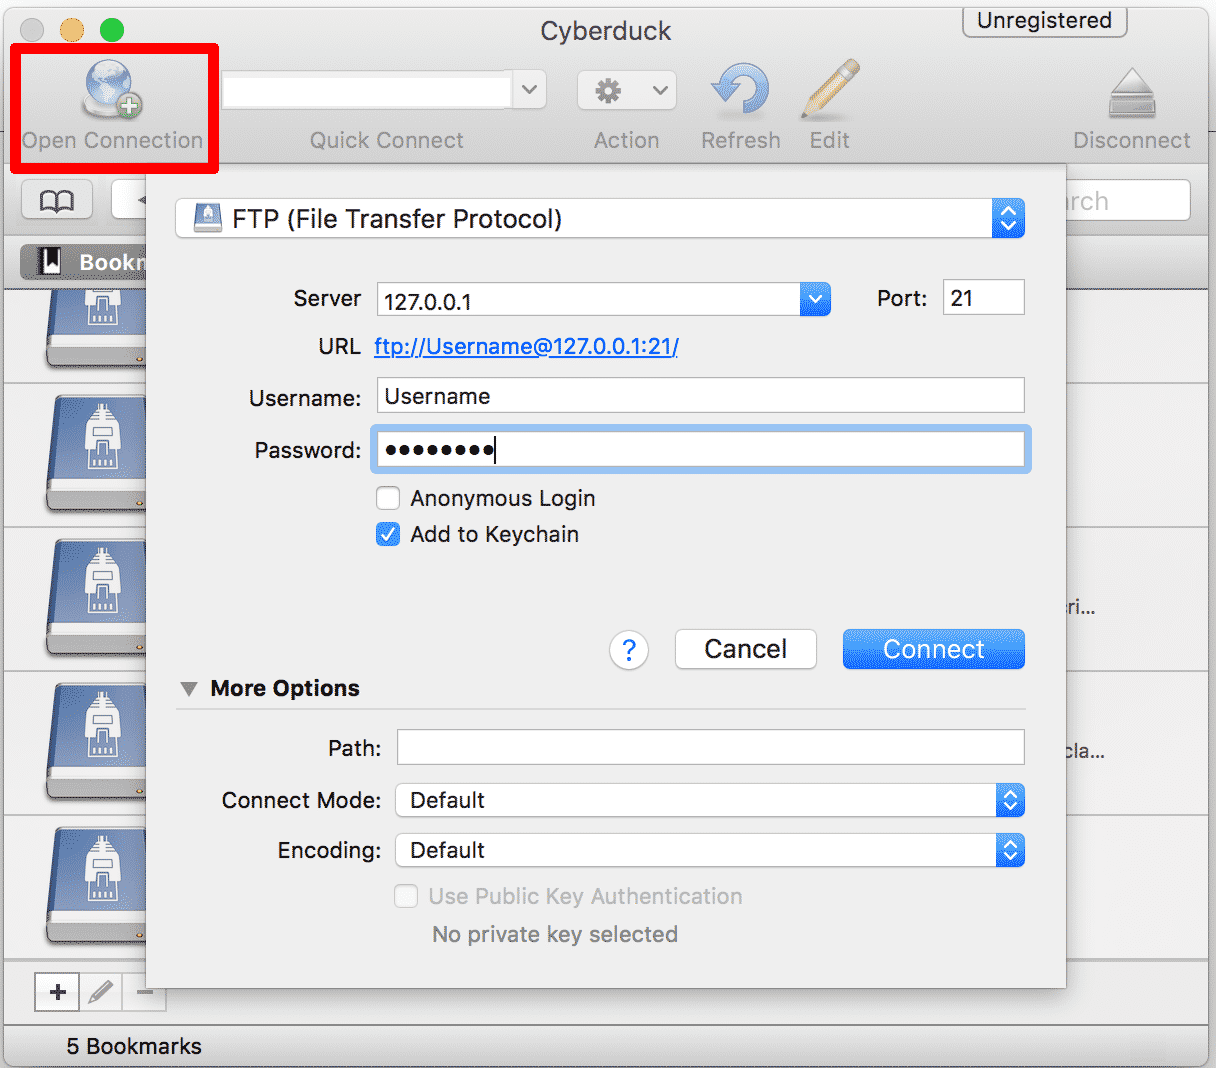
310 redirects can also be added by editing the .htaccess file that is in the root directory of WordPress. It is a plain text file that can be edited with Notepad or TextEdit. To access this file, you will have to use an FTP program like FileZilla, Cyberduck or WinSCP. We’ll use Cyberduck for this example.
1. Open Cyberduck and add a new connection.
Click on the new connection button on the top left Cyberduck’s interface. Enter the IP address of your server, your FTP password and FTP username. You may have to also enter the path to your WordPress installation. If you do not know these details, contact your web host.
2. Open the .htaccess file
Once you are in the WordPress home directory (where you installed your blog), you will see a list of files. Double click the .htaccess file to open it in your selected editor.
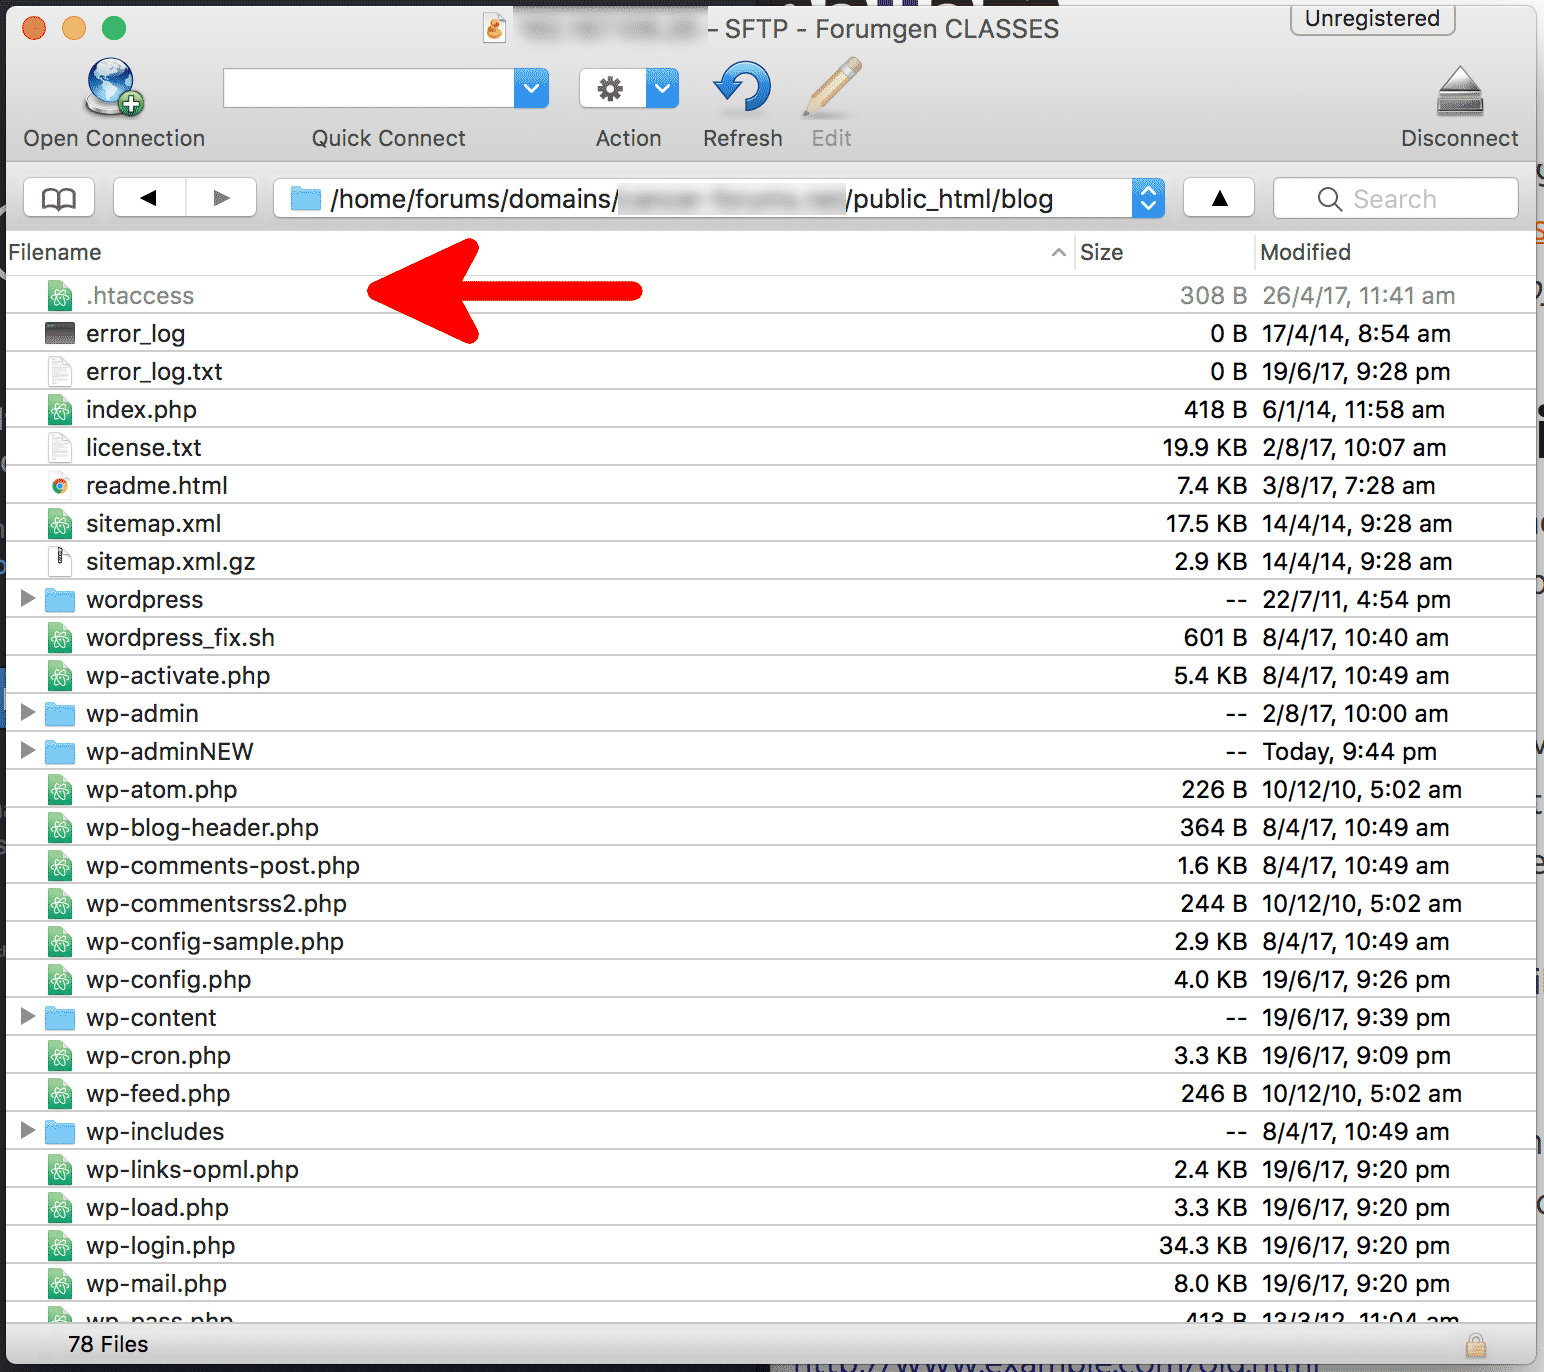
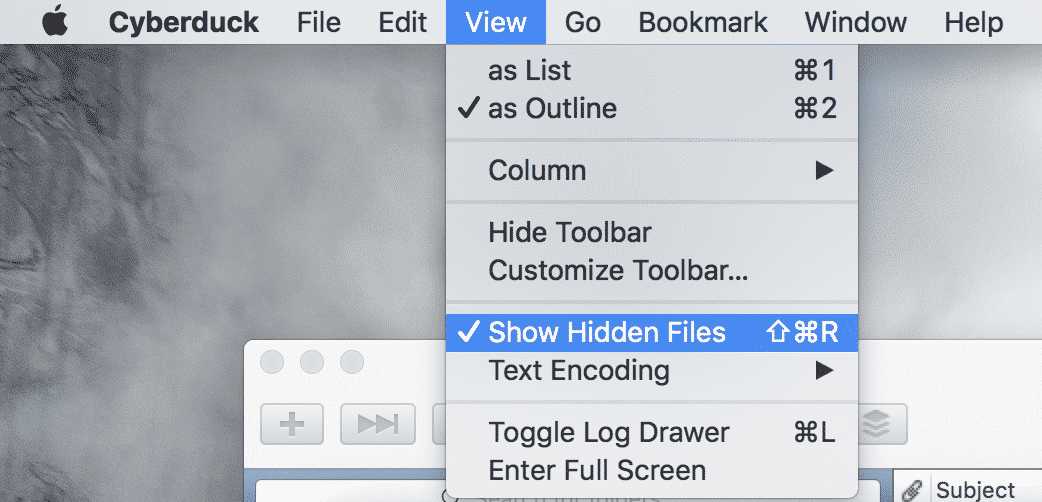
If you cannot see the .htaccess file, select View > Show Hidden Files in Cyberduck.
3. Edit the .htaccess file
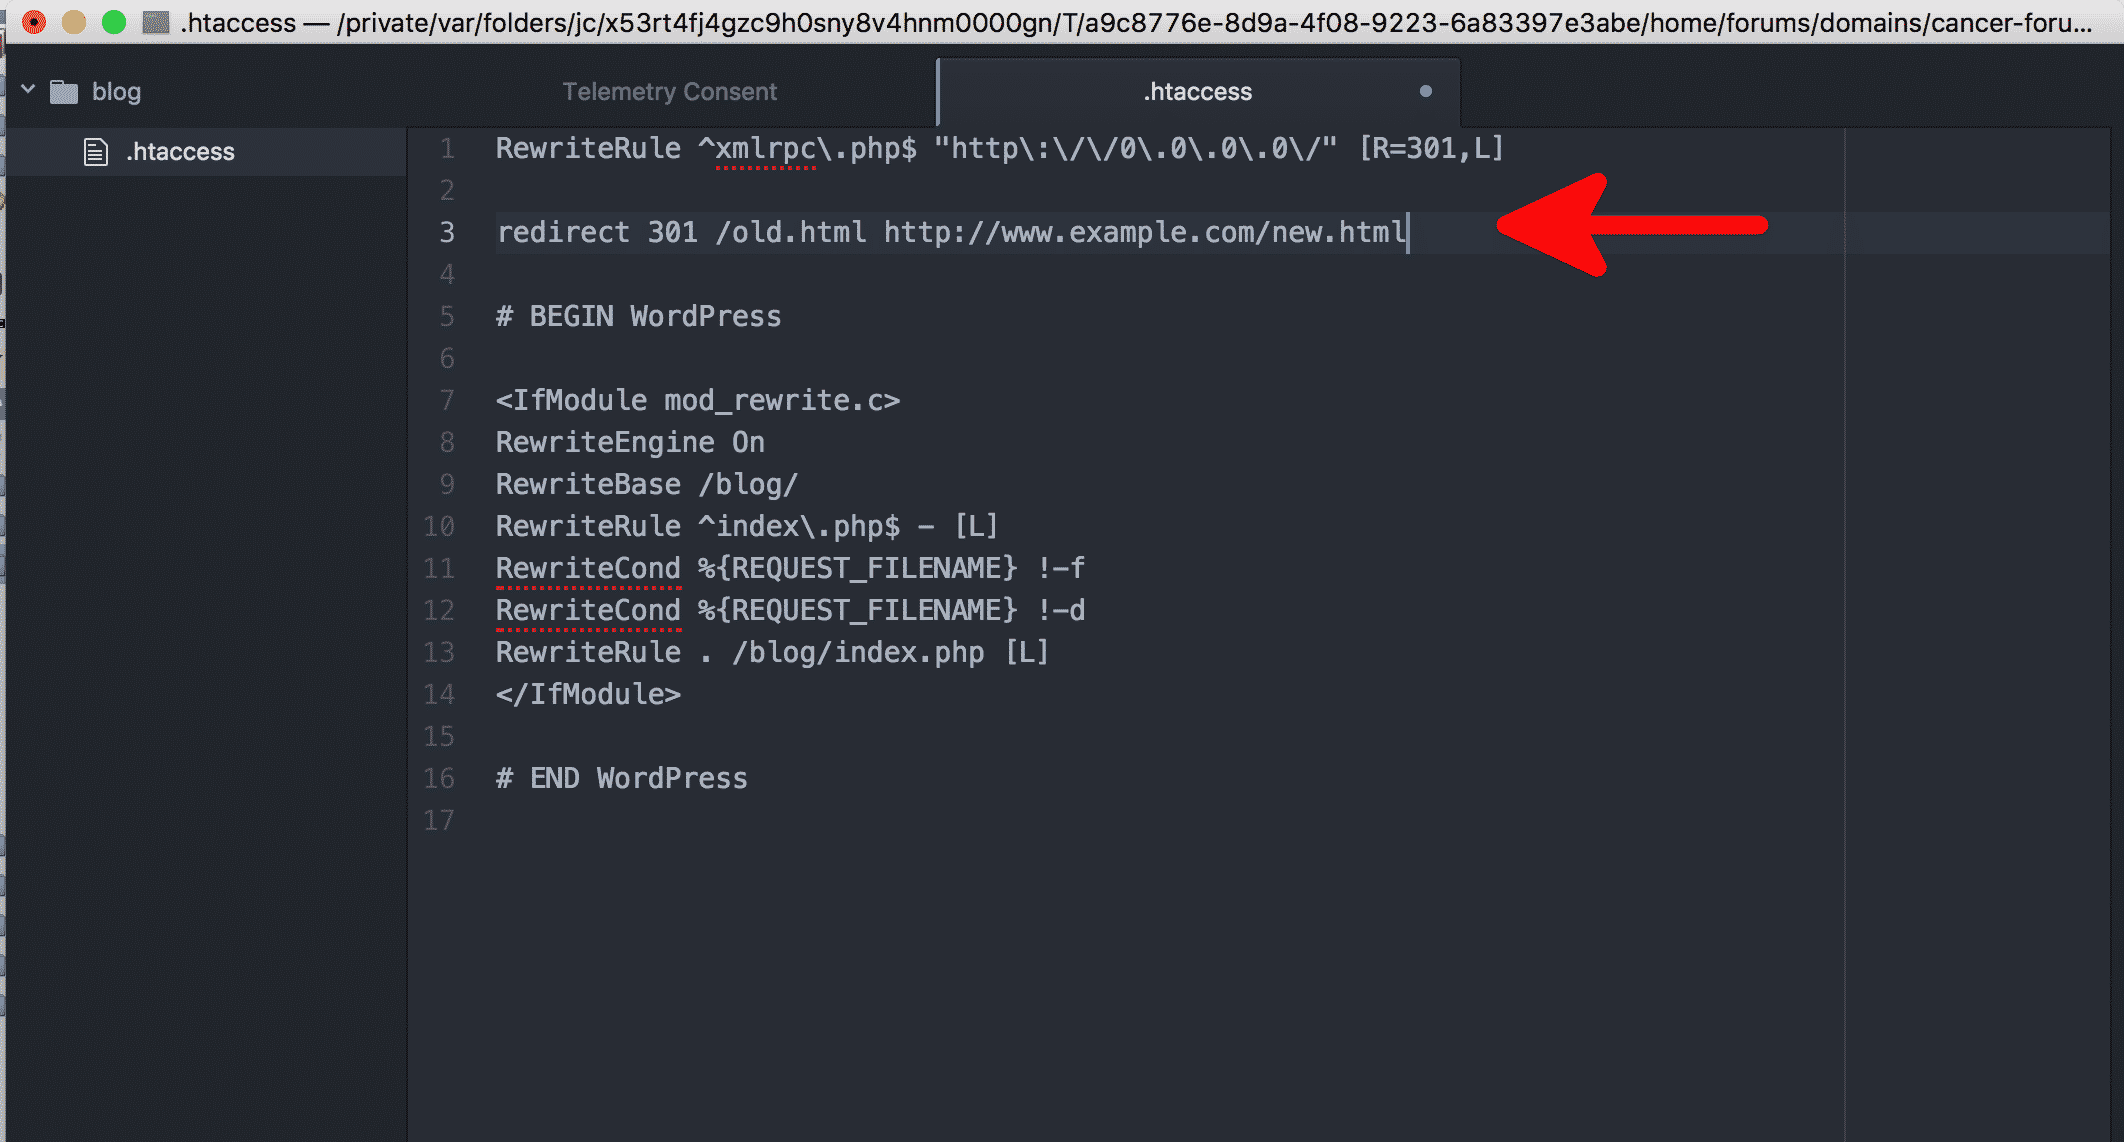
Adding a 301 redirect to the .htaccess is simple. If you wanted to redirect people from a page called old.html to a page called new.html, we would add the following line:
redirect 301 /old.html http://www.example.com/new.html
This line needs to be added just above the #BEGIN WordPress line in your .htaccess file (see the image below). After you have added the line, save the file so Cyberduck can upload it to your server.
Your server will then tell any web browser or search engine trying to reach old.html that it has permanently moved to new.html.
Thanks for reading How To Add a Redirect in WordPress! For more WordPress tutorials, please subscribe to the site or follow us on social media.
 194 customers signed up in the last 30 days