
Dmytro Spilka
If you run a website or a blog, you probably already know that website speed is vital for the overall user experience and site performance. Slow sites can result in a high bounce rate, loss of search rankings and a decrease in traffic.
If you have been reading our previous blog posts, you would know that people wouldn’t usually wait for more than 3 seconds for the website to load, unless your site is the only source of valuable information. Even if that’s the case, this would not be a valid reason to keep your site slow and not trying to improve its performance.
We understand, it can be a very tiring & a challenging task to accomplish. That said, there are a couple of quick fixes you can do to drastically improve your performance in a matter of 10-20 minutes. We are talking about The Cache Plugin 🙂
We’ve carried out a number of tests between W3 Total Cache, WP Super Cache & WP-Rocket, and identified that WP-Rocket is the best-performing plugin, and is the easiest to configure. This is purely based on our own opinions and tests we’ve carried out for our site. The result may be different for your site, and you may find that other plugins perform better than WP-Rocket.
A bit about WP-Rocket:
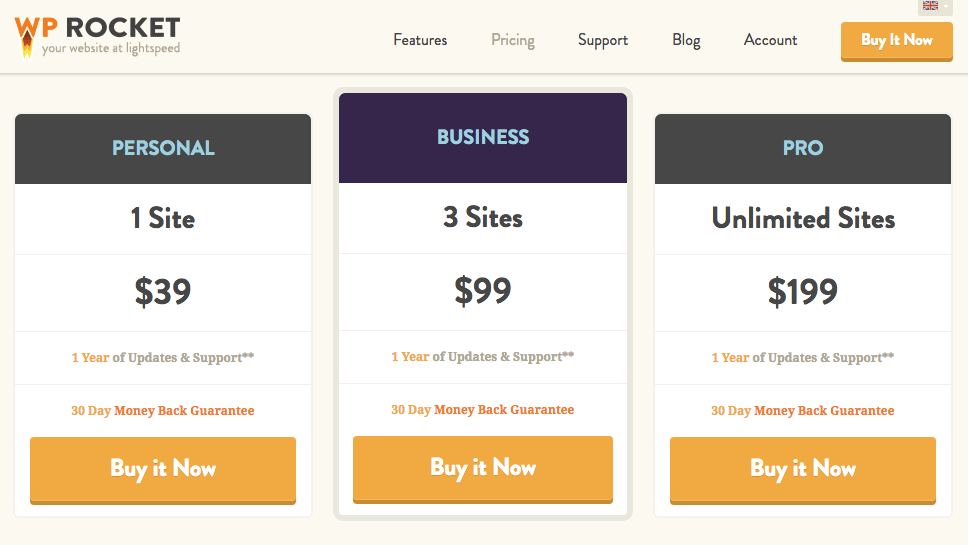
- WP-Rocket is a premium plugin that starts at $39 for 1 site, $99 for 3 sites and $199 for an unlimited number of sites.
- The plugin supports a number of features, such as GZIP compression, CSS, HTML & JavaScript minification, mobile caching, DNS prefetching, CDN configuration and many more.
- WP-Rocket is one of the most user-friendly caching plugins that is relatively easy to configure.
Installing WP-Rocket
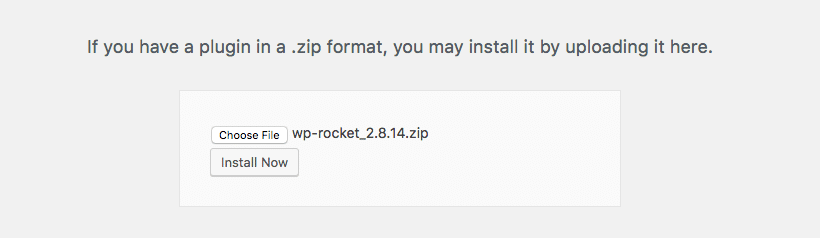
To install the plugin, go to WP-Rocket Website > Pricing > Choose your preferred type of license > Purchase & Download a ZIP file.
Then, navigate to your WordPress dashboard > plugins > add new > upload a ZIP file > hit “install now” and then activate the plugin.
Please note: Page caching is activated right away as soon as the plugin is activated.
To configure the basic and advanced options, go to the WordPress settings > WP Rocket
Configuring WP-Rocket
The options are pretty straightforward to understand, although there a couple of advanced options that we’ll look at later in this tutorial.
But first, let’s take a look at the basic options and what each one of them can do for us.
Basic Options
On the WP-Rocket settings dashboard, you will be presented with the following list of basic options. To enable a particular function, simply check the box. But, before you do that, please read our explanation to each option below:

Lazyload – Ensures that your images are only loaded when they are actually visible to the user. Enabling this option will reduce the load time, especially if you have a lot of images, and you don’t want them to be loaded simultaneously.
Files Optimisation – This option minifies your HTML, CSS & Javascript files by eliminating space, unnecessary characters and comments, as well as combining your scripts into fewer files. Please Note: This option may stop your theme or plugins from functioning properly. If you encounter any issues, simply disable the option.
Mobile Cache – If using a responsive theme, you should activate this option to serve cached versions of your pages to mobile users.
Feeds Cache – Option to cache your WordPress RSS Feeds.
Logged-in Users Cache – This option creates cache files for every user. This is important when you a run a community website that requires people to log-in.
SSL Cache – This option enables caching for pages that use SSL (Secure Sockets Layer), also known as https://. You will need to activate this option if your entire site is on https://.
Emojis – This option replaces Emojis with WordPress Smileys.
Clear Cache Lifespan – This option is set to 24 hours by default. This means that your cached files will be automatically refreshed every 24 hours.
Advanced Options
Let’s now go through the advanced options. Please Note: Only use these options if you know what you are doing. If any of the functions break your site – disable that option.
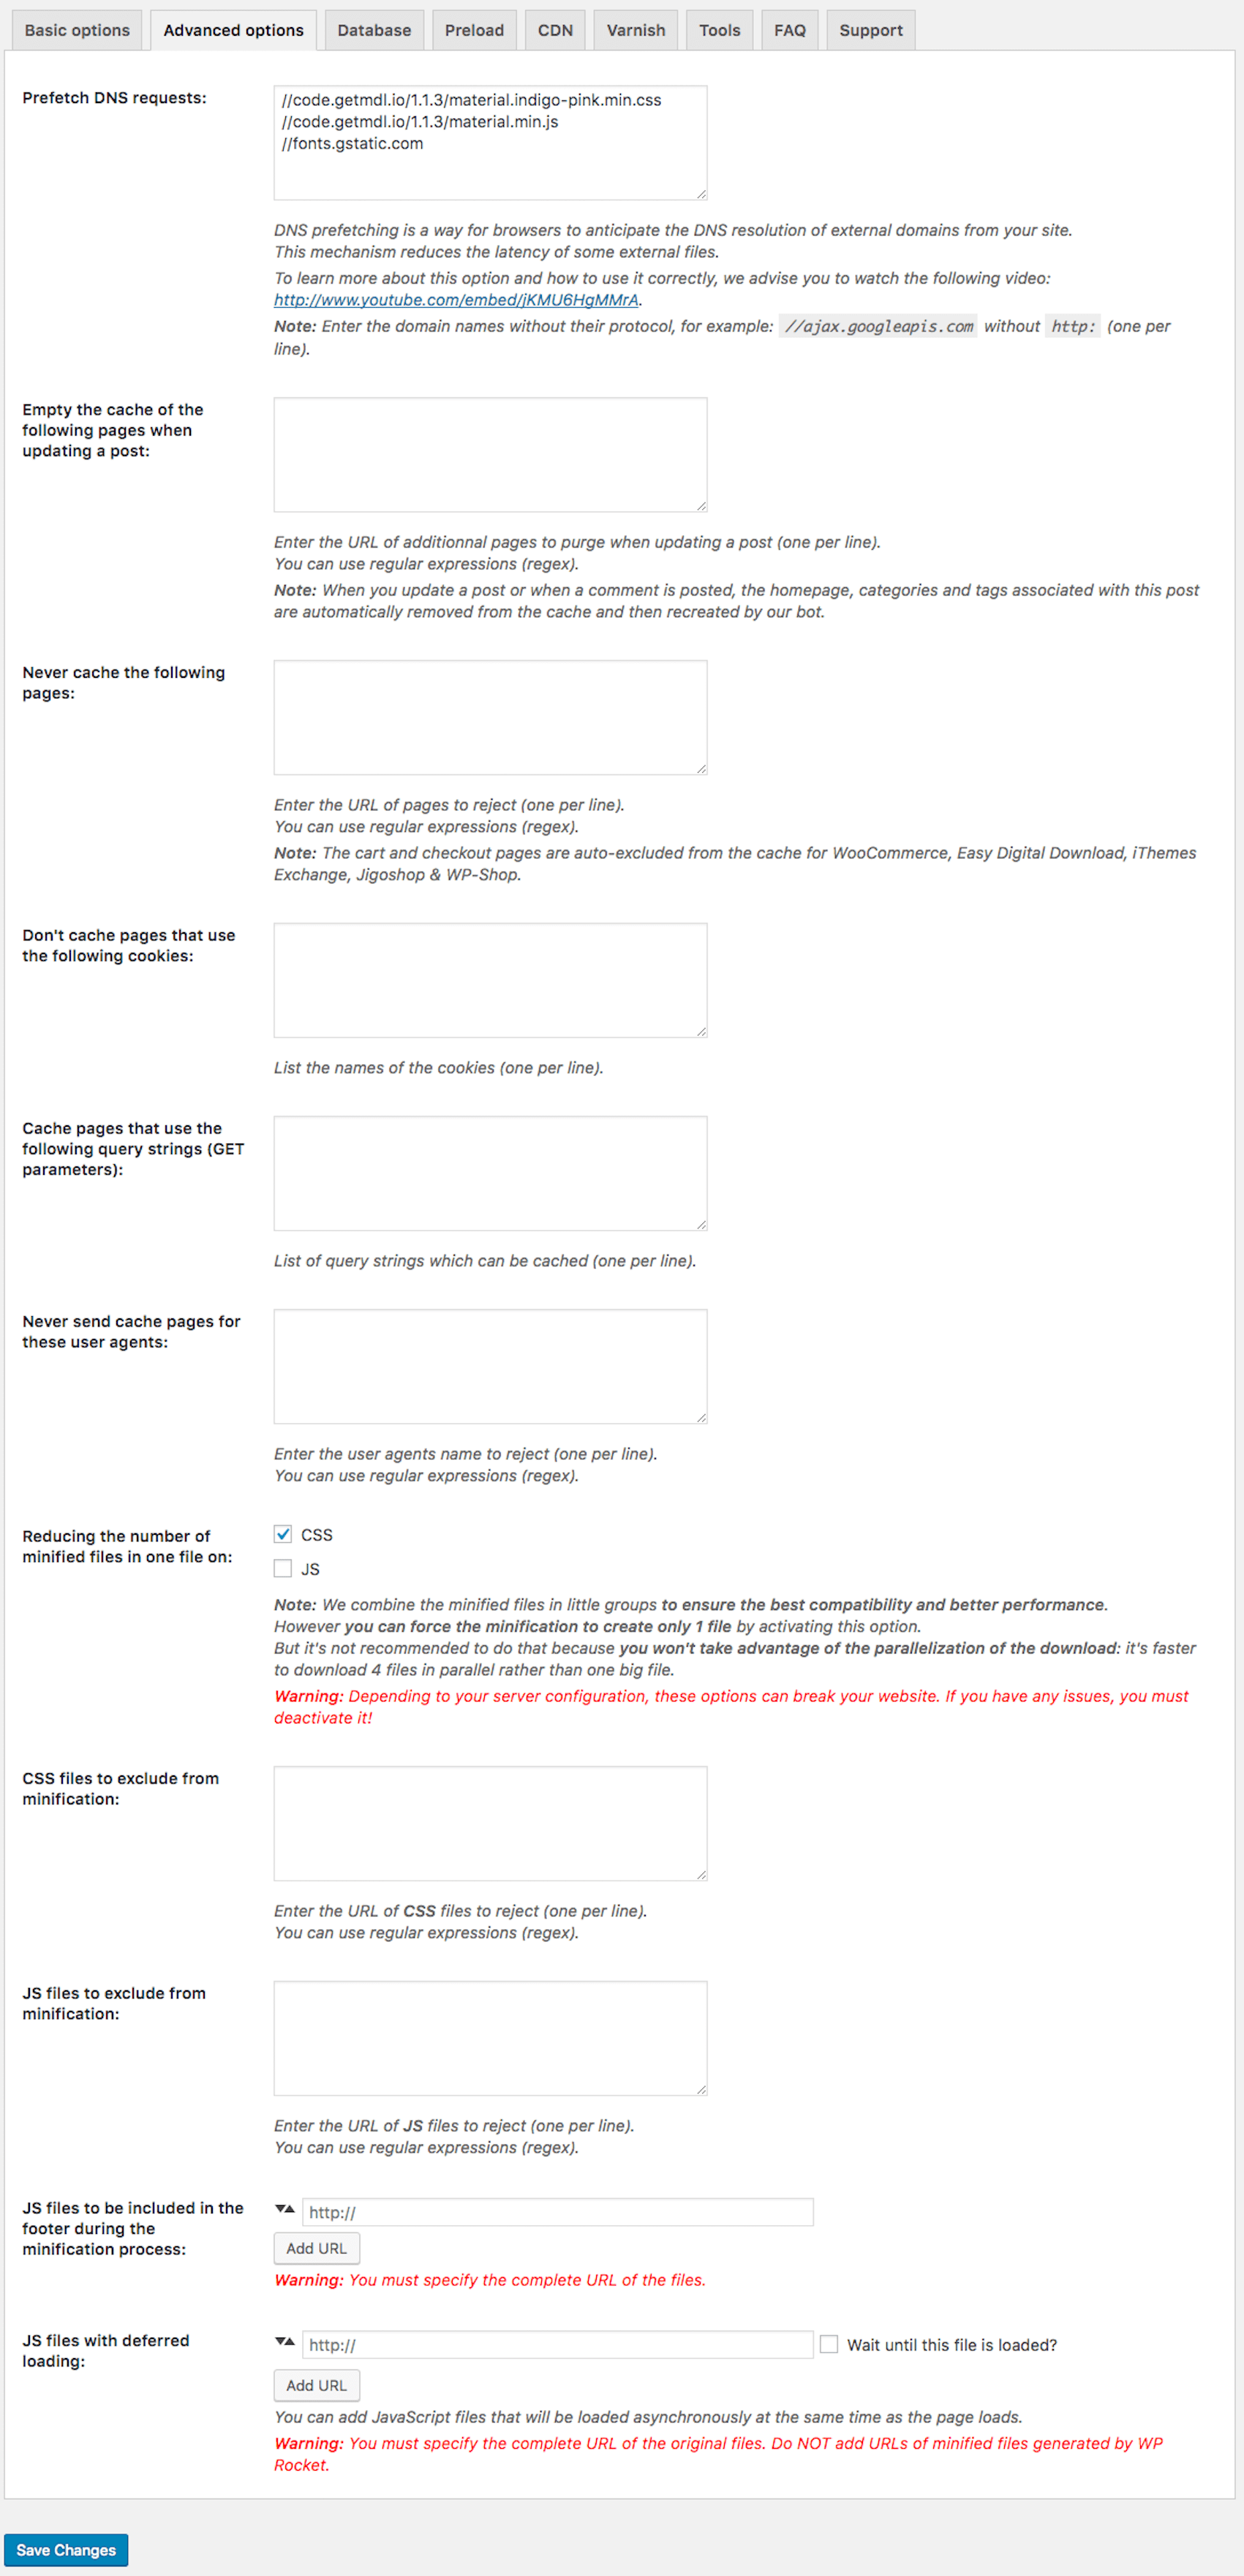
Prefetch DNS Requests – This can be helpful when your site is pulling files or assets from other websites, for example, Google Fonts. Prefetching can reduce the number of “handshakes” and DNS lookups. To use, copy and paste the URL that you wish to be prefetched, for example, //fonts.googleapis.com
Empty the cache of the following pages when updating a post – When you create new content, WP-Rocket will automatically update the cache of the Home Page & Related Pages to the new post. If you wish other pages to be refreshed, simply enter the URLs.
Never cache the following pages – This option allows you to input URLs that you don’t want to be cached. Please note: If you are running an e-commerce store, exclude “Cart” and “Checkout” pages.
Don’t cache pages that use the following cookies – Allows you to exclude pages from being cached based on cookies.
Cache pages that use the following query strings – Enter a query string to cache all pages that use that particular parameter in a URL.
Don’t show cached pages to the following user-agents – Allows you to exclude bots (A.K.A User-Agents, such as Googlebot) from receiving cached pages.
CSS files to exclude from minification – Enter CSS files that you don’t wish to be minified.
JavaScript files to exclude from minification – Enter JS files that you don’t wish to be minified.
JS files to be moved to the footer – WP-Rocket puts all minified JS files to the header of the site. This function allows you to enter an original JS URL (not the minified one) that you wish to be moved to the footer of the page. Please Note: This can break your theme & plugin files.
JS files with deferred loading – Input render-blocking JavaScript files. Again, you would need to enter original JS files as opposed to minified versions.
CDN Configuration
If you are using a CDN (Content Delivery Network) to host your files, WP-Rocket makes it easy to integrate it with the plugin.
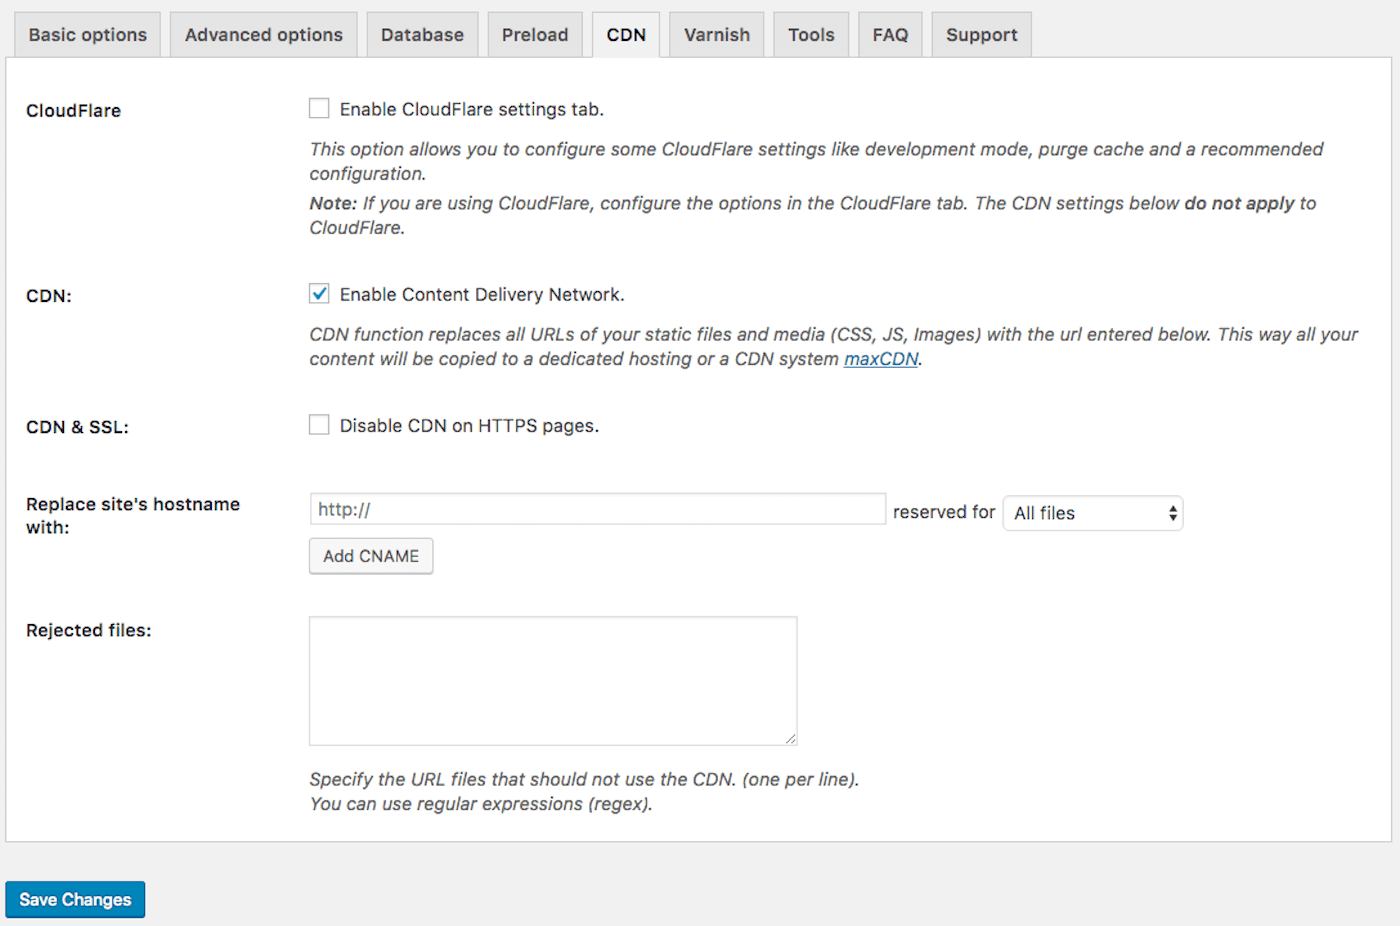
CloudFlare – If you are using CloudFlare as your CDN, ensure to tick the box to configure it with the plugin. You will be asked to enter your CloudFlare account email, API key and domain.
CDN – If using any other CDN (e.g. MaxCDN or KeyCDN) you can also configure it using WP-Rocket. Simply check “Enable CDN” box and enter your unique CDN domain (this has to be configured directly with your CDN provider).
CDN & SSL – If your site is using SSL (https://) but your CDN does not serve files through SSL, you would need to check this box for it to work properly.
Rejected Files – Allows you to enter files that you don’t wish to be served from a CDN.
Database
This option allows you to clean up your Database. It’s recommended to backup your database before proceeding with a cleanup.
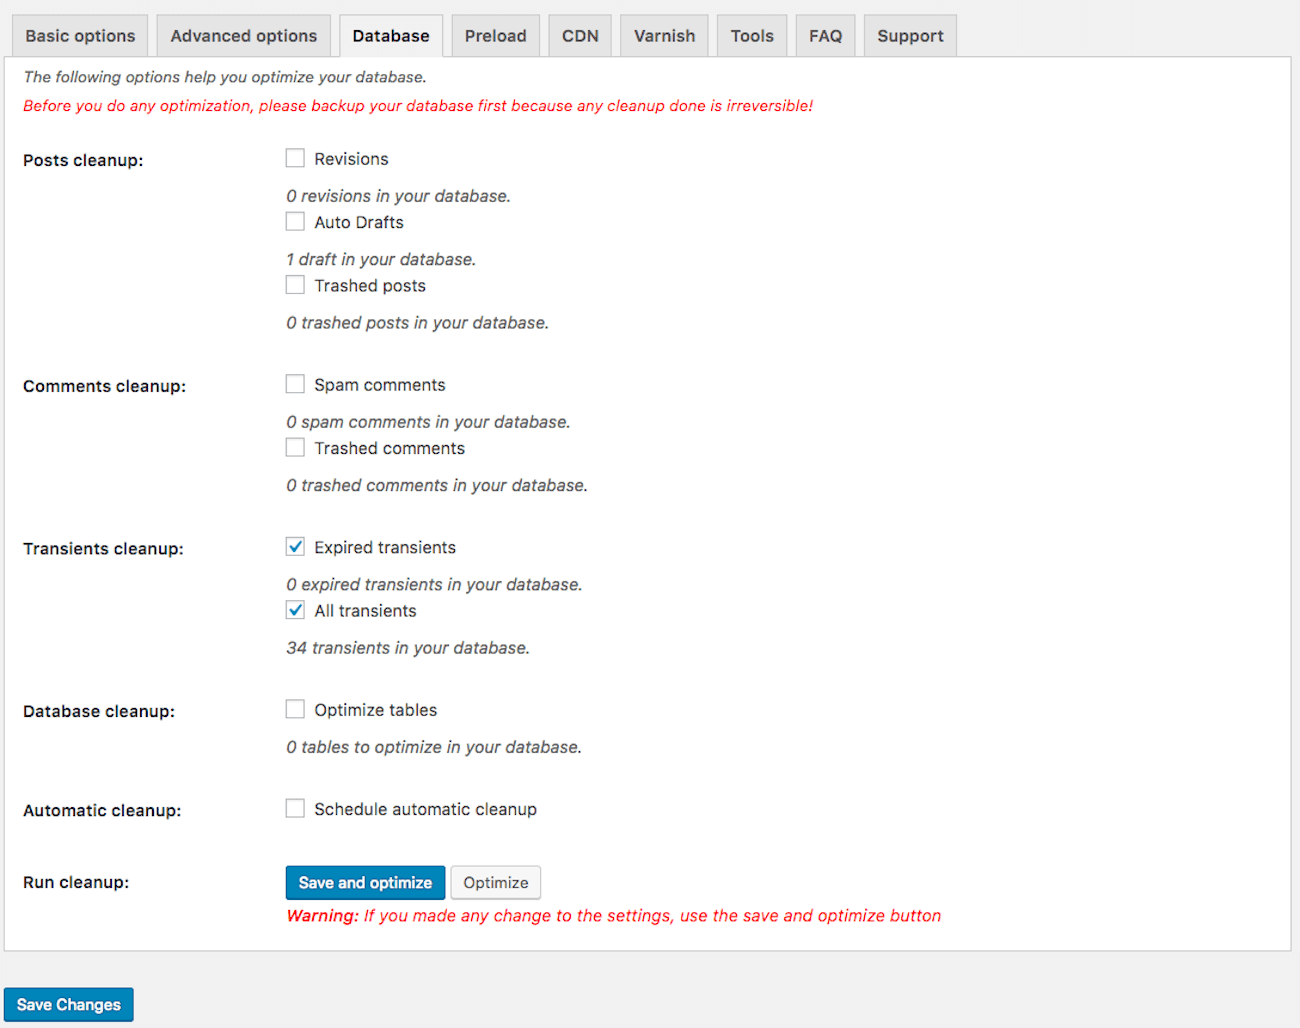
Clean up includes:
- Post revisions, auto drafts and trashed posts
- Spam and trashed comments
- All & expired transients
- Tables
You can also schedule an automatic cleanup.
To Sum Up
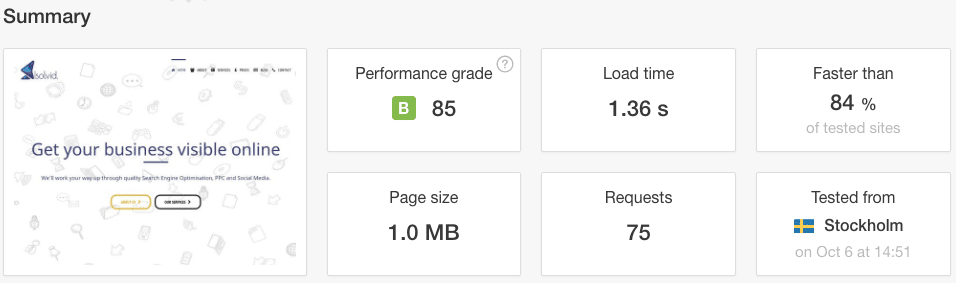
By installing and configuring WP-Rocket Cache we were able to reduce the speed of our website to 1.36 seconds, which is considered to be quite fast, but not perfect.
We hope you can do even better! We’d love to hear your thoughts and achievements!
Dmytro Spilka
Head Wizard
 234 customers signed up in the last 30 days