Yellow Pencil is one of the most powerful WordPress plugins available. It is a Visual Style Editor that makes customising the visual appearance of your WordPress as simple as 2+2! You will be able to make significant CSS design changes without touching a line of code or calling your web designer.
Yellow Pencil has a simple-to-use interface that most people can pick up in a few minutes. It lets users change most aspects of a page’s design including the layout, colours, fonts, animations and background textures. Yellow Pencil lets you update your website’s design more frequently and continually improve its appearance.
This guide will highlight some of the capabilities of Yellow Pencil. We’ll then walk you through the installation process and show you how to use it. Let’s check Yellow Pencil out!
Table of Contents
Who Is Yellow Pencil For?
Yellow Pencil is perfect for any website owner who doesn’t have the technical knowledge needed to edit their website’s design. When using Yellow Pencil, you won’t have to fuss around with your CSS code — the plugin handles all of that for you. You simply change the look of your website design using the frontend Yellow Pencil editor.
Yellow Pencil is also very useful for website owners interested in saving money on website design updates. You will be able to change most aspects of your website without hiring a professional.
What Can Yellow Pencil Do?
Yellow Pencil provides tools that let you edit the appearance of your website in real time. You will be able to select any element on the page and make changes to its position, padding, size, font and so much more. Any changes that you make are immediately reflected on the page.
The plugin does not edit your WordPress Theme’s files. Instead, it creates additional CSS code. This approach keeps your theme intact, should you ever decide to revert to it. The editor also has the undo, redo and revert to original buttons, so you can repair any mistakes you make while editing. The main features of Yellow Pencil include:
- Element Inspector: This is the tool that is used to select layers in your web page’s design for editing. Simply click a layer and start customising using a floating menu. You will have over 50 design elements that can be changed, including colours, fonts, sizes, positioning, and padding.
- 600+ Font Families: Yellow Pencil ships with over 600 Google Font families, thus no need to instal a separate Google Fonts plugin. You will have many stunning fonts to choose from when altering your design.
- 300+ Pattern Assets: The plugin also ships with patterns that can be used for backgrounds and headings.
- Live CSS Editor: If you want to fine-tune any aspects of your design or layout, you can switch to the Live CSS Editor.
- Drag and Drop Controls: Yellow Pencil lets you drag and drop design elements, moving them to any position on the screen. Images can also be resized on the fly.
- Visual Animation Generator: You can even construct advanced animations involving text and images.
- Measuring Tools: You can use the plugin’s measuring tools to ensure your design is pixel perfect.
Installing Yellow Pencil
There are three versions of Yellow Pencil available:
- Lite Version (Free): This version does not contain the font family, animation and size properties
- Regular ($20): This is a fully featured version that is licensed for one project or website
- Extended ($125): This version is for WordPress developers who are selling their themes.
The plugin can be purchased from Codecanyon.
Once you have purchased Yellow Pencil, you will be able to download a zip file of the plugin. Installing the plugin is incredibly simple.
1. Login to WordPress
2. Upload the plugin to WordPress
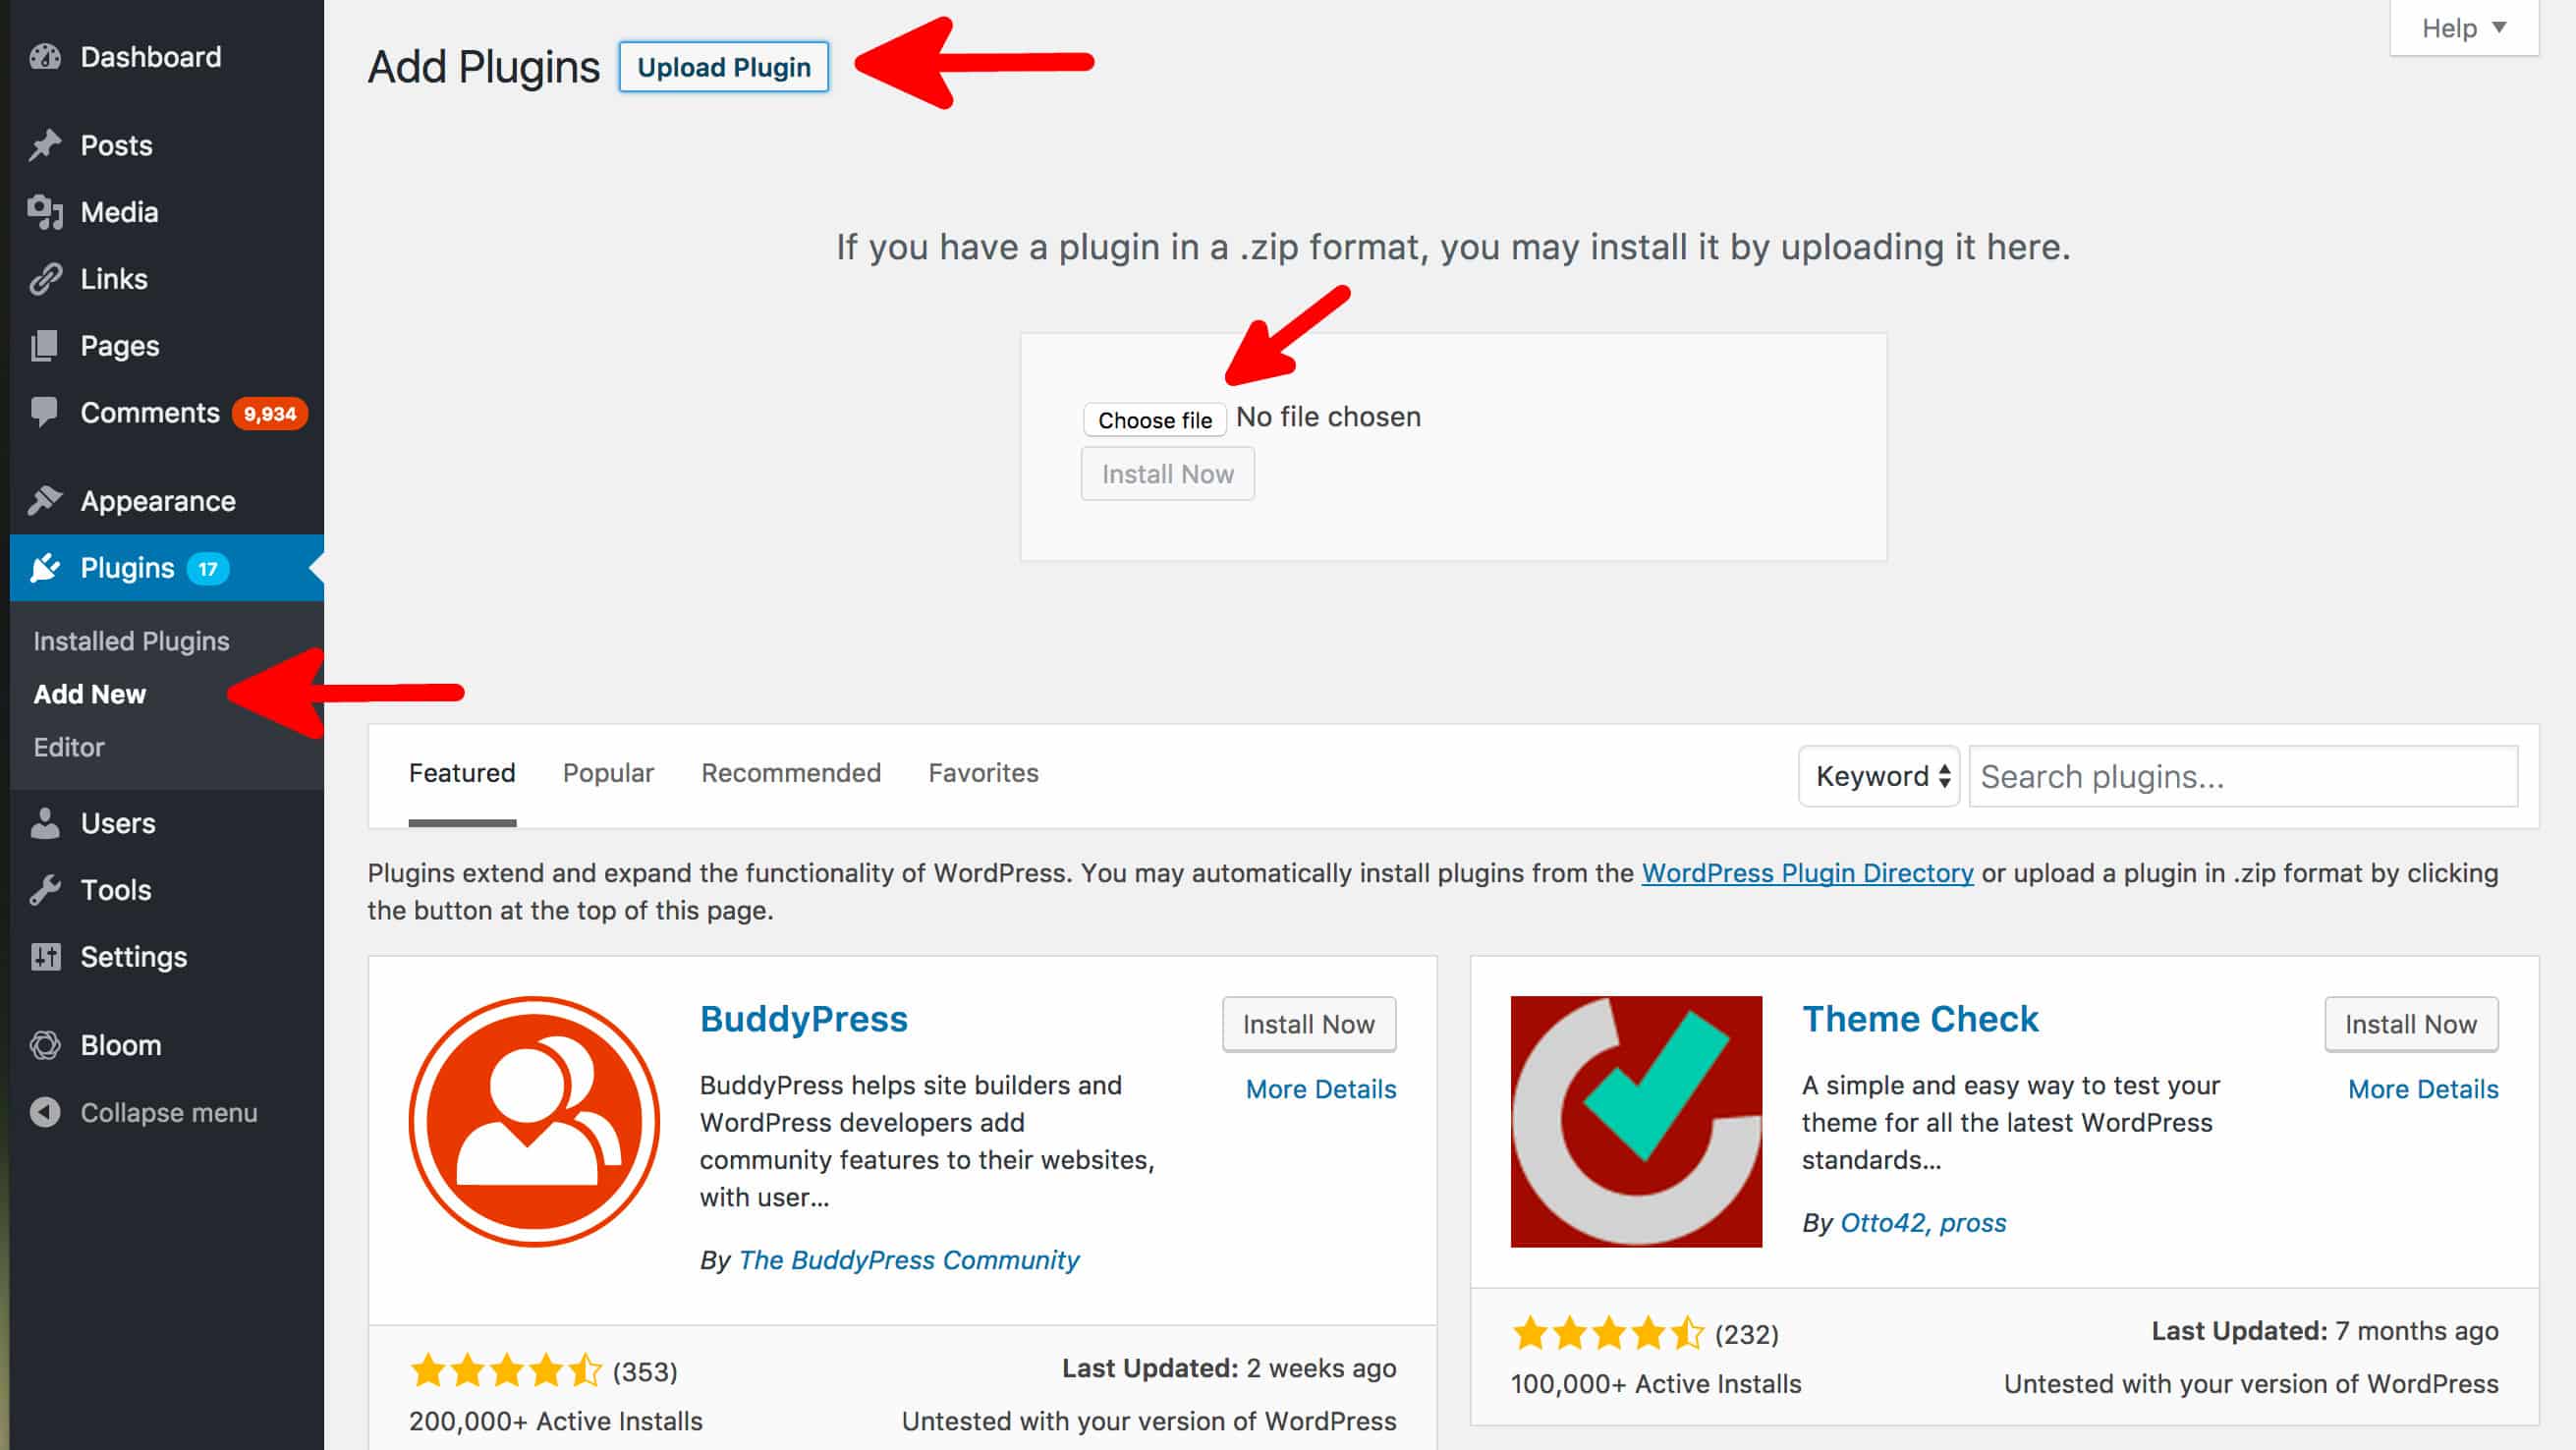
Go to the Plugins > Add New section. Click the Upload Plugin button on the top of the screen. Click the Choose File button, then upload Yellow Pencil’s zip file.
3. Activate the plugin
Once the plugin is uploaded, activate it.
Using Yellow Pencil
Once you have activated the plugin, you will see a welcome screen and a new menu on the left-hand side called Yellow Pencil. It will look something like this:

The new menu items are easy-to-understand and include the following:
- CSS Styles: Once you have made changes to pages and added new CSS styles, details of those changes will appear here.
- Settings: You can tell Yellow Pencil to use Dynamic Inline CSS (adding CSS to the page) or Static External CSS Files (adding CSS to external files)
- Custom Animations: Manage your custom animations on this page.
- Product License: This is where you can activate your license and view details of the current license.
- Import/Export: This section lets you import or export your Yellow Pencil settings
- About: General information about the installation and some useful resources.
There are a few ways to start editing your pages with Yellow Pencil.
1. Click on the Start to visual customizing link on Yellow Pencil’s About page.
2. Go to WordPress Panel > Appearance > Yellow Pencil
3. Visit the page you wish to edit and use the Yellow Pencil menu at the top of the page (which only appears when you are logged into WordPress).

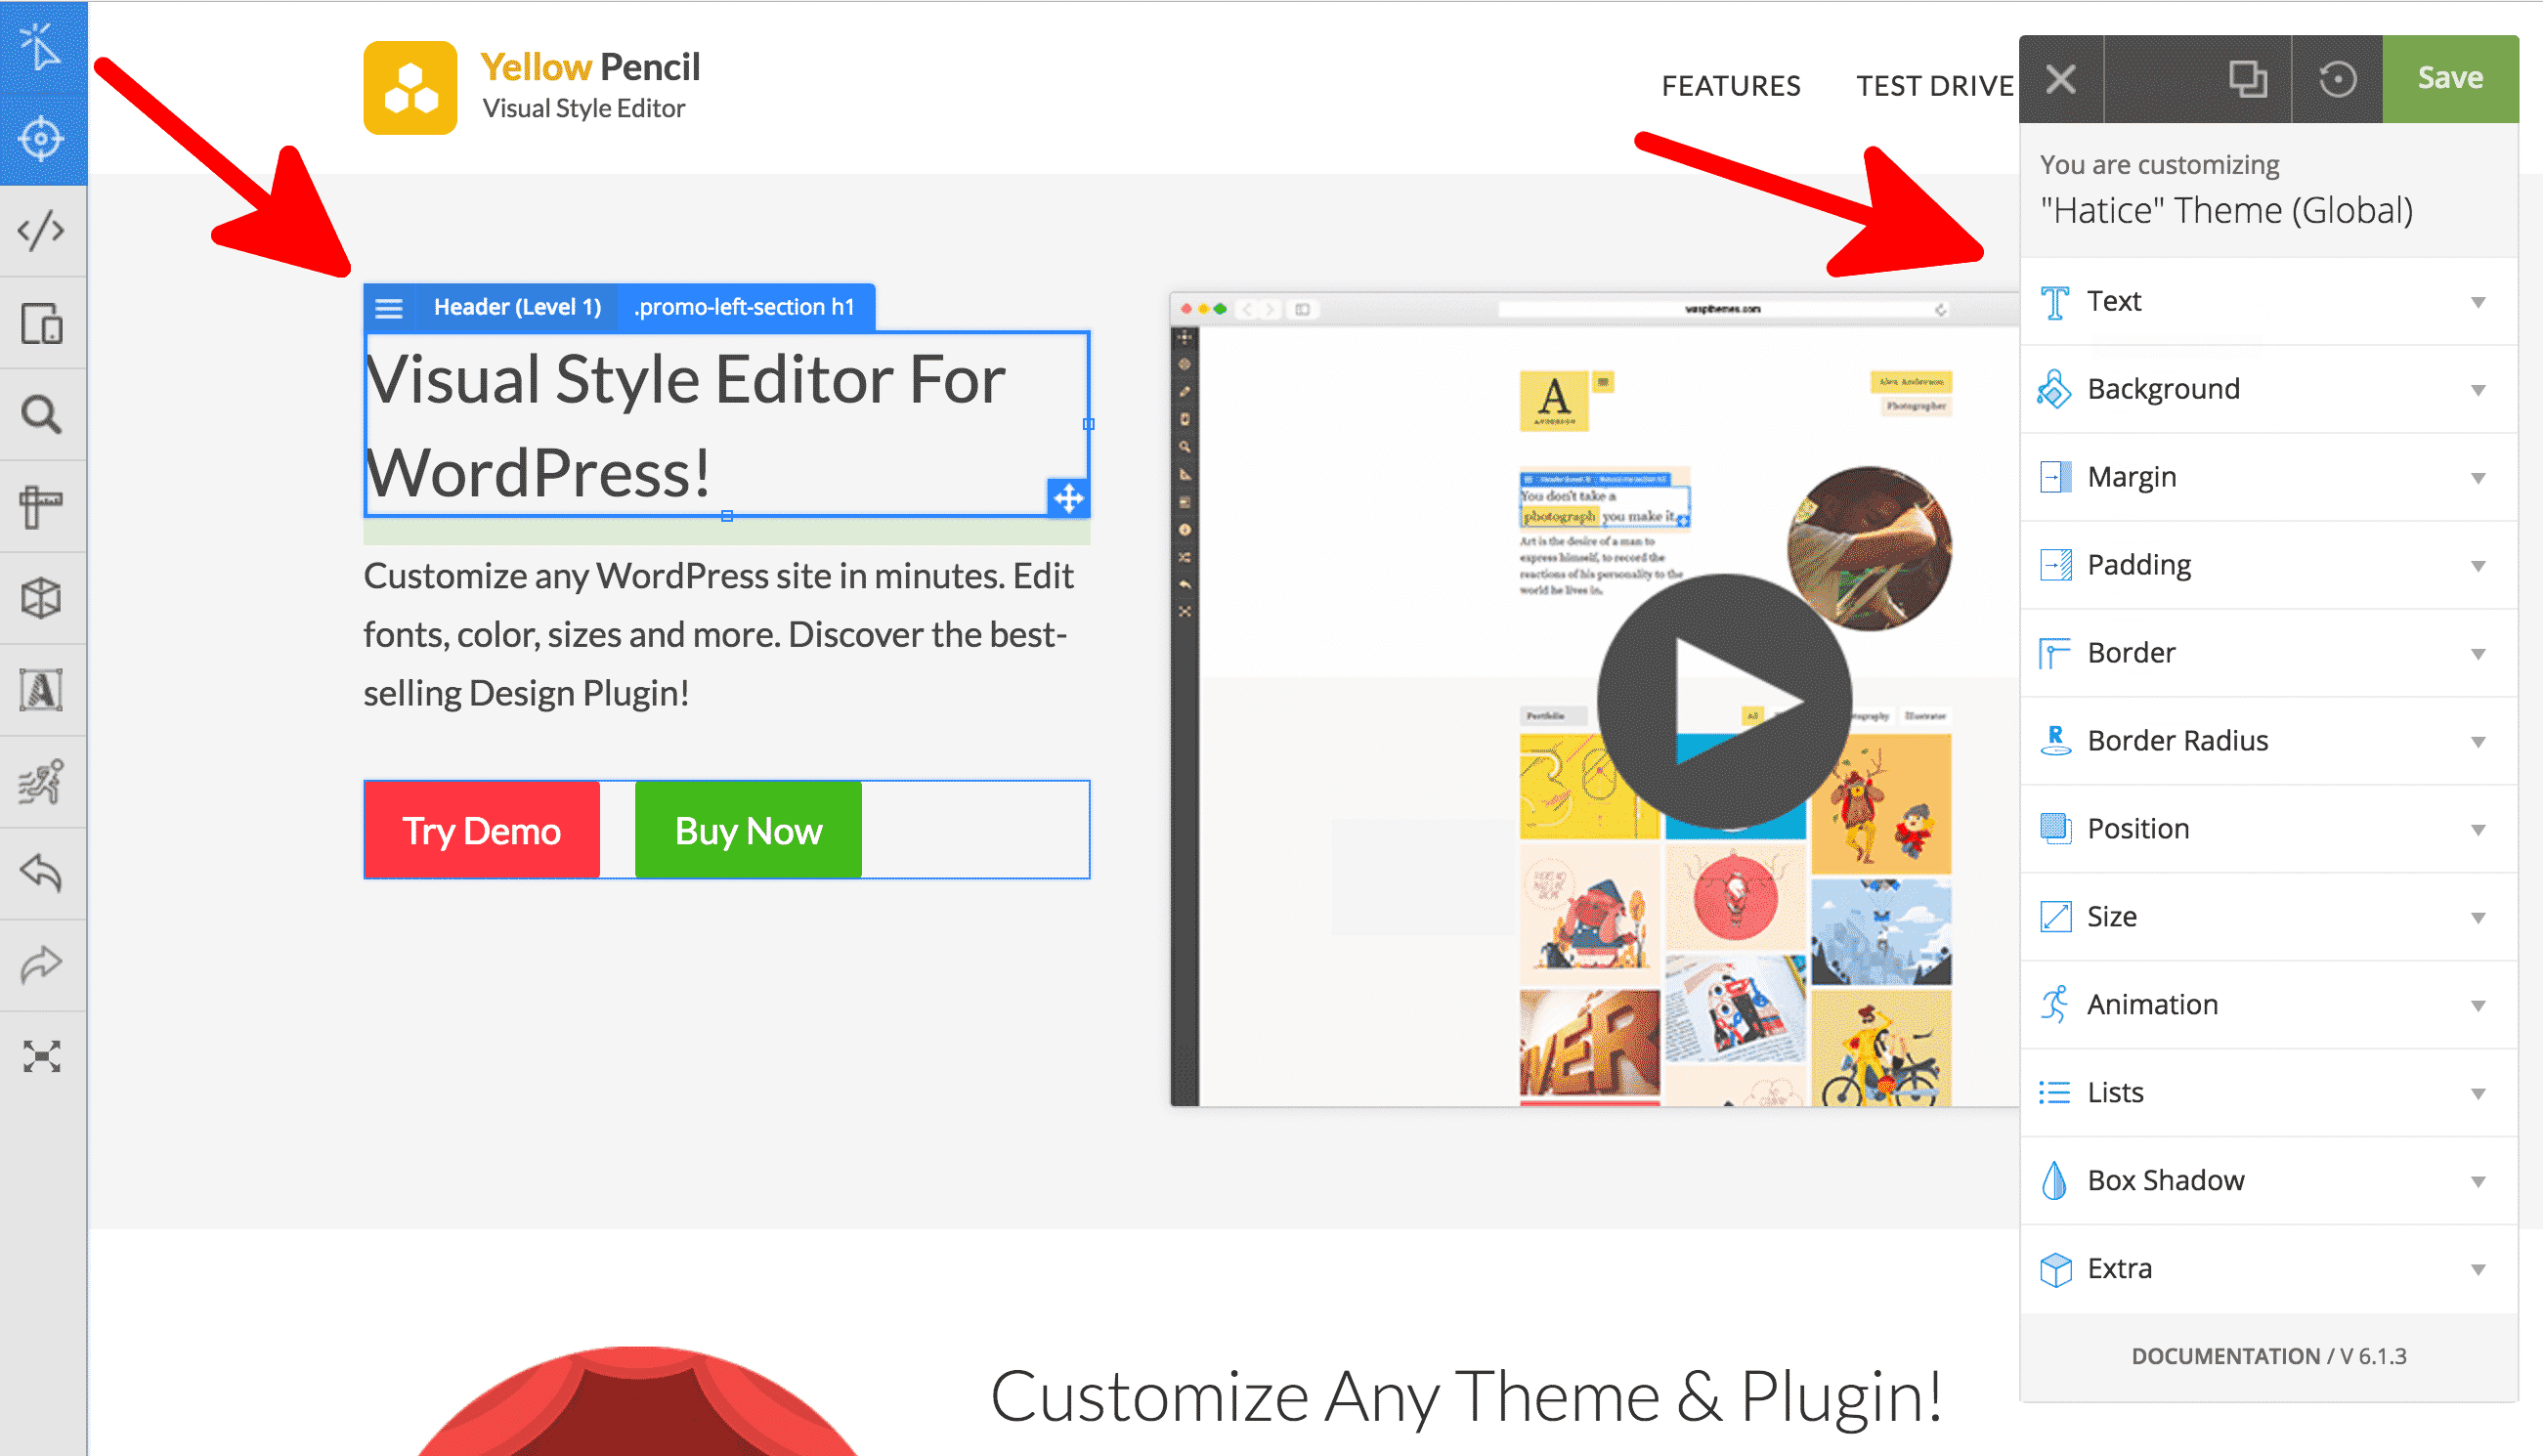
So you quickly can see Yellow Pencil in action, we’ll jump over to the Wasp Themes website where they have a Yellow Pencil Demo Page.
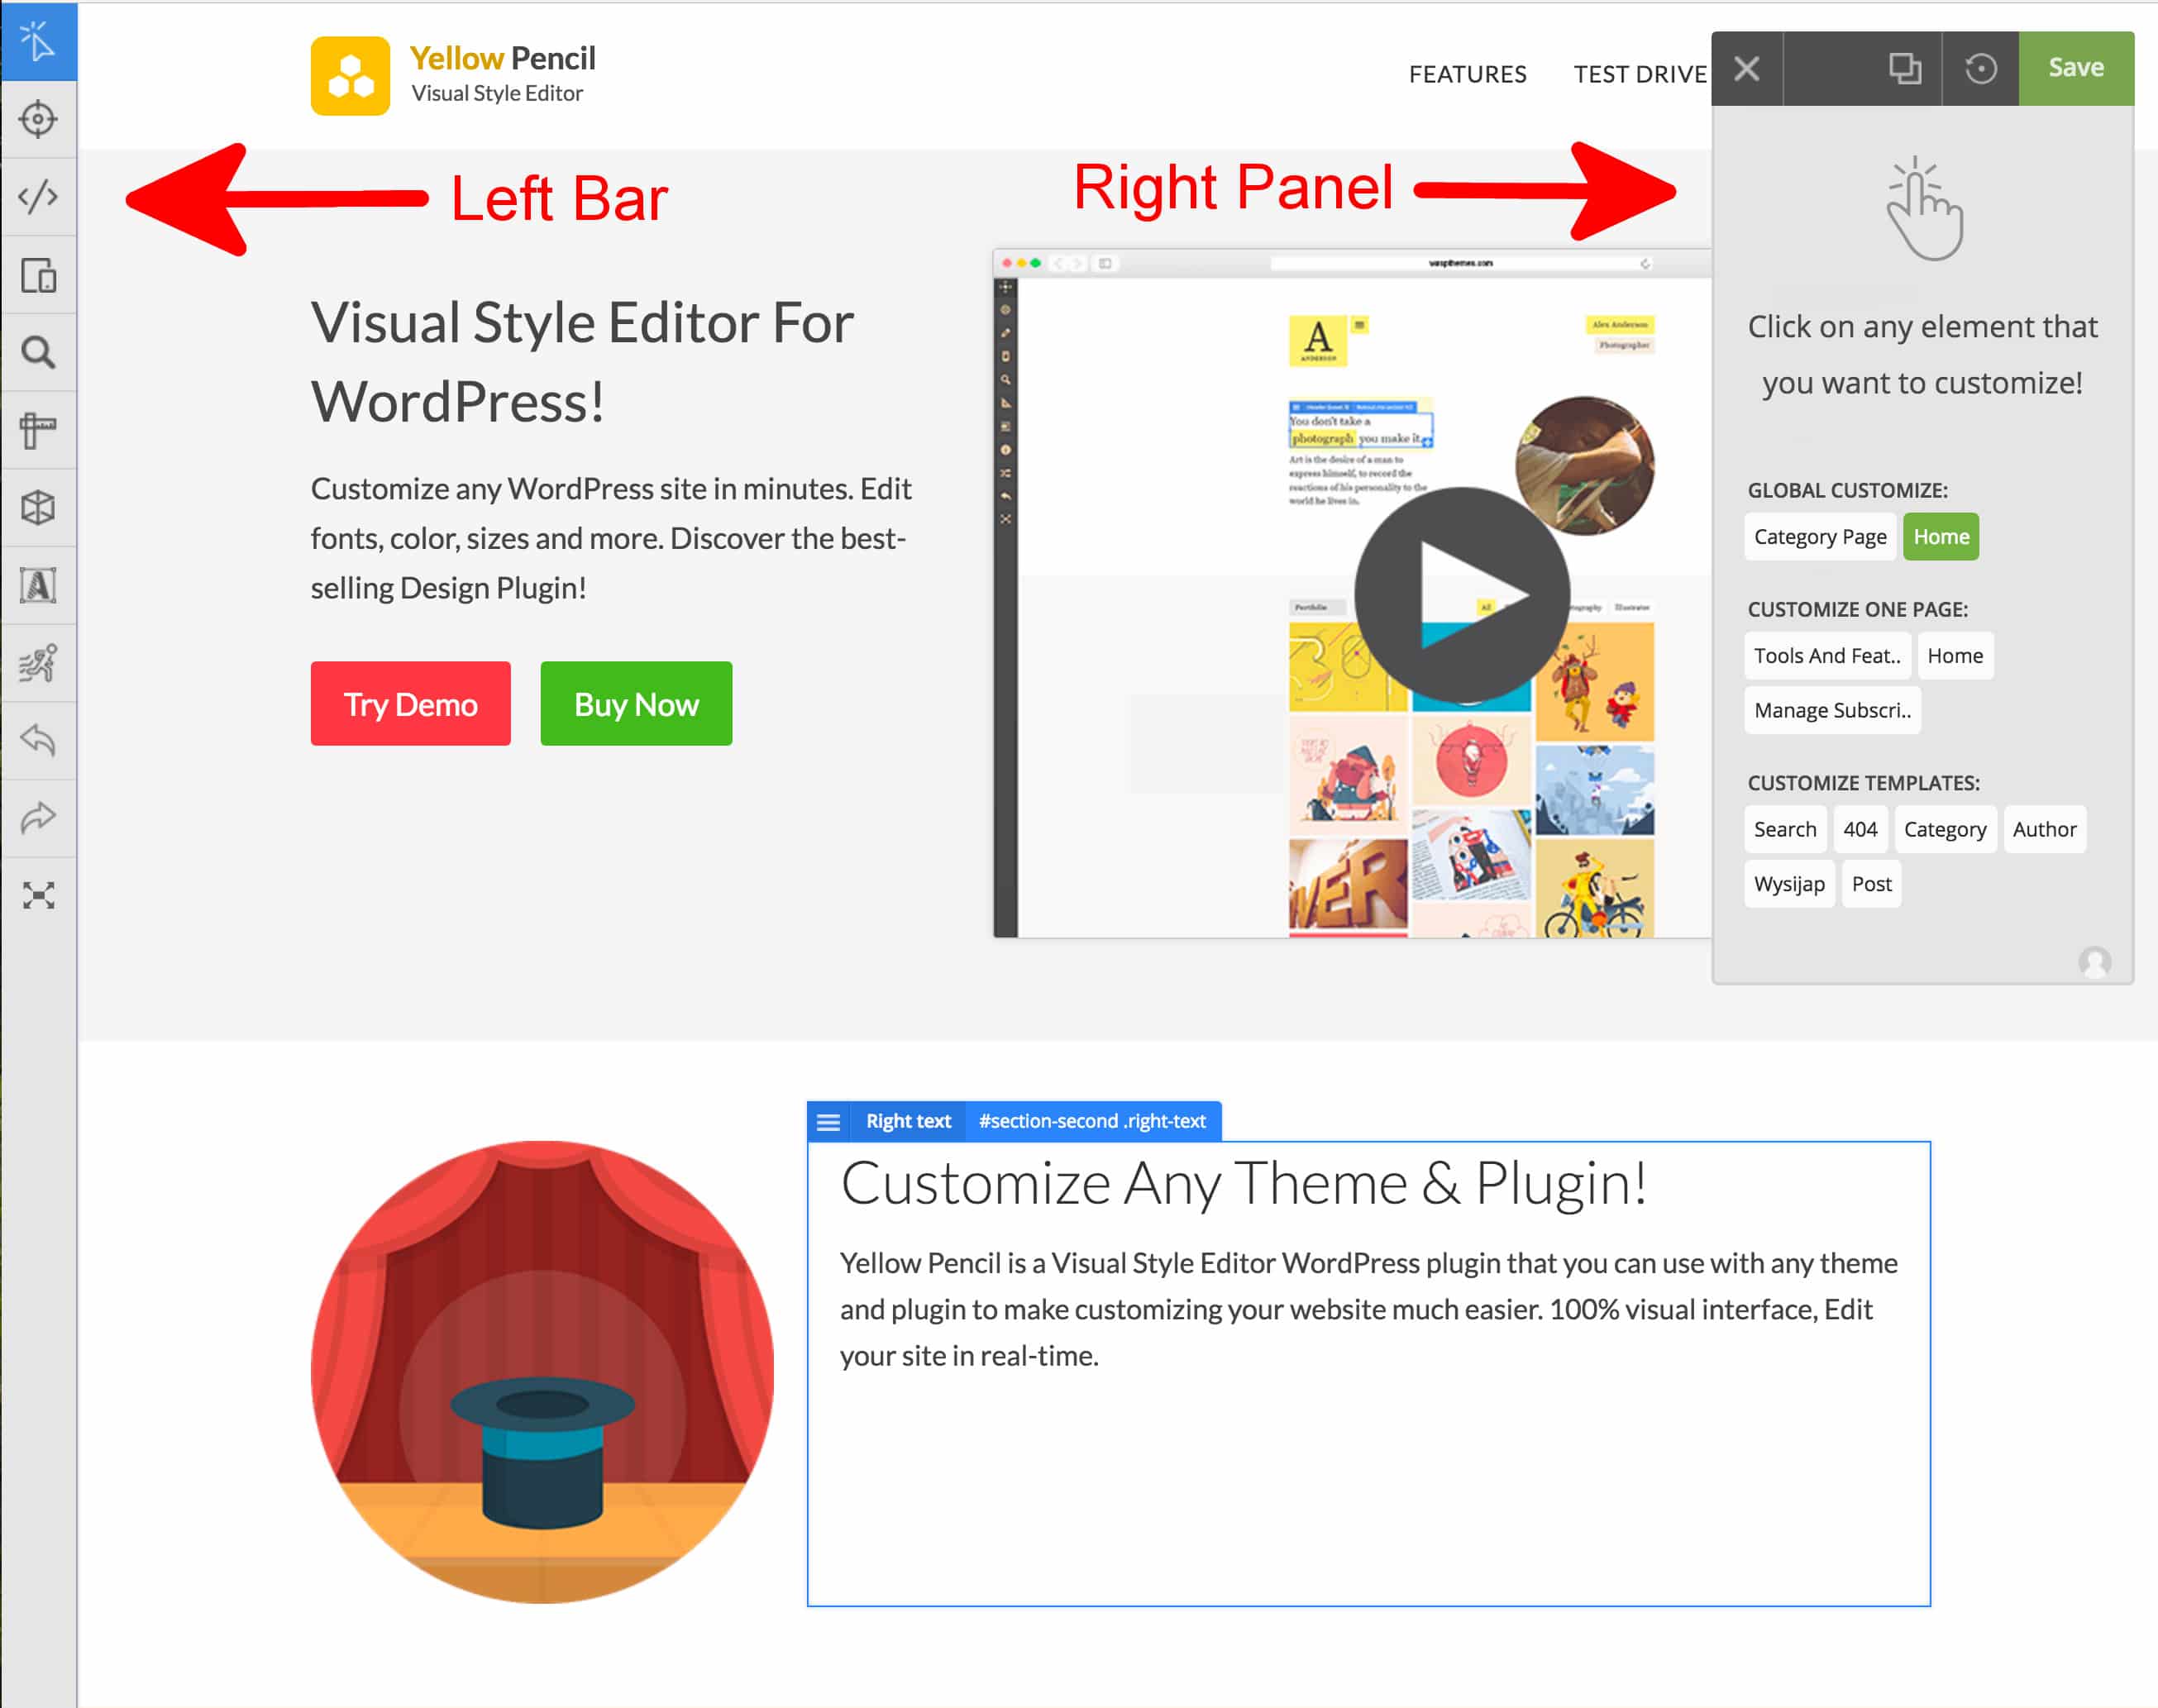
We have added two red arrows to illustrate the plugin’s interface. On the left-hand side, you have the Left Bar, which contains a variety of tools. On the right-hand side, you have the Right Panel, which contains either the type of customisation (as shown here) or style properties.
Customising Types
When you first visit a page with Yellow Pencil, you must choose which “type” of edit you wish to make. The Right Panel will display the three customising types available — Global Customize, Customize One Page, and Customize Templates.
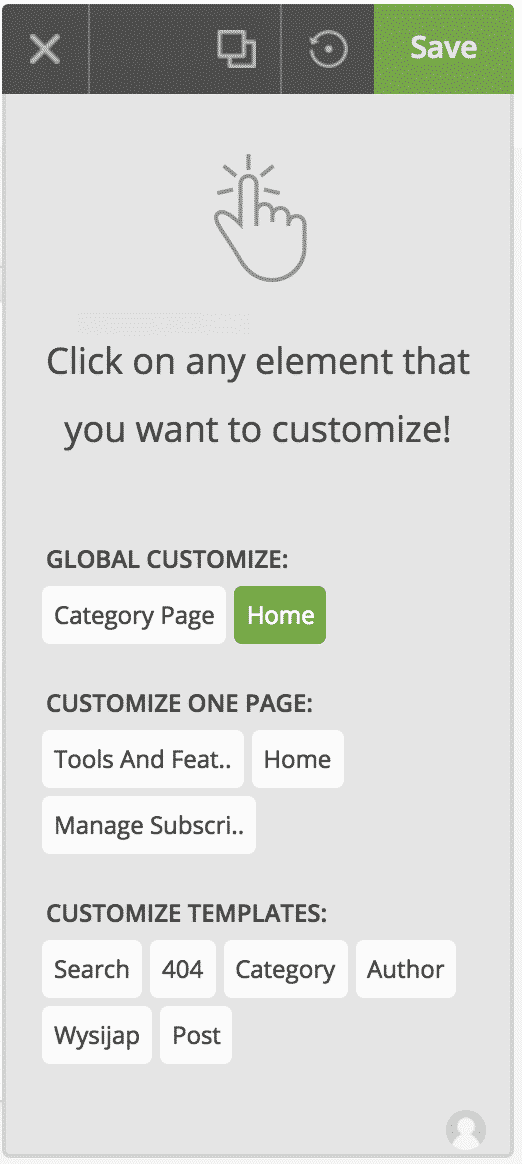
Global Customization: Creates changes that are applied to all pages across your website. This might be useful if you are changing a navigation item or footer.
Customize One Page: Will only apply the changes you make to a specific page. This might be useful if you just want to make changes to the Home Page and nothing else.
Customize Templates: Allows you to make changes to any template pages you use. For example, you might have a Products page that uses a template. This allows you to make changes o all products pages at once.
Because the changes you may overlap one another, Yellow Pencil prioritises customisations. They use the following order One Page Customization > Template Customization > Global Customization. That means that the changes you make to a single page will override global changes or template changes.
The Left Bar
Let’s have a quick look at the tools on the Left Bar:
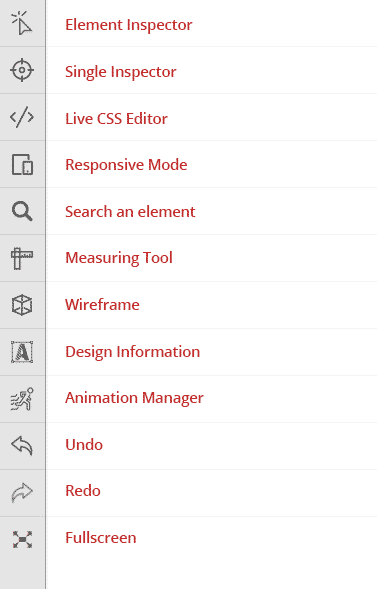
- Element Inspector: This tool is used to choose which element you are editing. Simply click the item you wish to modify and the options for that element will appear on the Right Panel. You can select multiple elements by holding down the shift key.
- Single Inspector: This tool will only select the element that is clicked (ignoring previously selected elements)
- Live CSS Editor: This editor allows you to make precise changes to the page’s CSS code.
- Responsive mode: This mode allows you to see how the design looks on different sized screens.
- Search An Element: This allows you to search for elements by their name, tag, or ID.
- Measuring Tool: Useful for making pixel perfect adjustments to your design
- Wireframe: This tool hides the colours of design, making it easier to focus on the layout and structure of your page.
- Design Information: This tool will show you useful information about the element that you currently have selected.
- Animation Manager: Yellow Pencil has a powerful animation tool that lets you quickly add animations to elements. There are dozens of animations available, which make it easy to add a little action to your page.
- Fullscreen mode: This tool allows you to perform edits in full screen.
Changing The Appearance of Your Site
When you click on an element with the Element Inspector, you will see the Right Panel change in appearance. It will change from Type Selection mode into CSS Properties mode.
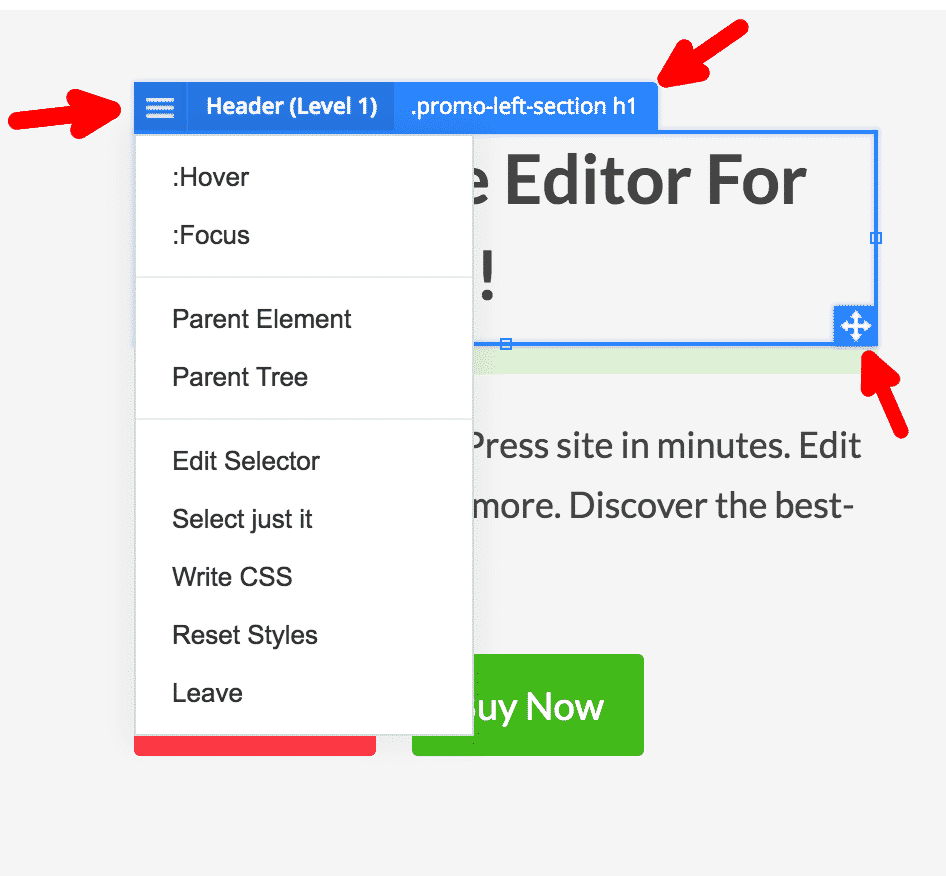
You will also notice a blue box around the element you selected. This box allows you to rename your element, drag your element around the screen, edit the selector, reset styles and much more. Click on the upper left-hand corner of the blue box to see the options for the element. Use the bottom right corner to drag the element around. Click on the element’s name on the upper right to rename the element. Easy!
When you click on an element the Right Panel displays dozens of CSS properties that can be used to change its appearance, location and behaviour. They include the font, background, margins, padding, border, position, animation, opacity and so much more!
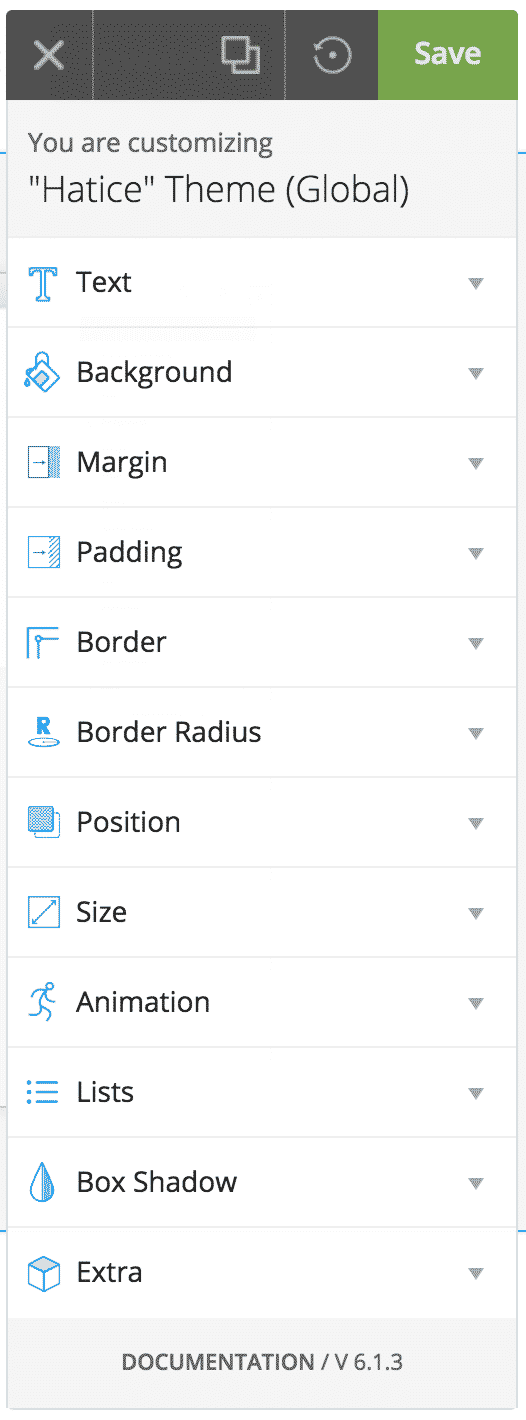
You will notice that the Right Panel has four buttons on its top bar. It will also tell which level you are editing at (Global, Single Page or Template). The buttons on the top bar include:
- Close Editor: As you may have guessed — this means close the editor and go back to the main site.
- Live Preview: View your work in a browser.
- Reset Changes: Roll back the changes you have made on a page. Remember to check the level that you are editing at — global, single page or template.
- Save: Save your changes
Click on a few of the CSS properties in the Right Panel, you will be amazed by how many options there are! You can now jump in and begin editing your page. Remember that you have the undo option and reset styles option to revert any mistakes that you make. For more details on using this powerful plugin, visit Yellow Pencil’s Documentation Page.
Thank you for reading Yellow Pencil: The Best Visual CSS Editor For WordPress! Subscribe to the blog or follow us on social media for more useful articles and tips.
 194 customers signed up in the last 30 days